Zanémarossi
-
Posts
92 -
Joined
-
Last visited
-
Days Won
4
Everything posted by Zanémarossi
-
I thought I had all the occurrences though... Weird
-
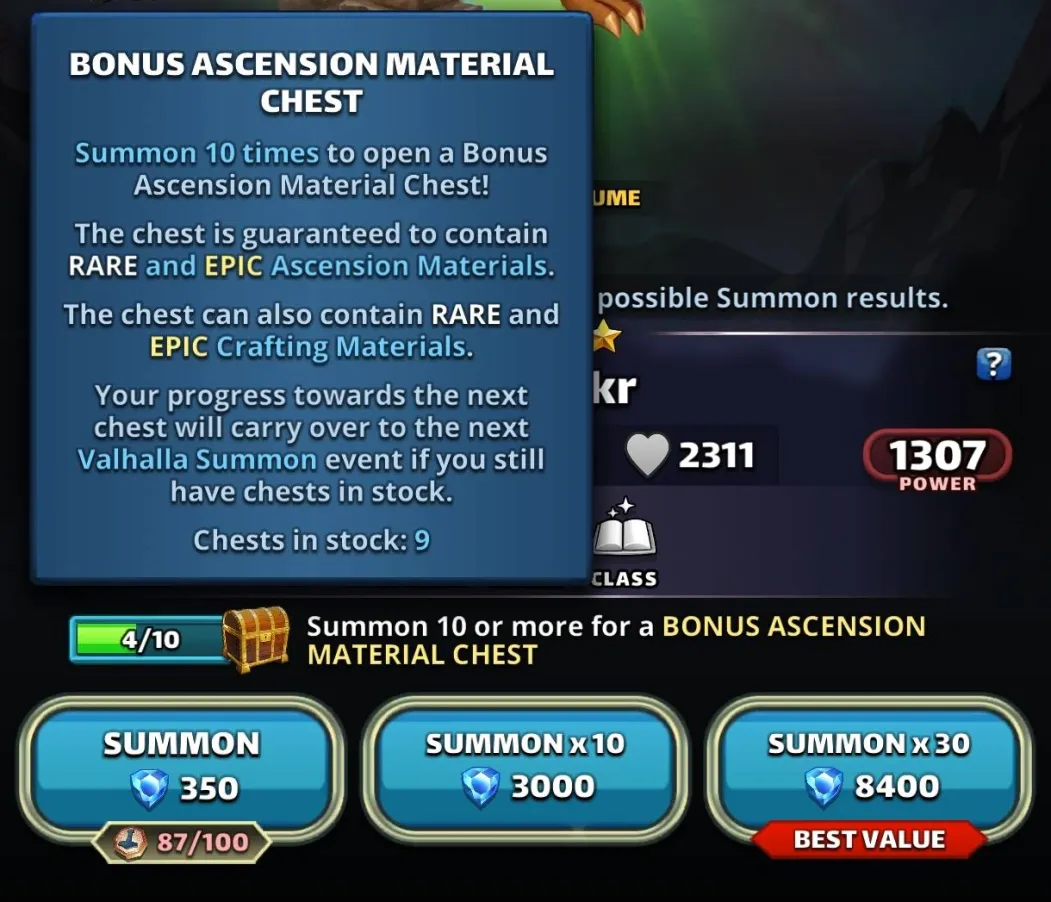
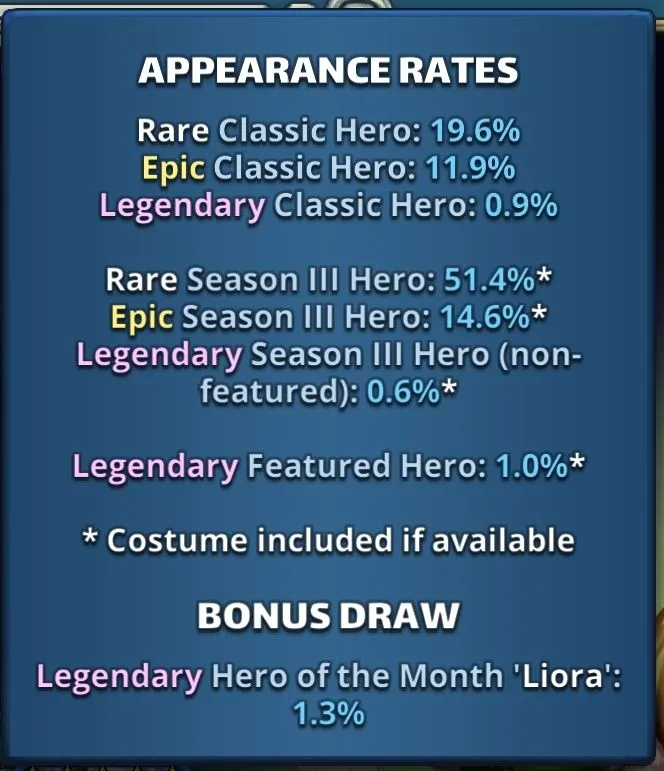
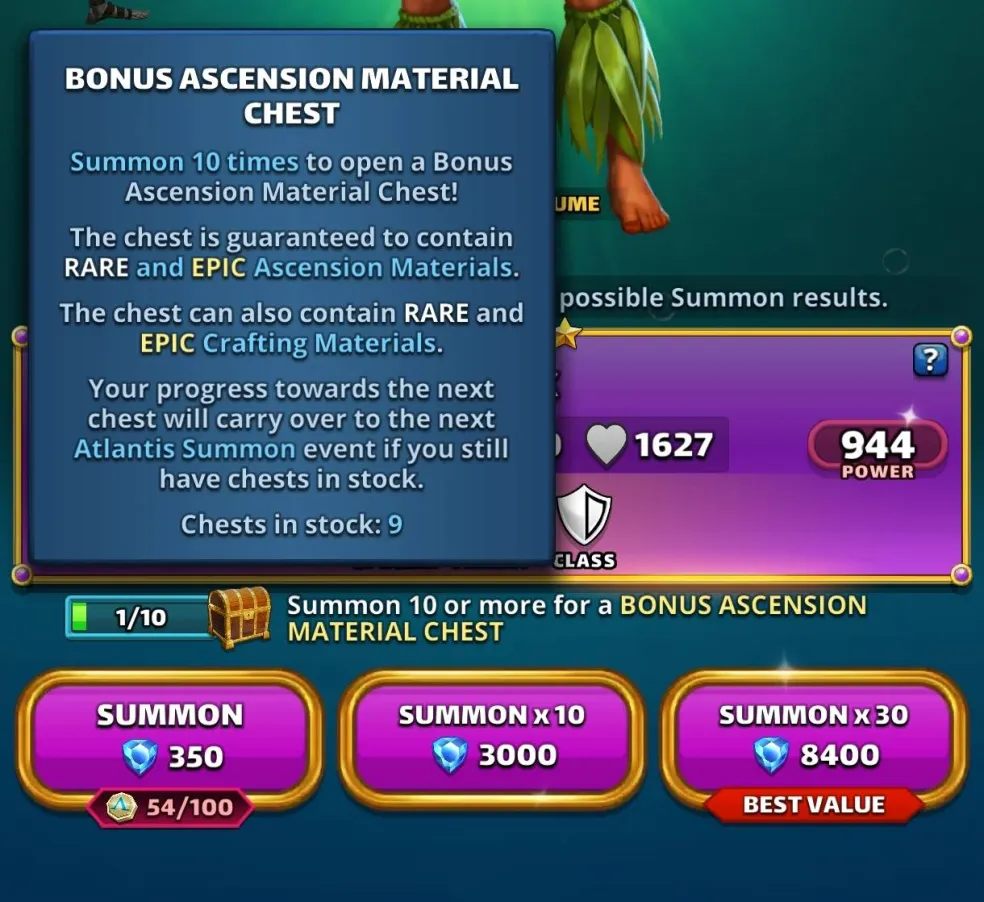
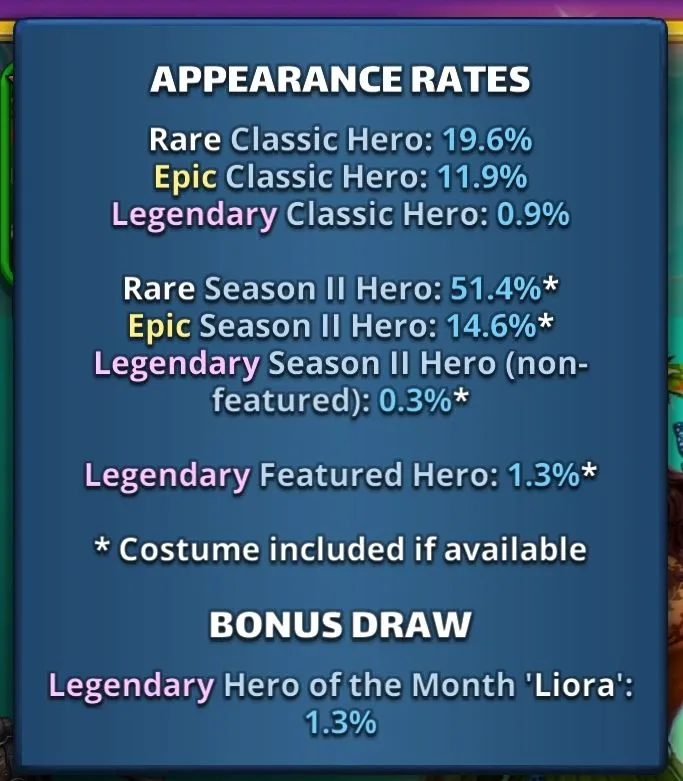
This thread is about Season 4 in reduced cost. The first occurrence appeared on March 25, 2022 Event: Tremors of Underwild (Reduced Cost) Core Rules: The basic functioning of the season (Stages, missions, etc.) remains the same as the original version. Find the guide Voyagers of The Underwild New Feature: The main difference is the addition of "Underwild Bats" monsters, which allow you to earn extra rewards when you complete the levels. Access Conditions and Cost How to Access the Event Where to Find It: Access is via the Seasons Tab. Prerequisite: You must have completed up to stage 15 of season 3. Base Season: It is available permanently. Frequency (Summon Portal): It is part of a 4-day rotation among several seasons: S2 > S3 > S4 > S5 > UT1 > UT2 Energy Cost (Reduced) The levels in this event cost less World Energy than usual: Easy Mode: 3 to 7 energy. Hard Mode: 7 to 13 energy. Specific Gameplay: Underwild Bats What is an Underwild Bats? These are creatures that can appear randomly in levels. They grant extra rewards if you complete the level: S4 Coins Emblems Crafting items Resource Bundle Daily Clam Limit The quantity of Exquisite Clams you can obtain is limited each day. Starting Cap: 15 clams per day. Increase: The limit increases by 15 each day up to a maximum of 60 clams per day. Monster Lure (Paid Option) The Monster Lure is an upgrade available through a special paid offer: It immediately increases your daily clam limit from 15 to 25 per day. It also increases the quantity of specific S4 pieces found in loot. How to Defeat Underwild Bats (Combat Tip) Invulnerability: The Underwild Bats appear "hidden" and are protected from direct damage for 3 turns. Attack: Once they emerge from cover, they can be attacked and defeated. Tip: If you use a damage sharing ability (which damages all enemies), you can defeat the clam even when hidden by targeting the other monsters. Tremors of Underwild Summon Portal Summoning Cost 1 Summon: 350 gems or 100 S4 coins 10 Summons: 3000 gems 30 Summons: 8400 gems Each summon in the portal credits a summoning chest. Every 10 summons, the retrieved chest grants rewards. You can only obtain a maximum of 12 chests per session. Appearance Rate Presence of heroes from three groups: The heroes from Season 4. The heroes from Season 1 (but without costumes). Resources (Farming) Find the farming thread here: Infographics available by Cap, Minzi, Kora, BirksG

-
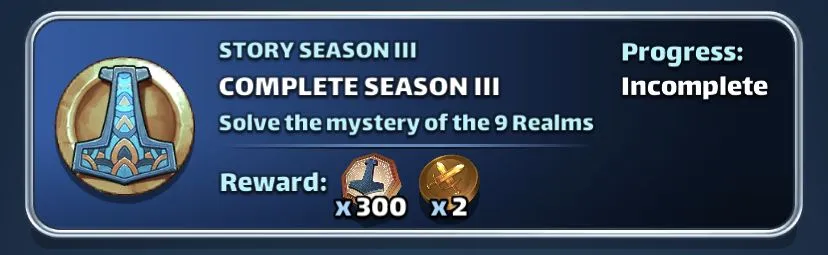
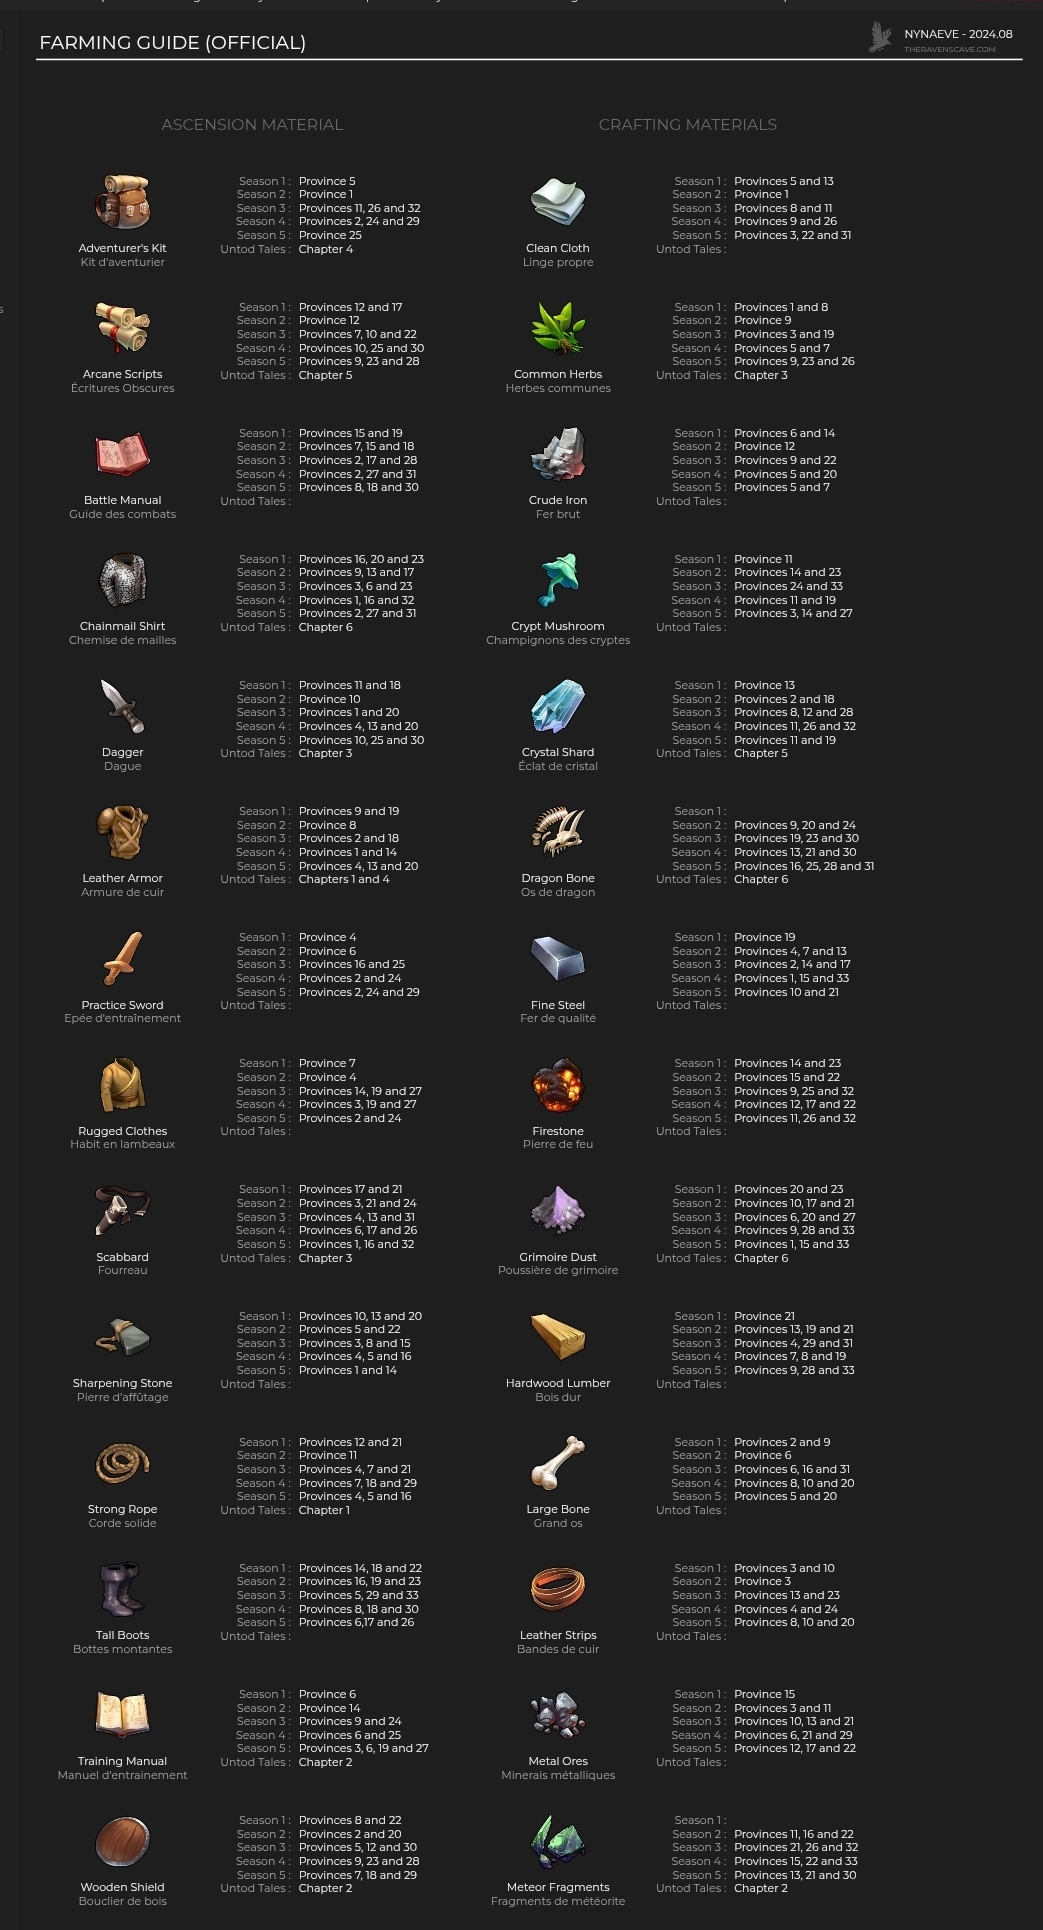
This document compiles the essential information regarding Season 4 of the game, titled Voyagers of the Underwild, which was initially launched on March 25, 2021. The Season consists of a map with specific level mechanics. This season was marked by the introduction of Fiends (Démons) to the game. Table of Contents 1. How to access the Event 2. Stages 3. Missions 4. Underwild Coins 5. Summon Portal 6. Underwild Family 7. Resources 1. How to Access the Event Where to Find It: Access is via the Seasons Tab. Prerequisite: You must have completed up to stage 15 of Season 3. Base Season: It is available permanently. Frequency (Summon Portal): It is part of a 4-day rotation among several seasons at reduced costs: S2 > S3 > S4 > S5 > UT1 > UT2. Find the season at a reduced cost: Tremors of Underwild 2. Levels A. General Overview Season 4 is divided into 36 Provinces with 10 stages each, which unlock as you progress. It features an Easy Mode and a Hard Mode. Hard Mode is only accessible after Easy Mode has been completed. The World Energy (WE) required varies across provinces. Each stage is divided into waves (ranging from 3 to 5 waves) featuring monsters and final bosses similar to other seasons. B. Specific Gameplay: Underwild Gems Enemies in the stages or heroes from the Underwild Family in your team have a chance to make an Underwild Gem appear on the board when they attack or use a special skill. The Underwild Gems inflict damage on a random hero each turn until they are matched. Underwild Gems can only appear on standard shields of the same element as the enemy that made them appear. The red arrow indicates that your team will suffer the damage. The green arrow indicates that your enemies will suffer the damage. C. Province Specifics: Biomes Season 4 introduces a "Biome" effect on every map stage. Each Biome has two components: A passive ability applied to all enemies in the region. A status effect (ailment or buff) applied to your heroes every 5 turns. Important Note: These periodic effects are cleansable status effects. They can be blocked by an Ailment Blocker hero (like Grazul or Garnet) or cleansed by a Cleanser (like Rigard or Ariel). Details: Sandy Caves (S4 1 to 5) Fungal Caves (S4 6 to 11) Crystal Rocks (S4 12 to 15) Deep Lagoon : Underwzter (S4 16 to 21) Grave of Anothos (S4 22 to 25) Bonechil (S4 26 to 31) Devouring Depths (S4 32 to 36) 3. S4 Missions Specific missions allow you to earn Gems or Avatars. Log of Missions Minion/ Mob Avatar Missions 400x Savage Morlocks 650x Sharkstomps 900x Crystal Fairies 1150x Gillbeast Warriors 1400x Cave Ants 1700x Bonechill Rogues 2000x Possessed Morlock Guardians Boss Avatar Missions 50x Cyclops Maulers 80x Spretrolls 110x Crystal Maulers 140x Sharkbeast Fighters 170x Gargantuan Bats 210x Crystal Beetles 250x Crystalline Crimson Spirits Biome Missions 80x Sandy Caves Stages 100x Fungal Caves Stages 125x Crystalrocks Stages 140x Deep Lagoon Stages 200x Grave of Anathos Stages 250x Bonechill Stages 300x Devouring Depths Stages Guides Credit by @Cap @Kiiro @Zartanis 4. The Underwild Coins This is the exclusive currency for summoning Season 4 heroes. Acquisition: They are rewarded the first time you complete a map stage. Amount: Easy Mode gives 3 coins per stage. Hard Mode gives 5 coins per stage. Summoning: 100 Underwild Coins are required for one free summon. 5. Summon Portal Summon Cost 1 Summon: Costs 350 Gems or 100 Underwild Coins (S4 Coins). 10 Summons: Cost 3000 Gems. 30 Summons: Cost 8400 Gems. Each summon in the portal credits a summoning chest. Every 10 summons, the retrieved chest grants rewards. You can only obtain a maximum of 12 chests per session. Appearance Rate Heroes from three groups are present: Season 4 heroes. Season 1 heroes (without their costumes). 6. Underwild Family A. Family Bonus Heroes become stronger when teamed up with other unique heroes from the same family. Bonus for 1/2/3/4/5 heroes: 20% / 24% / 28% / 32% / 36% chance to summon an Underwild Gem onto the board when this hero casts their special skill. The Underwild Gems inflict 50 points of damage to a random enemy each turn until they are matched. Underwild Gems can only appear on standard shields of the same element as the hero. B. Hero List (By Rarity) All the heroes have a costume. 5 Legendary : Aouda, Akkorog, Captain Nemo, Dr. Moreau, Elizabeth, Garjammal, Hannah, Lepiota, Morel, Phileas Fogg, Prof. Lidenbrock, Russula, Xnolphod, Zenobia. 4 Epic : Griffin, Mack, Rokkamush, Tettukh, Zila Lei. 3 Rare : Helo, Gramps, Morris, Poppy, Vollermork. 6. Resources Farming Find the farming thread here: To search stages, cover S2 to UT2 by BirksG : https://monsterfarm.pages.dev/ Find details of Stages by Elioty on his drive Infographics available by Cap, Minzi, Kora, BirksG, Nynaeve
-
16th occurrence updated
-
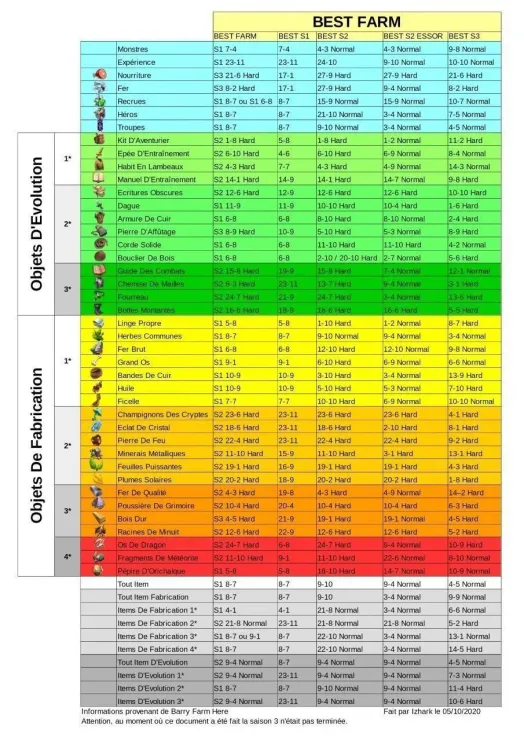
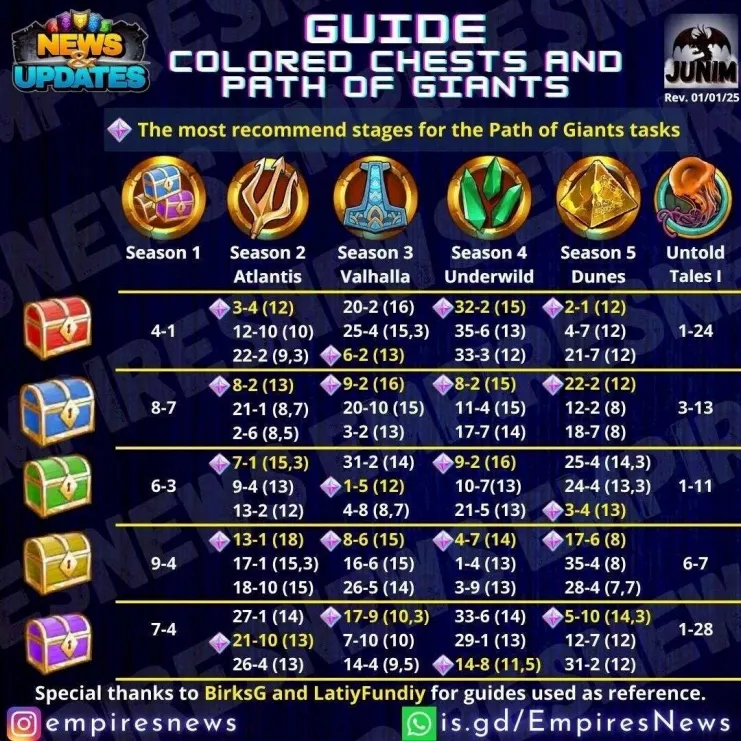
This short guide is part of a quick summary of information regarding farming. You can find all the information in each corresponding season guide (resources, missions, colored chests, etc.) in the Guides & Information section. Several resources exist and are communicated in each article. Note that the site: Empuzzled.com/farming-guide by Vabe is also a very quick way to retrieve information Rotation farming Each Season event lasts 4 days: S2 > S3 > S4 > S5 > UT1 > UT2 Elemental chests General Resources Missions This guide will be updated later
-
I found the quality to be better on the last one ^^
-
Merciii !! Touchée J'ai mis la rotation dans l'article à la fin, effectivement elle manquait ^^
-
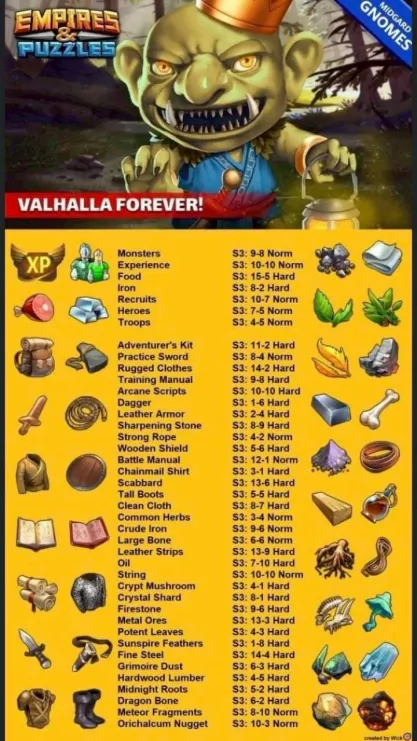
This thread is about Season 3 in reduced cost. The first occurrence appeared on Auguste 2021. 1. Event: Valhalla Forever (Reduced Cost) The Valhalla Forever : the event is a reduced cost ! Core Rules: The basic functioning of the season (Stages, missions, etc.) remains the same as the original version. Find the guide : Season 3 : Valhalla New Feature: The main difference is the addition of "Midgard Gnome" monsters, which allow you to earn extra rewards when you complete the levels. 2. Access Conditions and Cost How to Access the Event Where to Find It: Access is via the Seasons Tab. Prerequisite: You must have completed up to stage 15 of season 2. Base Season: It is available permanently. Frequency (Summon Portal): It is part of a 4-day rotation among several seasons: S2 > S3 > S4 > S5 > UT1 > UT2 Energy Cost (Reduced) The levels in this event cost less World Energy than usual: Easy Mode: 3 to 7 energy. Hard Mode: 7 to 13 energy. 3. Specific Gameplay: Midgard Gnome What is a Midgard Gnome ? These are creatures that can appear randomly in levels. They grant extra rewards if you complete the level: Midgard Coins Emblems Crafting items Resource Bundle Daily Clam Limit The quantity of Midgard Coins you can obtain is limited each day. Starting Cap: 15 clams per day. Increase: The limit increases by 15 each day up to a maximum of 60 clams per day. Monster Lure (Paid Option) The Monster Lure is an upgrade available through a special paid offer: It immediately increases your daily clam limit from 15 to 25 per day. It also increases the quantity of specific S3 pieces found in loot. How to Defeat Midgard Gnome (Combat Tip) Invulnerability: The Midgard Gnome can be killed; they have no special protections. 4. Valhalla Forever Summon Portal Summon Cost 1 Summon: Costs 350 Gems or 100 Atlantis Coins. 10 Summons: Cost 3000 Gems. 30 Summons: Cost 8400 Gems. Each summon in the portal credits a summoning chest. Every 10 summons, the retrieved chest grants rewards. You can only obtain a maximum of 12 chests per session. Appearance Rate Presence of heroes from three groups: The heroes from Season 3. The heroes from Season 1 (but without costumes). 5. Resources (Farming) Find the farming thread here: Infographics available
-
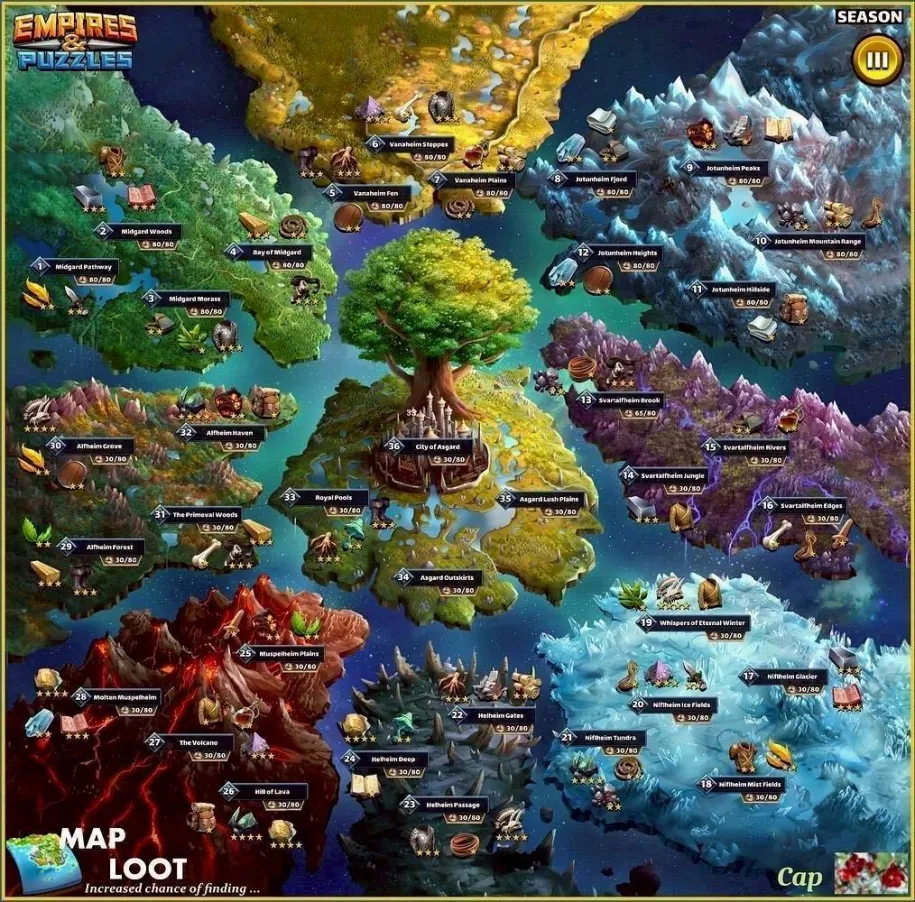
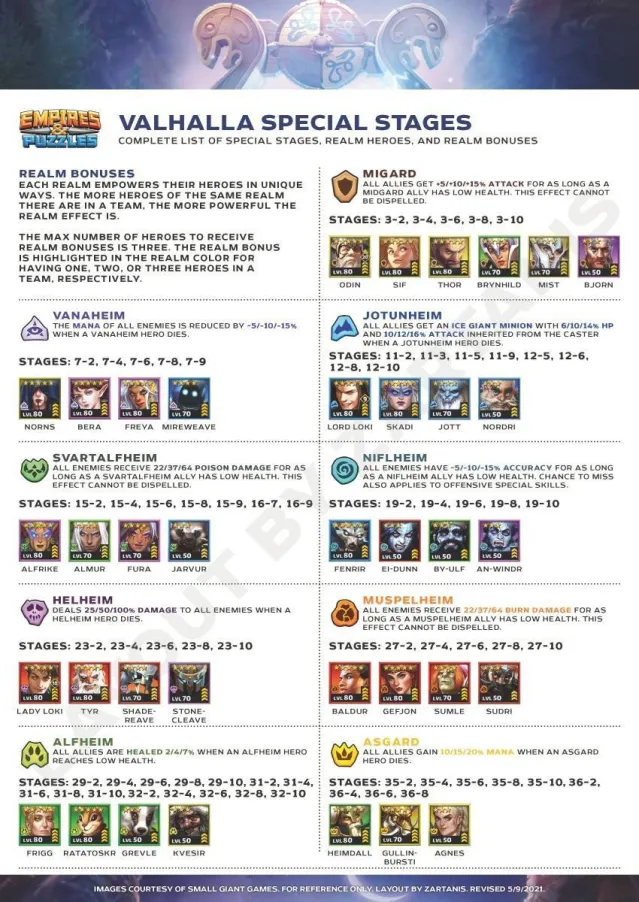
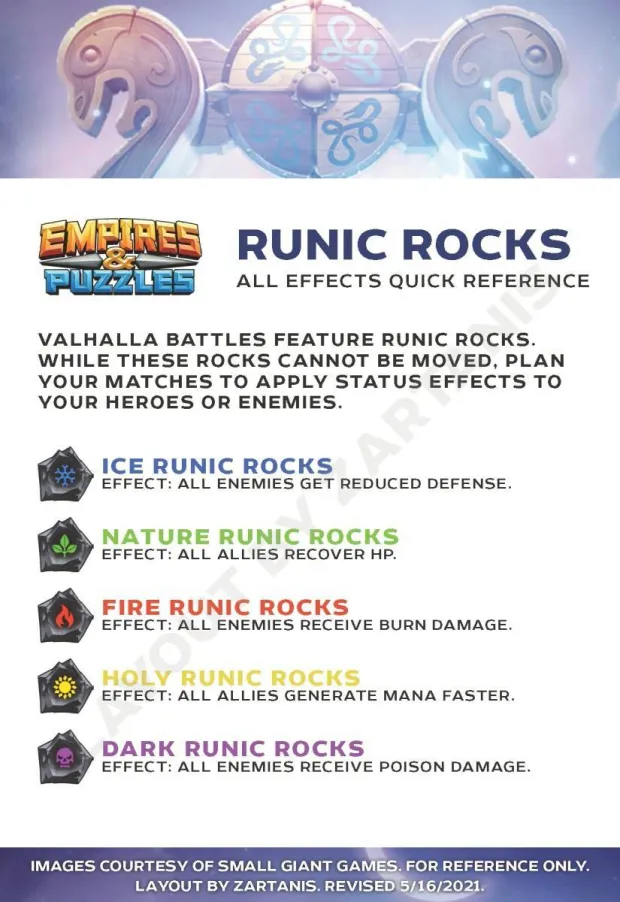
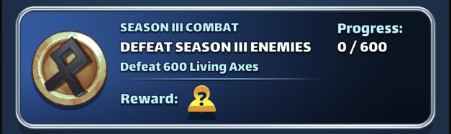
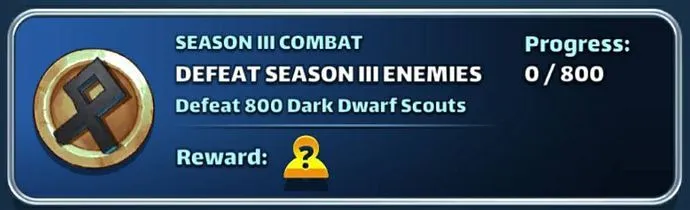
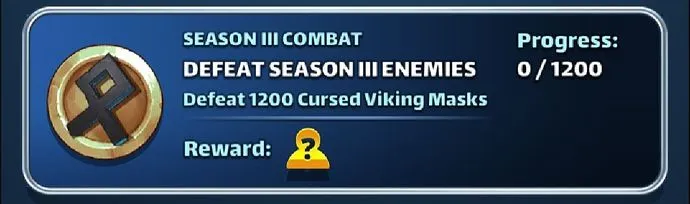
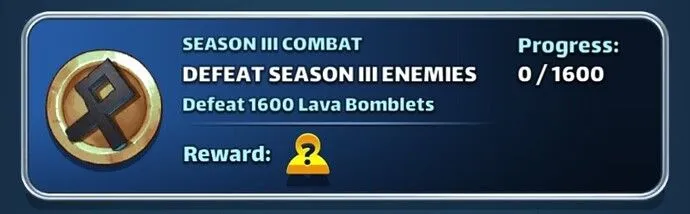
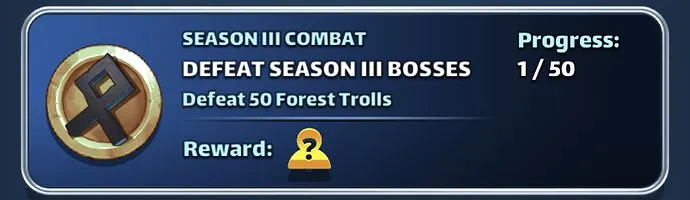
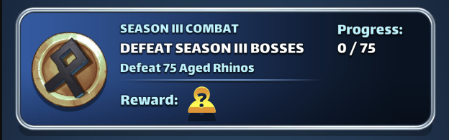
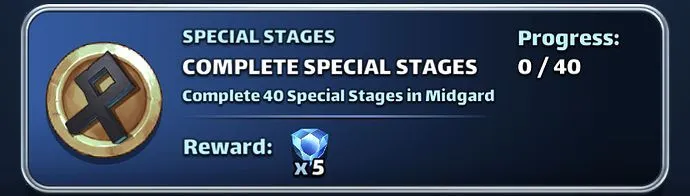
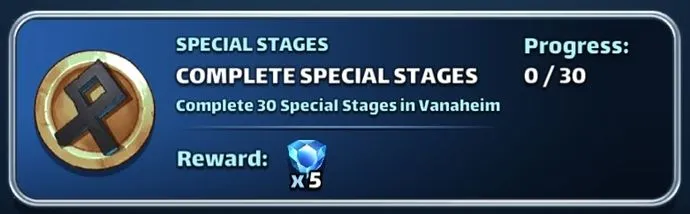
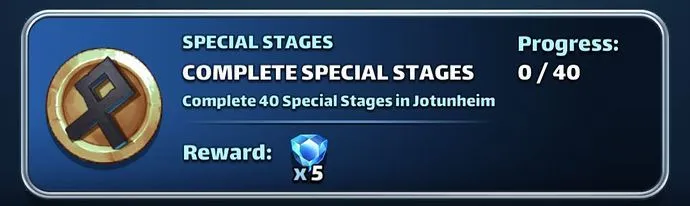
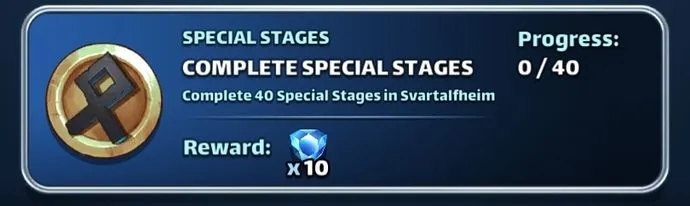
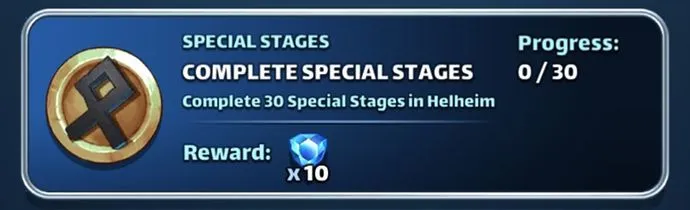
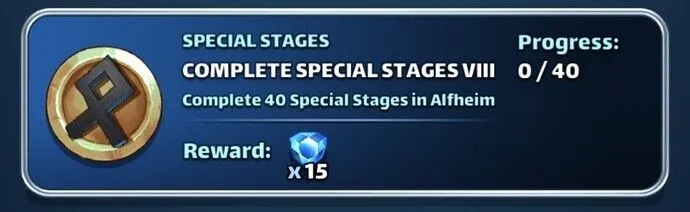
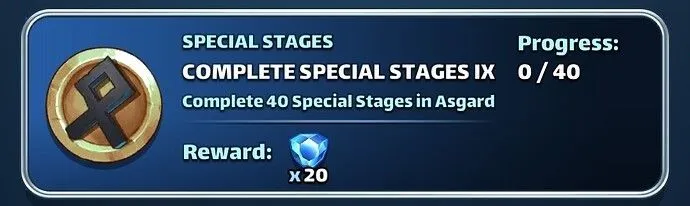
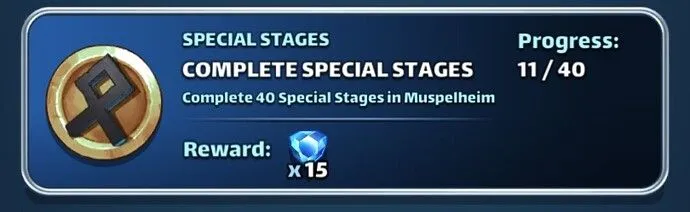
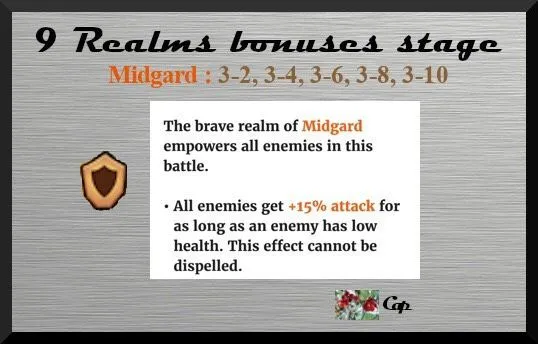
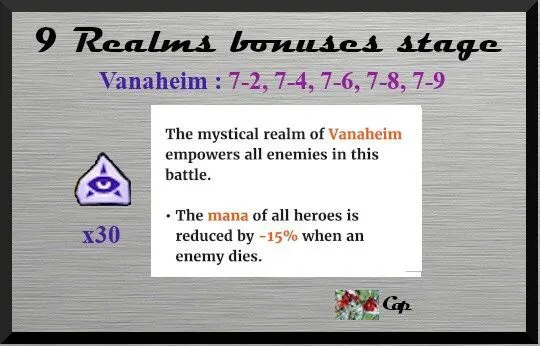
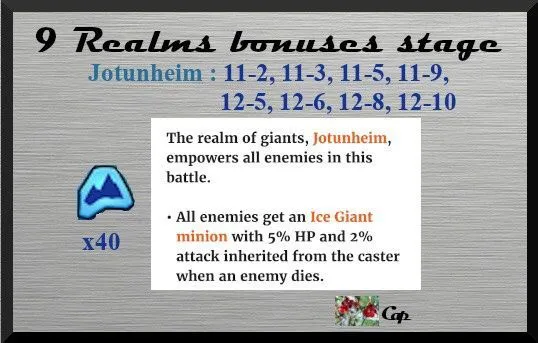
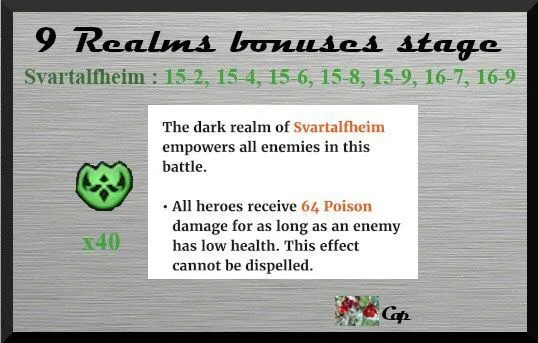
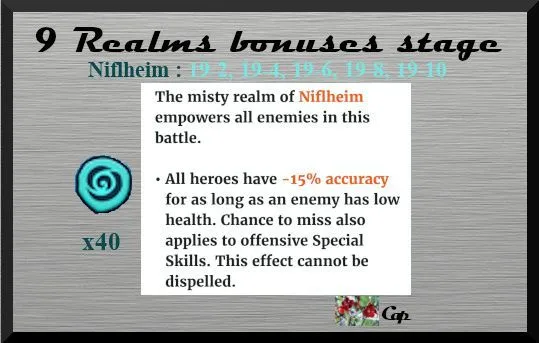
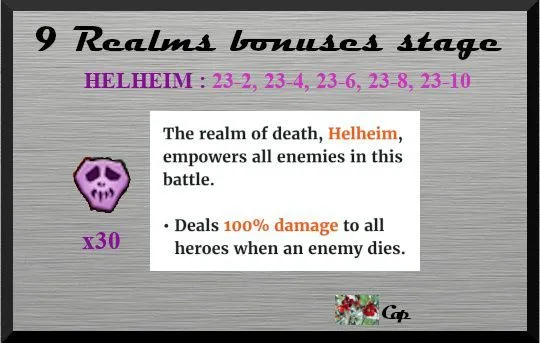
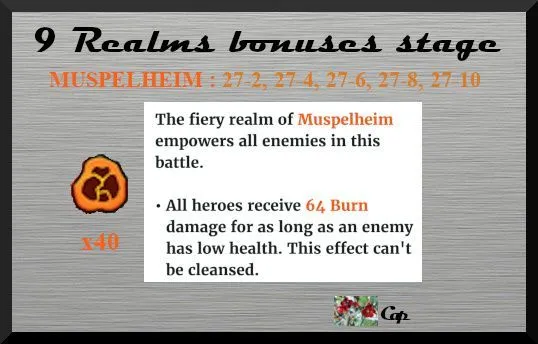
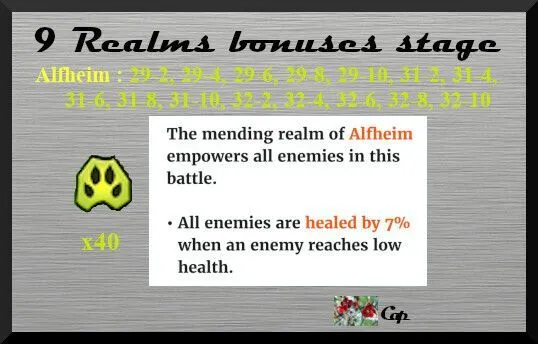
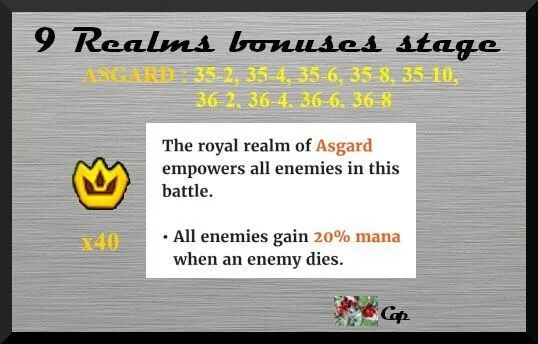
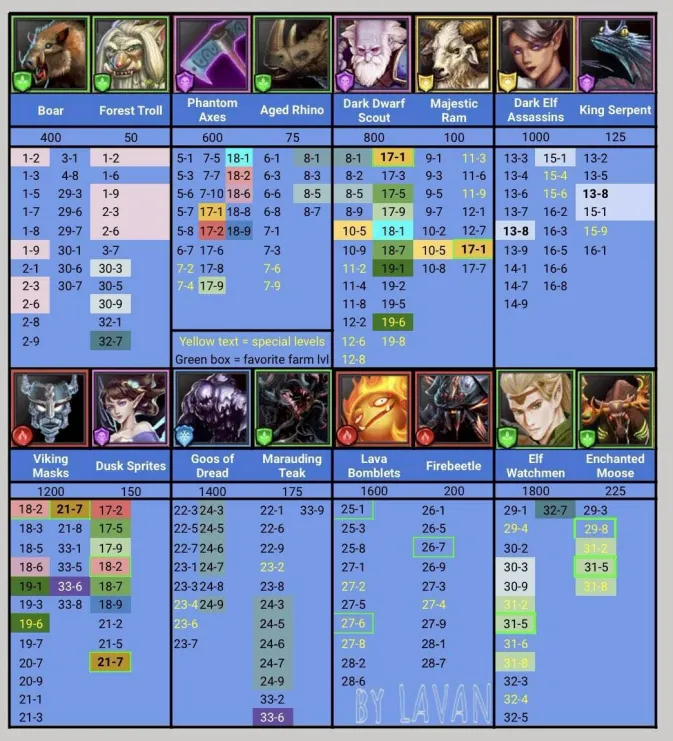
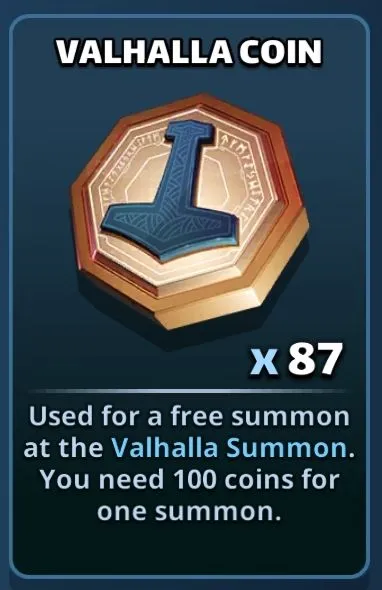
This document compiles the essential information regarding Season 3 of the game, titled Valhalla , which was initially launched on February 27, 2020. Table of Content 1. How to Access the Event 2. Stages and Specific GamePlay 3. S3 Missions 4. The Valhalla Coins 5. Summon Portal 6. Families of Valhalla 7. Resources 1. How to Access the Event Where to find it: Access is via the Seasons tab. Prerequisite: You must have completed up to Stage 15 of Season 2. Base Season: It is available permanently. Frequency (Summoning Portal): It is part of a 4-day rotation among several reduced-cost seasons: S2 > S3 > S4 > S5 > UT1 > UT2. Relive the season at a reduced cost: Season 3 : Valhalla Forever 2. Stages A. General Overview Season 3 is divided into 36 provinces of 10 stages that unlock as you progress. It features an Easy Mode and a Hard Mode. Hard mode is only accessible once Easy mode is completed. The required World Energy varies throughout the provinces from 6 to 10 (Easy) and 10 to 15 (Hard). Each stage is divided into waves (varying from 3 to 5 waves) featuring monsters and final bosses similar to other seasons. B. Stage Properties : Realms Midgard (P3) All enemies get +15% attack for as long as an enemy has low health. This effect can't be dispelled. Vanaheim (P7) The mana of all Heroes is reduced by -15% when an enemy is defeated. Jotunheim (P11-13) All enemies get an Ice Giant Minion with 5% HP and 2% attack inherited from the caster when an enemy is defeated. Svartalfheim (P15-16) All Heroes get 64 Poison damage for as long as an enemy has low health. This effect can't be cleansed. Niflheim (P19) All Heroes have -15% accuracy for as long as an enemy has low health. Chance to miss also applies to offensive Special Skills. This effect can't be cleansed. Helheim (P23) Deals 100% damage to all Heroes when an enemy is defeated. Muspelheim (P27) All Heroes get 64 Burn damage for as long as an enemy has low health. This effect can't be cleansed. Alfheim (P29-31-32) All enemies are healed by 7% when an enemy reaches low health. This effect can activate only once per turn. Asgard (P35-36) All enemies gain 20% mana when an enemy is defeated. Yggdrasil's Blessing (P36) The effect gets stronger every turn up to a maximum of x2 damage. The effect resets at the start of every wave. Unique Boss (P12-28-36) The Unique Boss heals itself and buffs are dispelled from the Heroes every 5 turns. Infographic by Zartanis C. Specific Gameplay: Runic Rocks Ice runic rocks Effect: all enemies get reduced defense. Nature runic rocks Effect: all allies recover hp. Fire runic rocks Effect: all enemies receive burn damage. Holy runic rocks Effect: all allies generate mana faster. Dark runic rocks Effect: all enemies receive poison damage. Infographic by Zartanis 3. S3 Missions Specific missions allow you to earn Gems or Avatars. Log of Missions Minion/ Mob Avatar Missions Boss Avatar Missions Realm Special Stages Missions Runic Rocks are a unique feature of the Valhalla Battles. Although they cannot be moved on the board, it is crucial to carefully choose your adjacent tile combinations to activate their powerful status effects on your heroes or your adversaries. GUIDE TO SPECIAL STAGES, COURTESY OF : @cap GUIDE TO STAGES FOR AVATAR MISSIONS, COURTESY OF : @cap @Lavan @Zartanis Ideal / Best Stages for Missions, Based on Data @Barry Farm project has collected monster counts sufficient to make recommendations on the best Stages for each Mission. And here’s a quickie summary: 4. The Valhalla Coins This is the exclusive currency for summoning Season 3 heroes. Acquisition: They are rewarded the first time you complete a map stage. Amount: Easy Mode gives 3 coins per stage. Hard Mode gives 5 coins per stage. Summoning: 100 Valhalla Coins are required for one free summon. 5. Summon Portal Summon Cost 1 Summon: Costs 350 Gems or 100 Valhalla Coins. 10 Summons: Cost 3000 Gems. 30 Summons: Cost 8400 Gems. Each summon in the portal credits a summoning chest. Every 10 summons, the retrieved chest grants rewards. You can only obtain a maximum of 12 chests per session. Appearance Rate Heroes from three groups are present: Season 3 heroes. Season 1 heroes (without their costumes). 6. Families of Valhalla Realms empower their members in unique ways, and the more unique members of the same realm there are in a team, the more powerful the realm effect is. Each hero has a costume. A. Vanaheim Realm Bonus for 1/2/3 Heroes: The mana of all enemies is reduced by -5/-10/-15% when a Vanaheim Hero is defeated. 5 Legendary : Bera, Freya, Norms 4 Epic : Mirewave B. Svartalfheim Realm Bonus for 1/2/3 Heroes: All enemies receive 22/37/64 Poison damage for as long as a Svartalfheim ally has low health. This effect can't be cleansed. 5 Legendary : Alfrike 4 Epic : Almur, Fura 3 Rare : Jarvur C. Helheim Realm Bonus for 1/2/3 Heroes: Deals 25 / 50 / 100% damage to all enemies when a Helheim Hero is defeated. 5 Legendary : Lady Loki, Tyr 4 Epic : Shadereave, Stonecleave D. Alfheim Realm Bonus for 1/2/3 Heroes: All allies are healed by 2/4/7% when an Alfheim Hero reaches low health. This effect can activate only once per turn. 5 Legendary : Frigg, Ratatoskr 3 Rare : Grevle, Kvesir E. Midgard Realm Bonus for 1/2/3 Heroes: All allies get +5/+10/+15% attack for as long as a Midgard ally has low health. This effect cannot be dispelled. 5 Legendary : Odin, Sif, Thorr 4 Epic : Brynhild, Mist 3 Rare : Bjorn F. Jotunheim Realm Bonus for 1/2/3 Heroes: All allies get an Ice Giant Minion with 6/10/14% HP and 10/12/16% attack inherited from the caster when a Jotunheim Hero is defeated. 5 Legendary : Lord Loki, Skadi 4 Epic : Jott 3 Rare : Nordri G. Niflheim Realm Bonus for 1/2/3 Heroes: All enemies have -5 / -10 / -15% accuracy for as long as a Niflheim ally has low health. Chance to miss also applies to offensive Special Skills. 5 Legendary : Fenrir 3 Rare : An-Windr, By-Ulf, Ei-Dunn, H. Muspelheim Realm Bonus for 1/2/3 Heroes: All enemies receive 22/37/64 Burn damage for as long as a Muspelheim ally has low health. This effect can't be cleansed. 5 Legendary : Baldur, Gefjon 4 Epic : Sumle 3 Rare : Sudri I. Asgard Realm Bonus for 1/2/3 Heroes : All allies gain 10 / 15 / 20% mana when an Asgard Hero is defeated. 5 Legendary : Heimdall 4 Epic : Gullinbursti 3 Rare : Agnes 7. Resources Farming Find the farming thread here: To search stages, cover S2 to UT2 by BirksG : https://monsterfarm.pages.dev/ Find details of Stages by Elioty on his drive
-
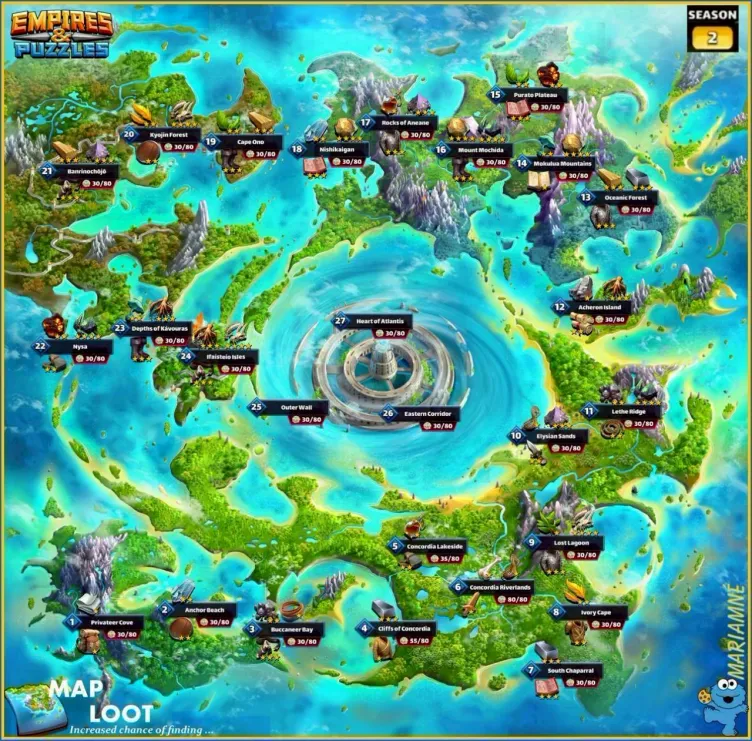
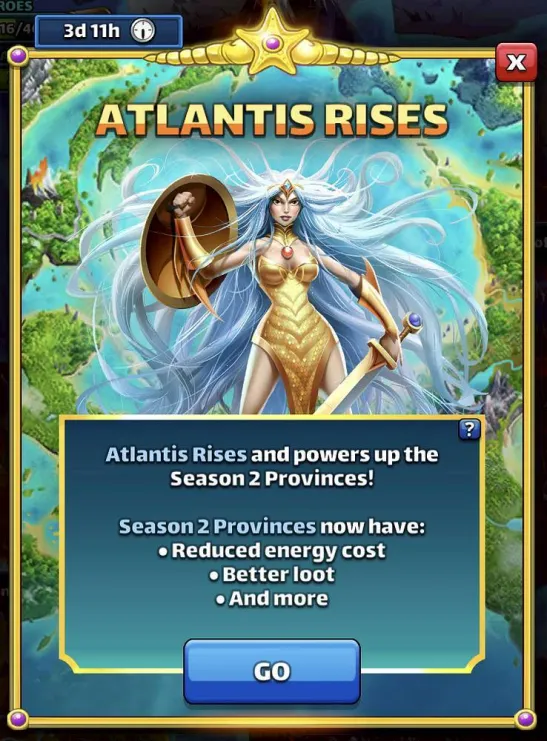
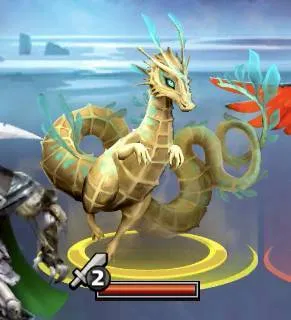
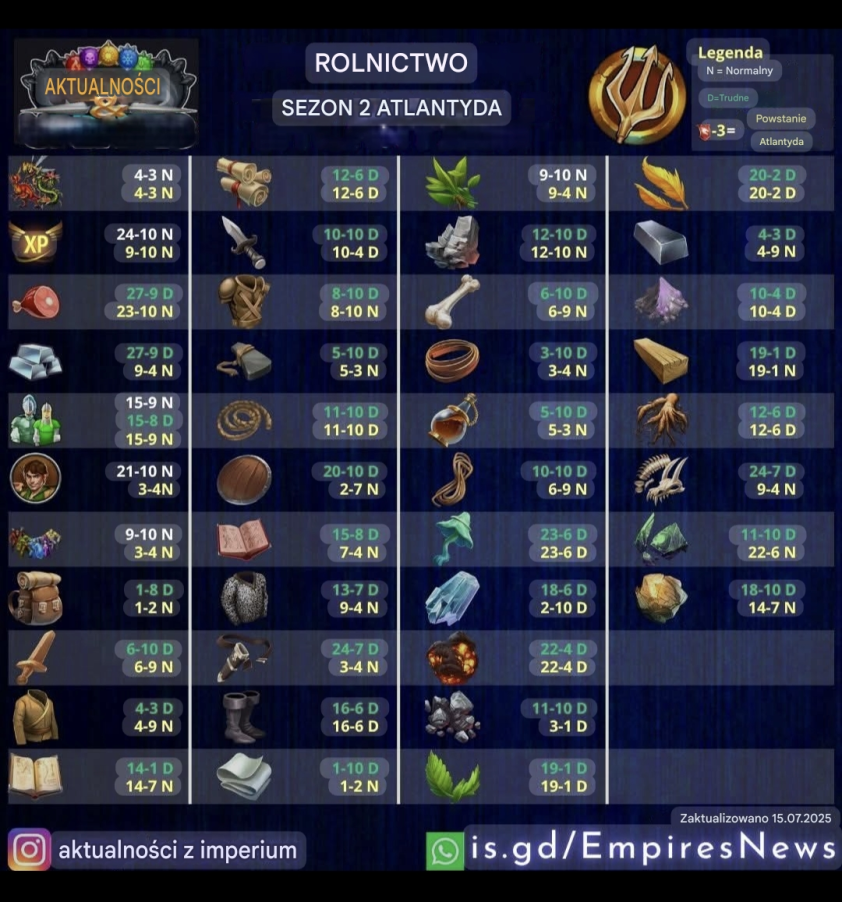
Season 2 : Atlantis Rises This thread is about Season 2 in reduced cost. The first occurrence appeared on February 2021 1. Event : Atlantis Rises (Reduced Cost) Core Rules: The basic functioning of the season (Stages, missions, etc.) remains the same as the original version. Find the base guide : Season 2: Atlantis Rewards: This season's usual rewards are improved and doubled. This event is very popular with players for farming and resources materials necessary for crafting items, basic resources or farming experience. New Feature: The main difference is the addition of "Dragon" monsters, which allow you to earn extra rewards when you complete the levels. 2. Access Conditions and Cost How to Access the Event Where to Find It: Access is via the Seasons Tab. Prerequisite: You must have completed up to stage 15 of season 1. Base Season: It is available permanently. Frequency (Summon Portal): It is part of a 4-day rotation among several seasons: S2 > S3 > S4 > S5 > UT1 > UT2 Energy Cost (Reduced) The levels in this event cost less World Energy than usual: Easy Mode: 3 to 7 energy. Hard Mode: 7 to 13 energy. 3. Specific Gameplay: Dragon What is a Dragon ? These are creatures that can appear randomly in levels. They grant extra rewards if you complete the level: Atlantis Coins Daily Clam Limit The quantity of Midgard Coins you can obtain is limited each day. Starting Cap: 15 clams per day. Increase: The limit increases by 15 each day up to a maximum of 60 clams per day. Monster Lure (Paid Option) The Monster Lure is an upgrade available through a special paid offer: It immediately increases your daily clam limit from 15 to 25 per day. It also increases the quantity of specific S3 pieces found in loot. 4. Atlantis Rises Summon Portal Summon Cost 1 Summon: Costs 350 Gems or 100 S2 Coins. 10 Summons: Cost 3000 Gems. 30 Summons: Cost 8400 Gems. Appearance Rate Presence of heroes from three groups: The heroes from Season 2. The heroes from Season 1 (but without costumes). A selection of old HOTM 5. Resources (Farming) Find the farming thread here: Infographics available by
-
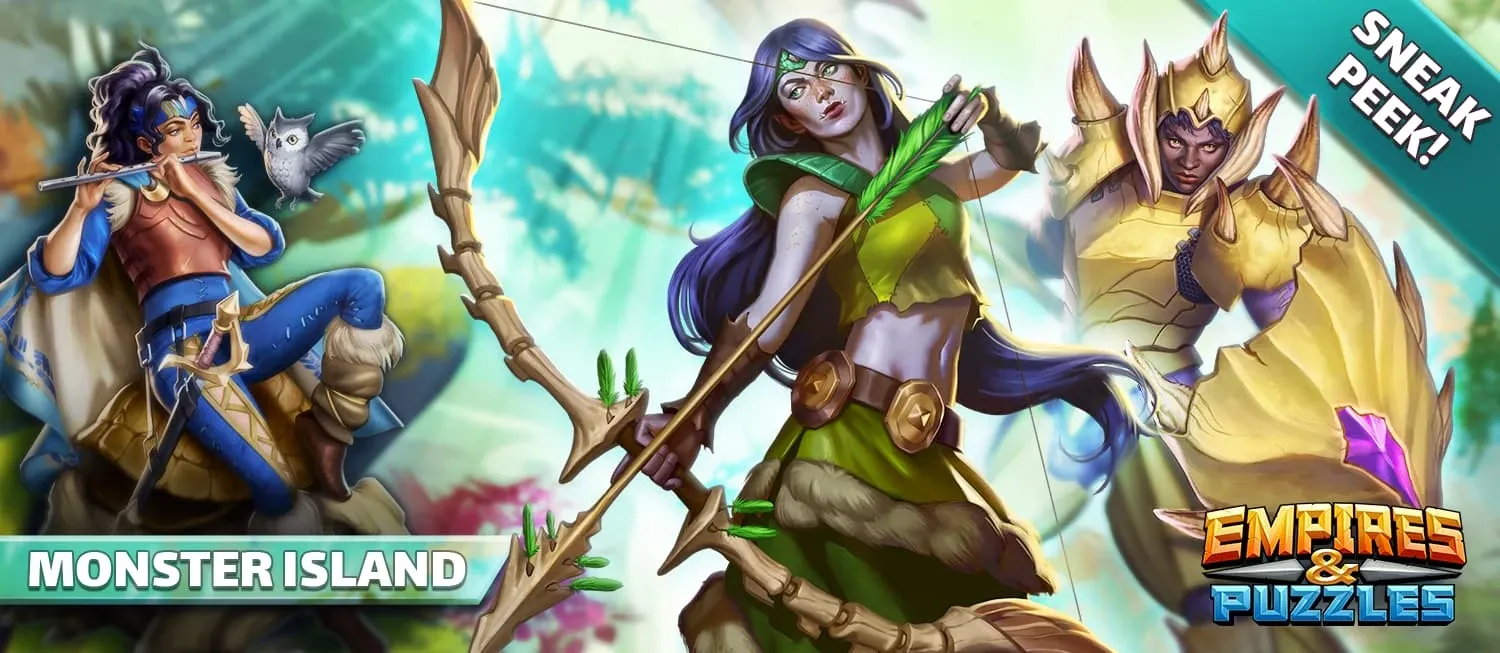
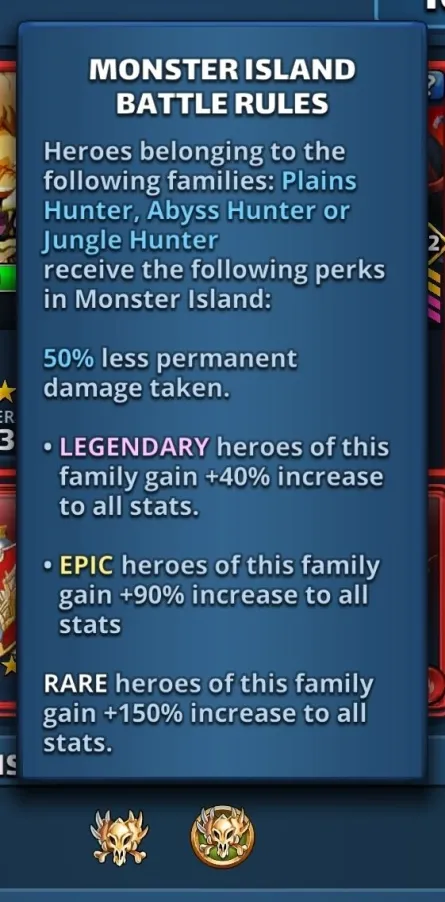
XI. Monster Island Families This section details the general bonuses of the event heroes and the specific bonuses for the different families. A. Event Heroes Bonuses (General) These enhancements apply to all designated event heroes: Statistical Enhancements (Attack, Defense, HP): Legendary: +40% Epic: +90% Rare: +150% Survival and Skill Enhancements: Permanent Damage: Heroes suffer a reduction in the amount of permanent damage received in combat. Special Skills: Their skills are enhanced, inflicting an additional ailment on all enemies. B. Family Bonuses Heroes become stronger when they are teamed with other unique Heroes of the same family. Abyss Hunter Family (Bonus : Defense) Bonus: For 1 / 2 / 3 unique Heroes: gains 10% / 15% / 20% defense. 5* Members: Otis, Goretooth, Dabria, Sorrow, Staintongue. 4* Members: Bogart, Numbskull. 3* Members: Basil, Greel. Plains Hunter Family (Bonus: Attack) Bonus: For 2 / 3 / 4 / 5 unique Heroes: gains 5% / 10% / 15% / 20% attack. 5* Members: Adalinda, Hawthorn, Cleaver, Malin, Waterpipe, Hammertusk, Ebba, Kai, Thura, Dubhán, Ruadh, Sigyn, Sune, Revna, Amund. 4* Members: Meadow, Maheegan. 3* Members: Edelaide, Dawn, Fianna. Jungle Hunter Family (Bonus: HP) Bonus: For 2 / 3 / 4 / 5 unique Heroes: gains 5% / 10% / 15% / 20% HP. 5* Members: Bone Breaker (Brise-os), Hurricane, Thunderclap, Mist Weaver (Tisse-brume), Tremor. 4* Members: Knuckles. 3* Members: Cedar. Titan Hunters Family (Special Bonus against Titans) Mana (Start of Battle): For 1 / 2 / 3 Heroes: Receives 10% / 15% / 20% mana. Mana (Against Titans): For 1 / 2 / 3 Heroes: Receives 40% / 60% / 100% mana. Counterattack: For 1 / 2 / 3 Heroes: Counterattacks with 125% / 150% / 175% of damage received from Titans' Special Skills. 5* Membres : Adelitza, Njal, Sorcha, Lumi&Taïga, Borgholf XII. Various Documents, Community Playlist OLD DOCUMENTS Credit by Cap DOCUMENTS TOP 100 Credit HeyAlexa, Ruskin505, Minko, Raj, Dom, Tobov, Alex, Fox PLAYLIST VIDEO English Général J : https://youtu.be/ZpV-LRZ61fU?si=no715F-vXqouGQ_s Combonator : 1/3 https://youtu.be/OpNVfgp3OTo?si=uu5Z5GYjagJolnwW 2/3 https://youtu.be/_xe1bdC6fDY?si=qOgm5lZBYFQgOOqk 3/3 https://youtu.be/-H6Pn4gfnq0?si=8Rat4ch1eXR3XJ4g French Zanemarossi : https://youtu.be/r6aSPZr5MKY?si=LolhDtloGzpikkky Spanish Pequena : https://youtube.com/shorts/AGx0KnTSMLo?si=Apr4-PpKCHVL6M9n Polish Navy (top 10): https://youtu.be/dEF2GhxOU-0?si=as9TJV2A4qZRIjg0
-
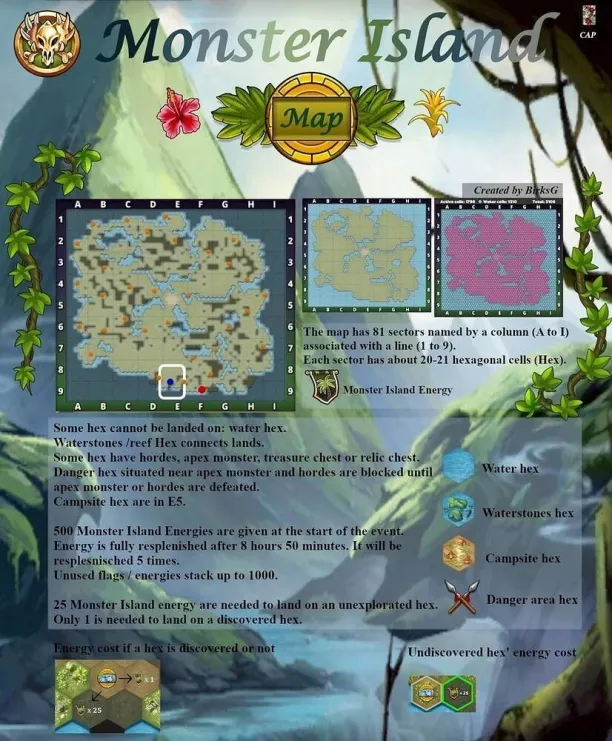
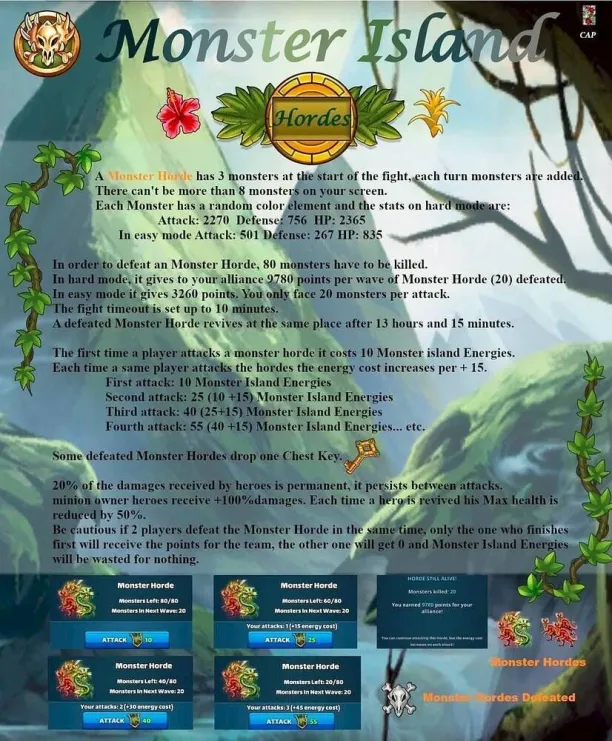
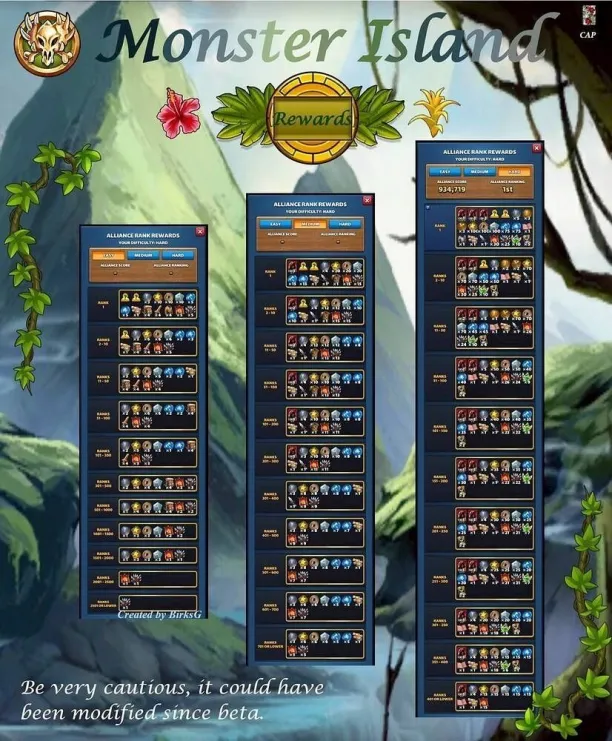
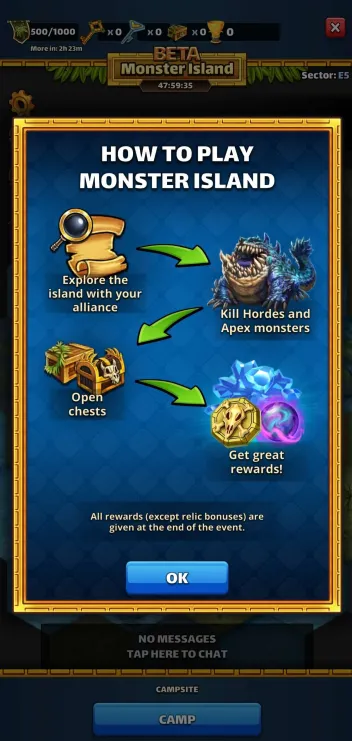
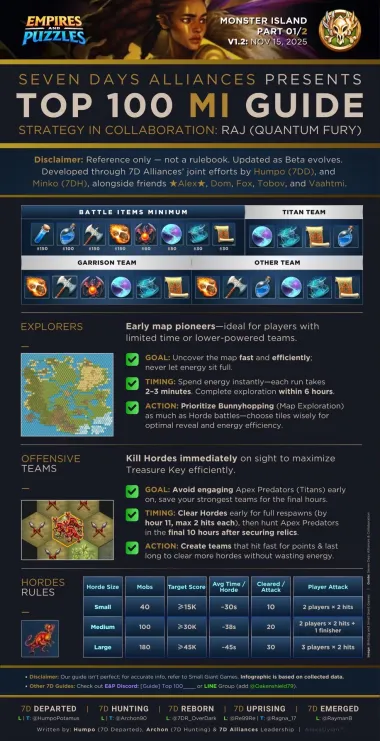
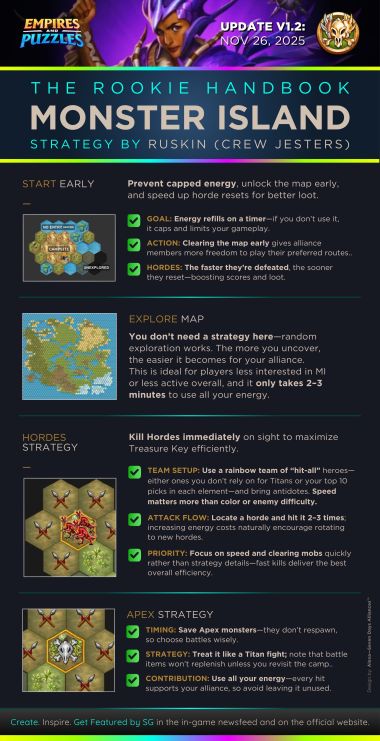
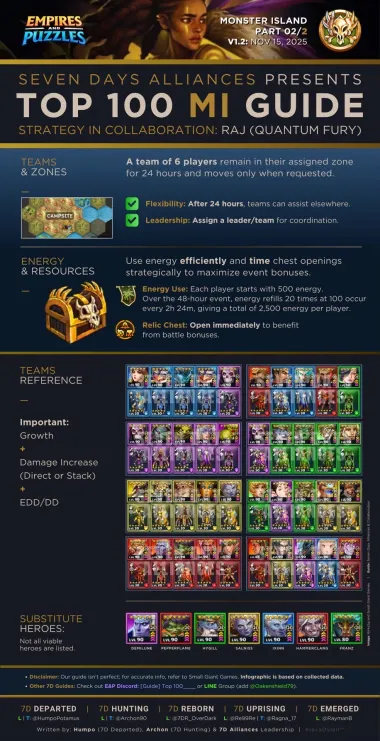
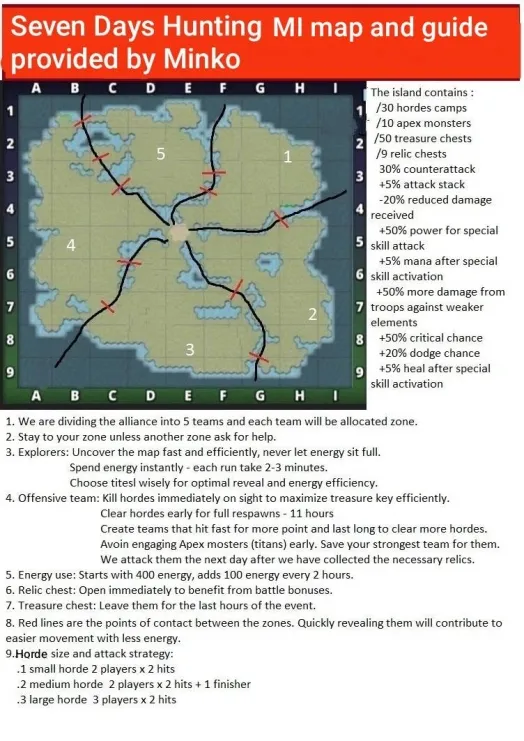
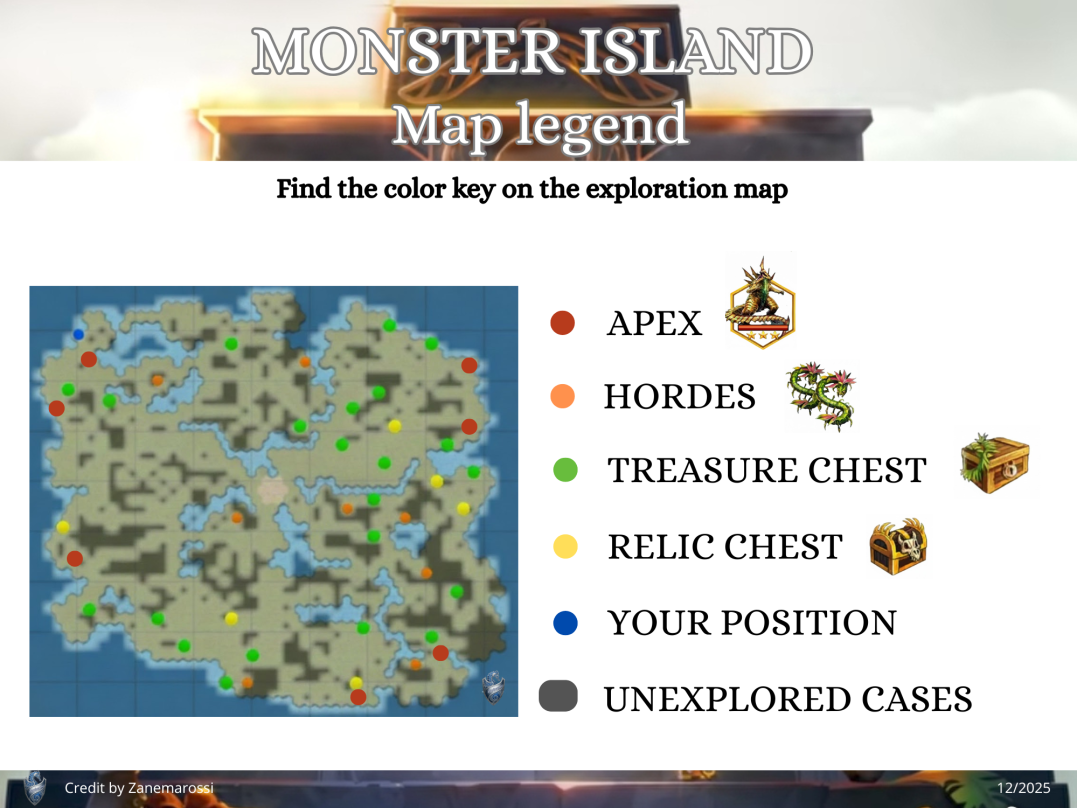
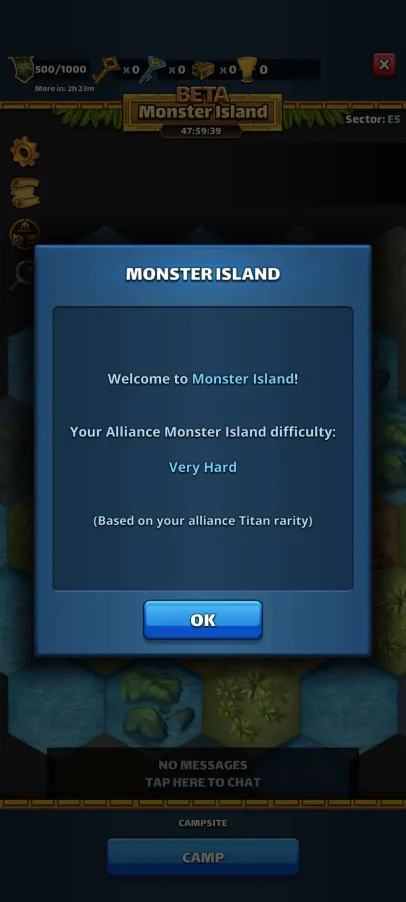
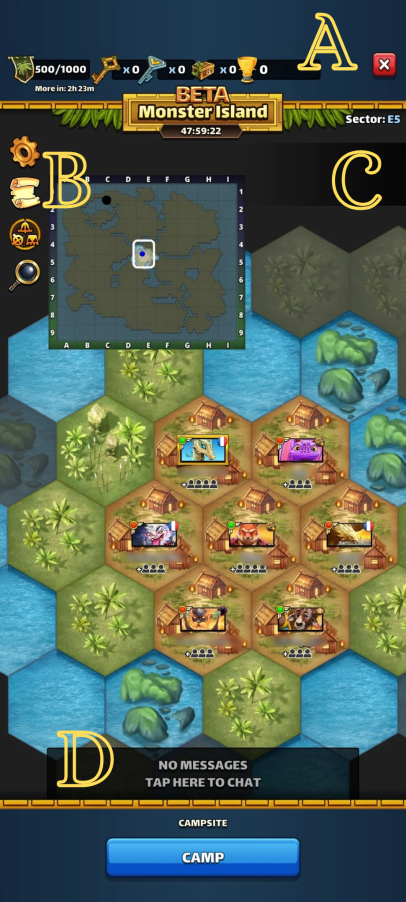
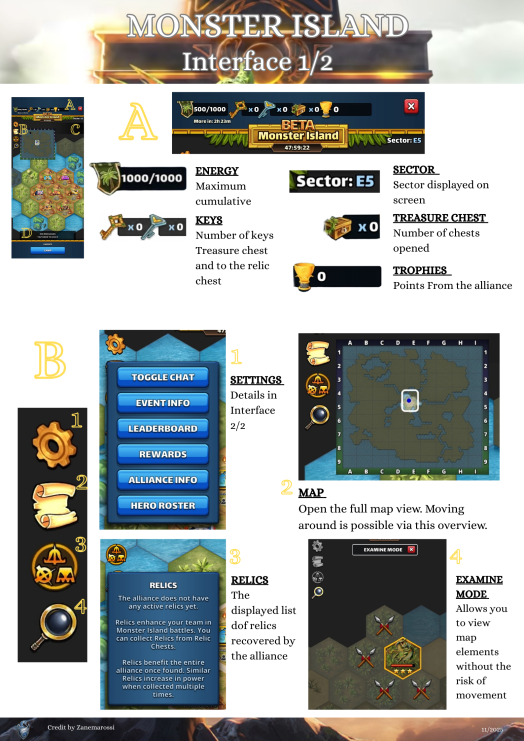
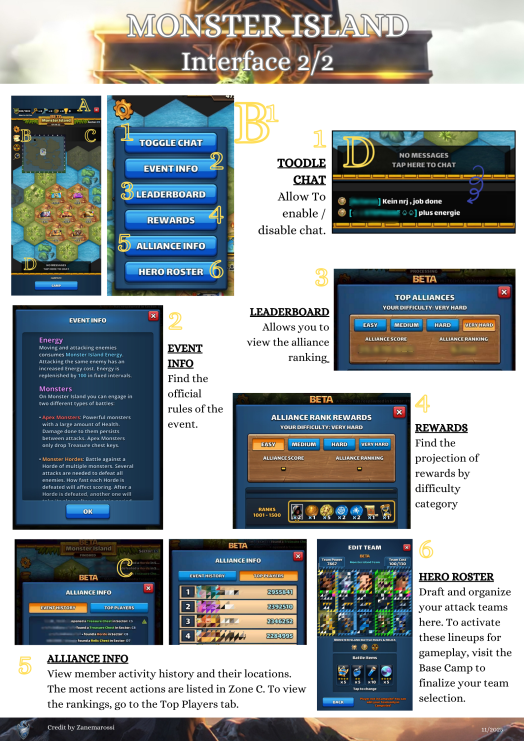
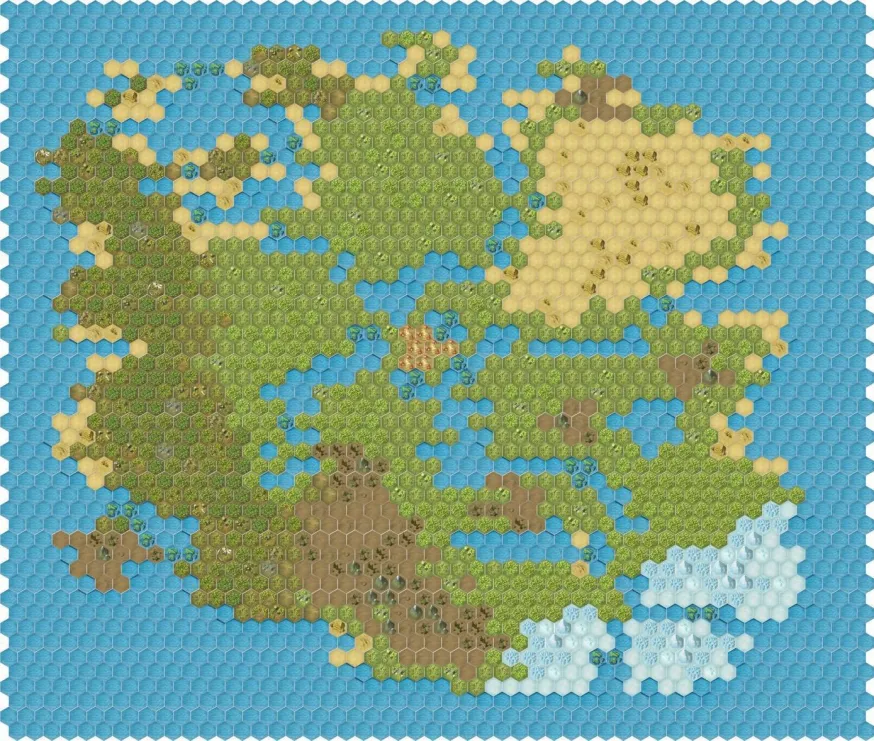
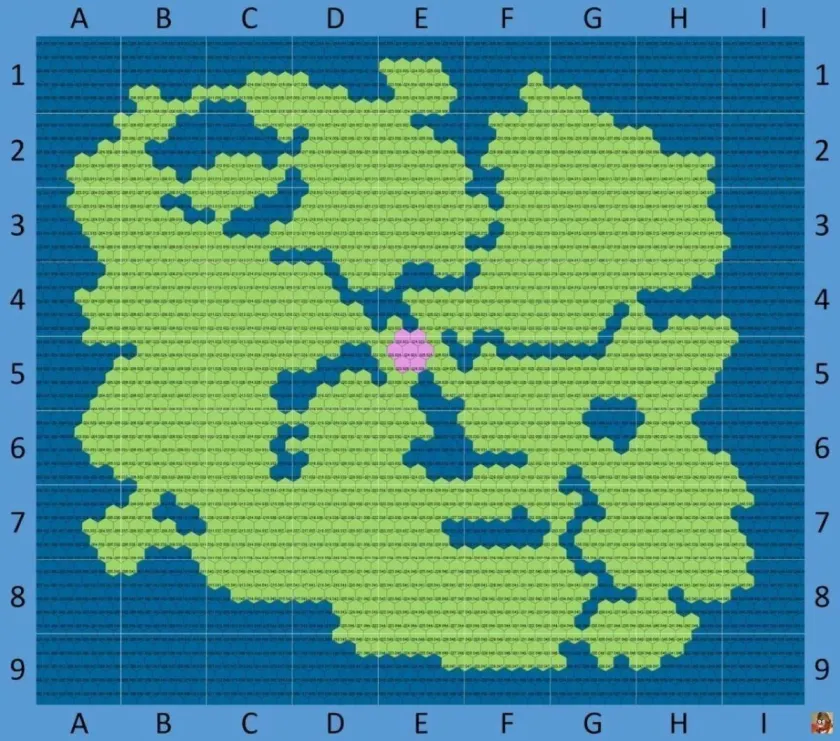
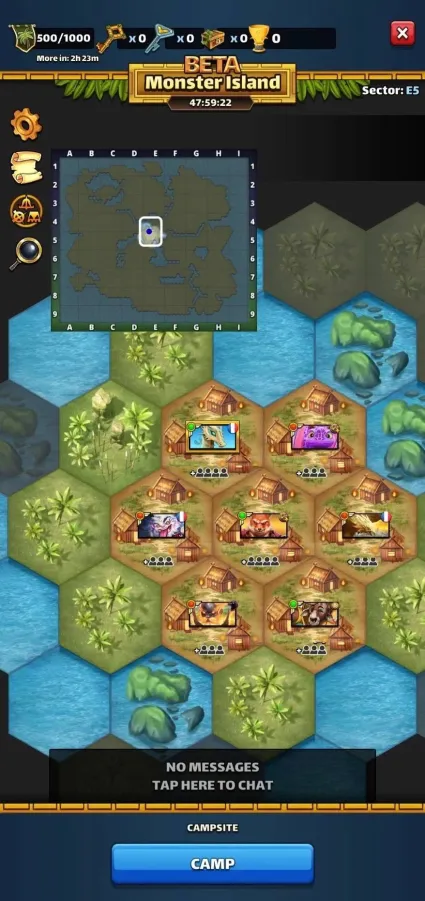
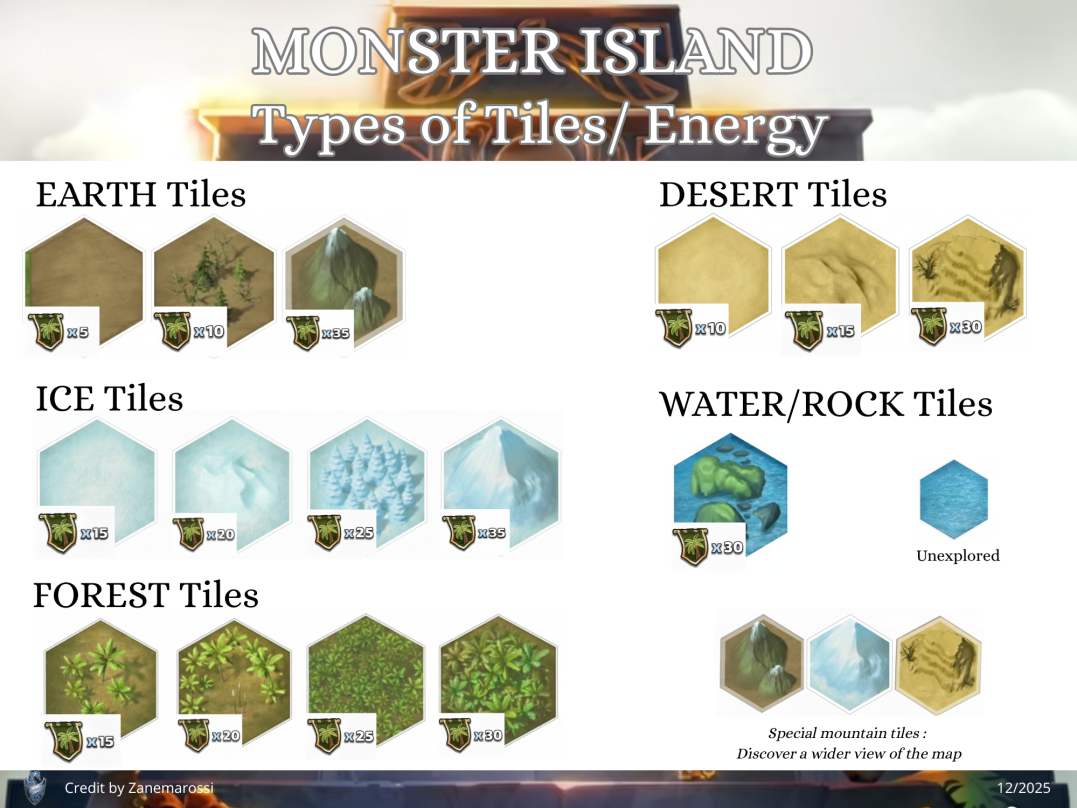
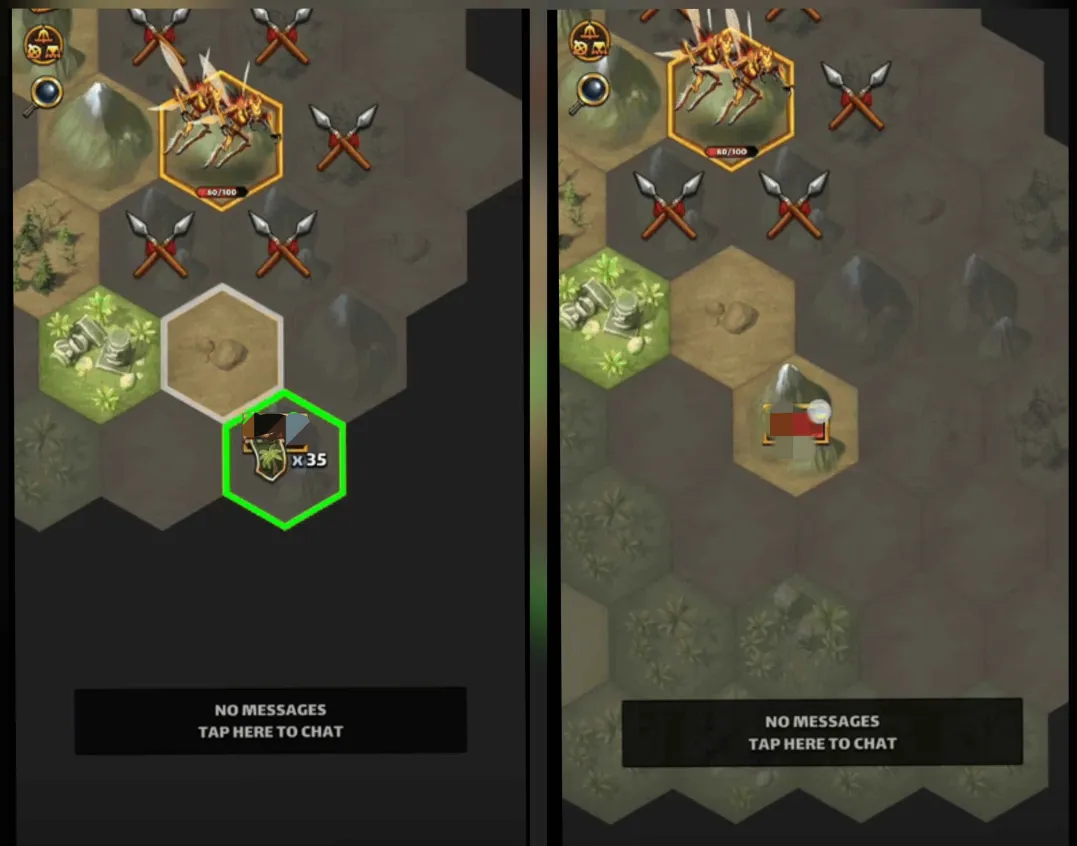
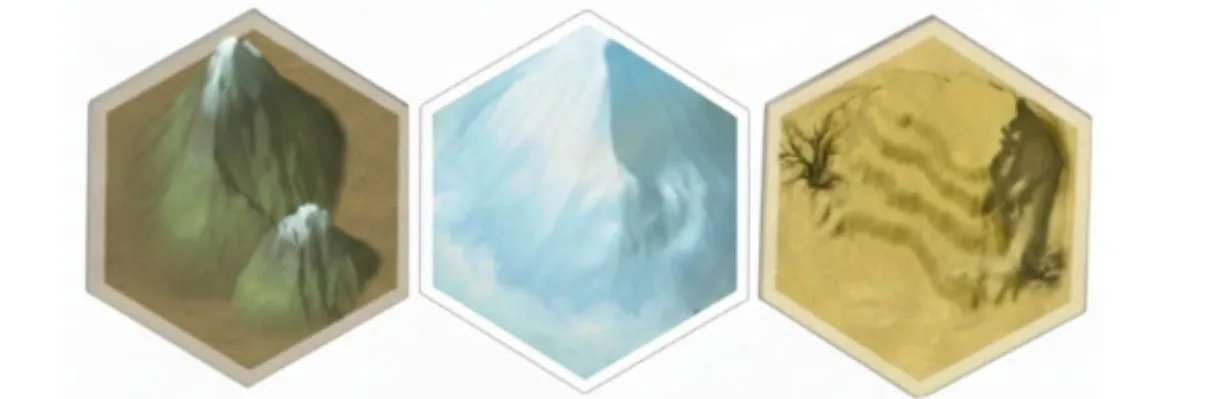
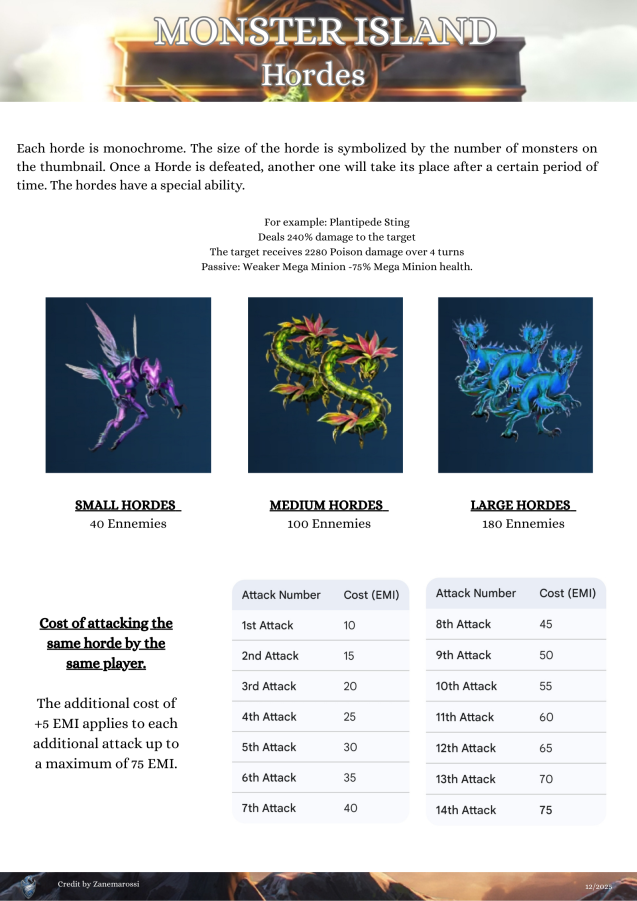
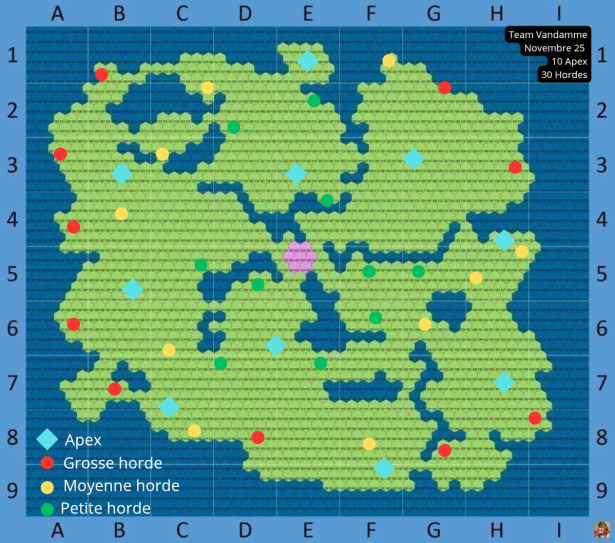
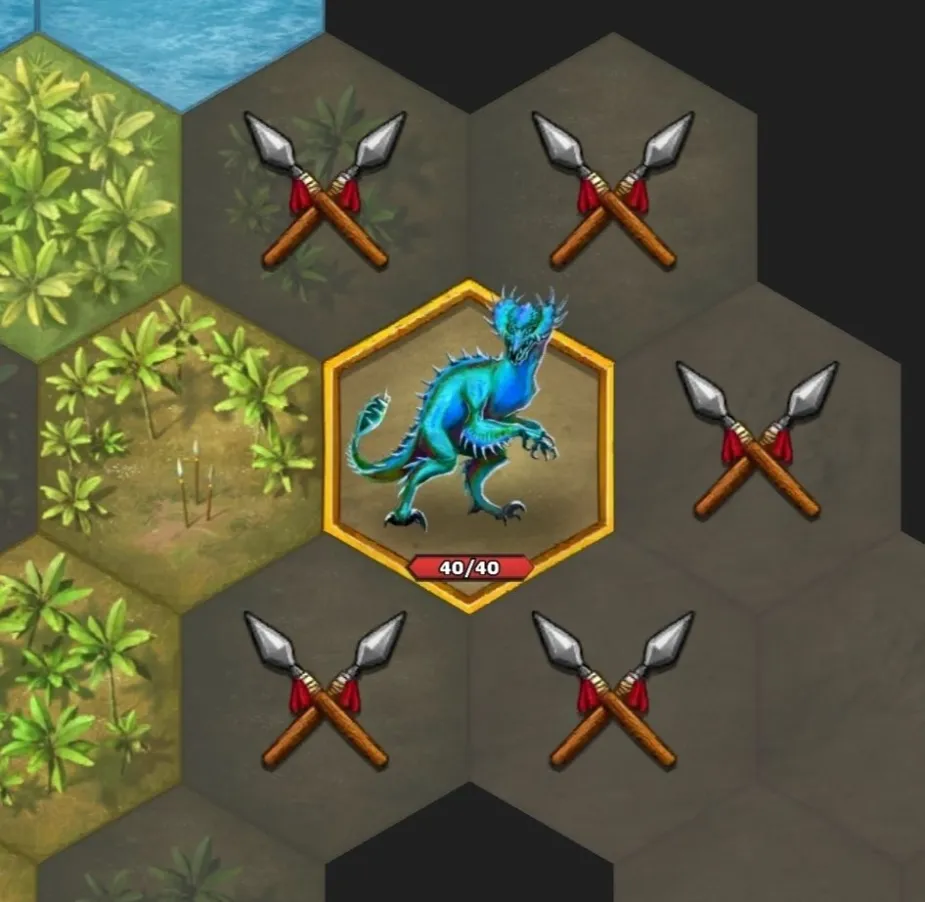
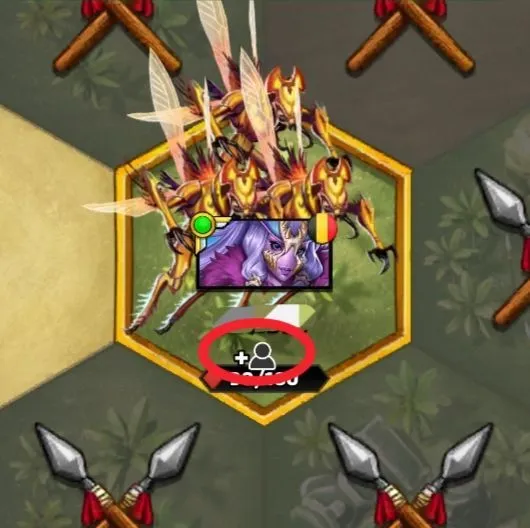
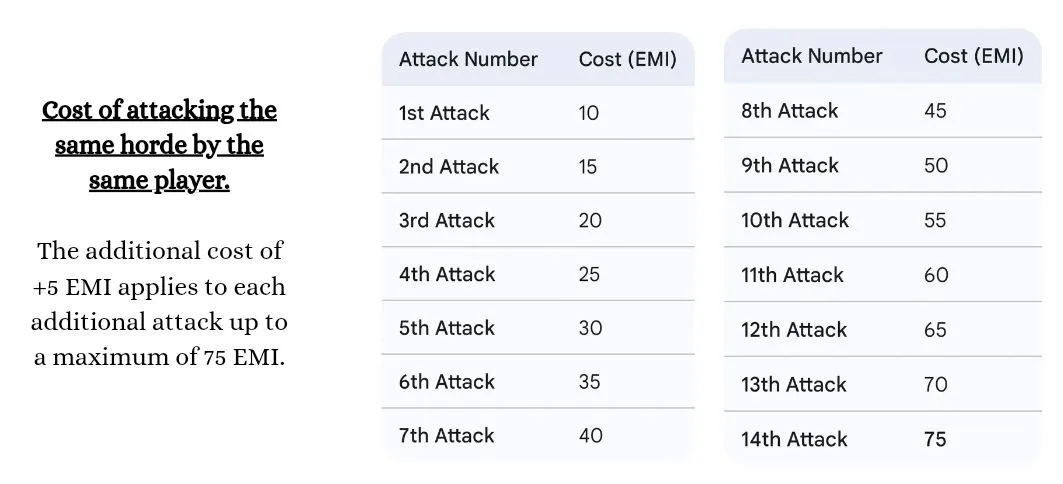
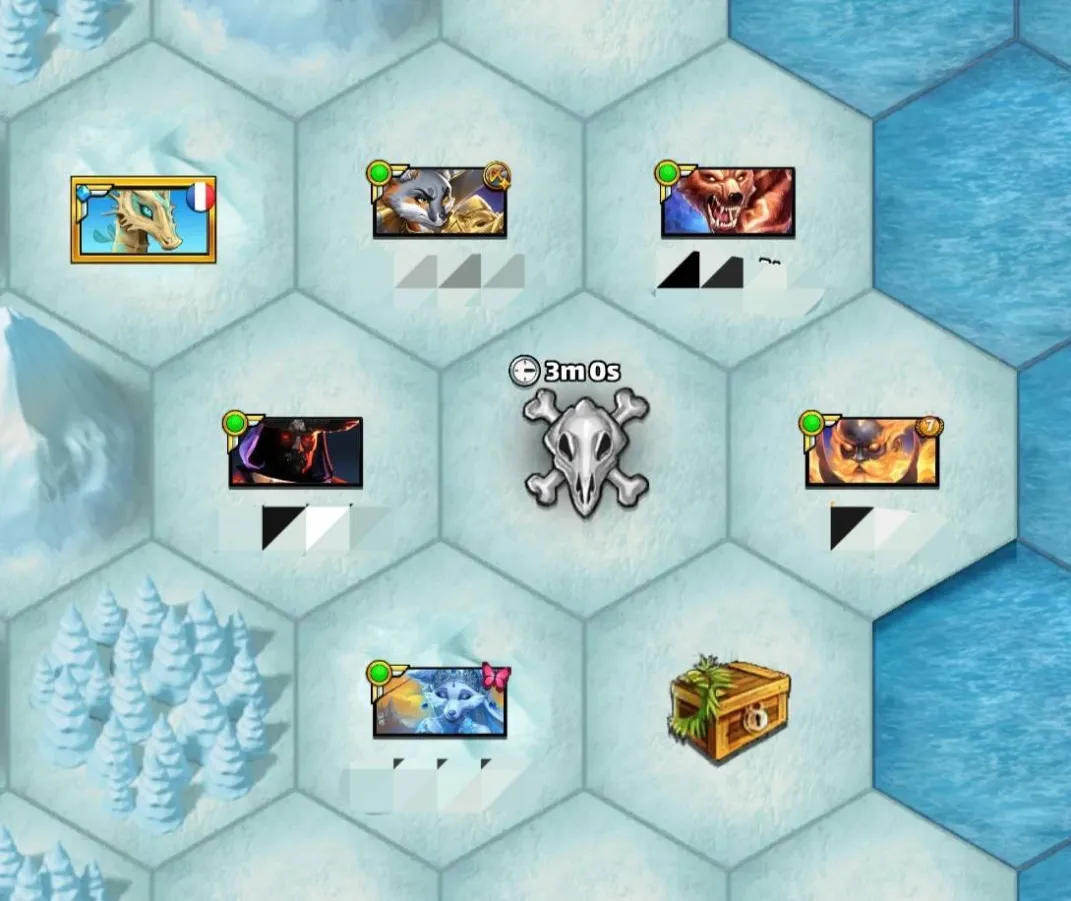
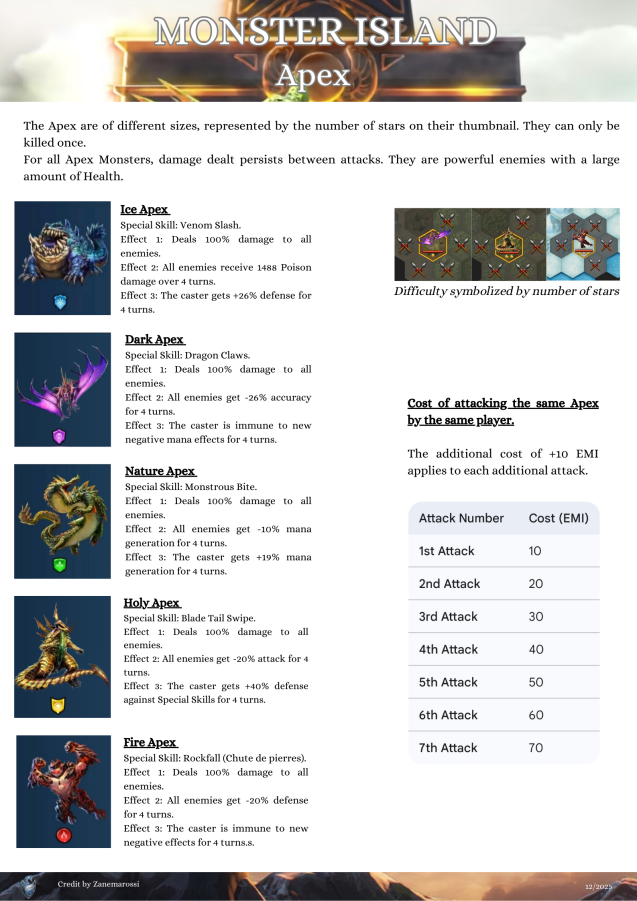
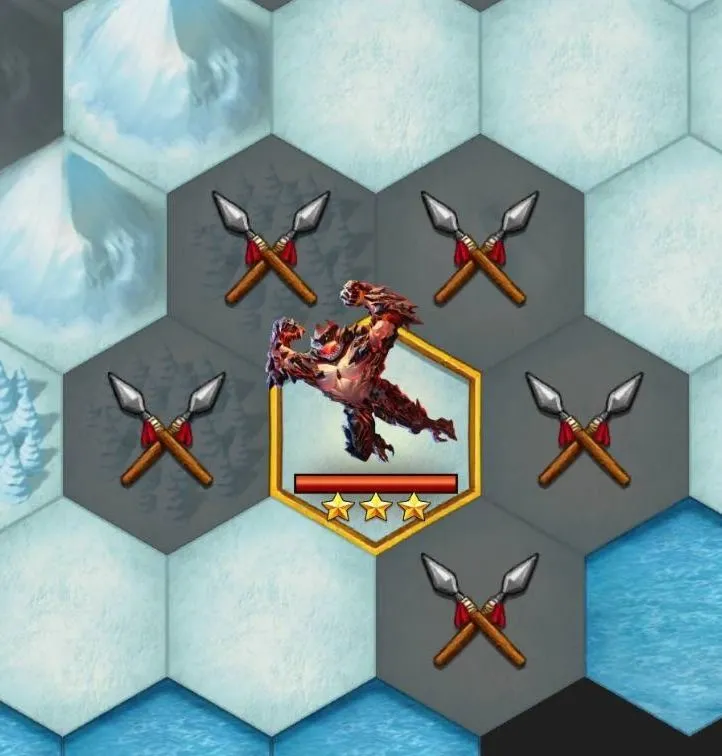
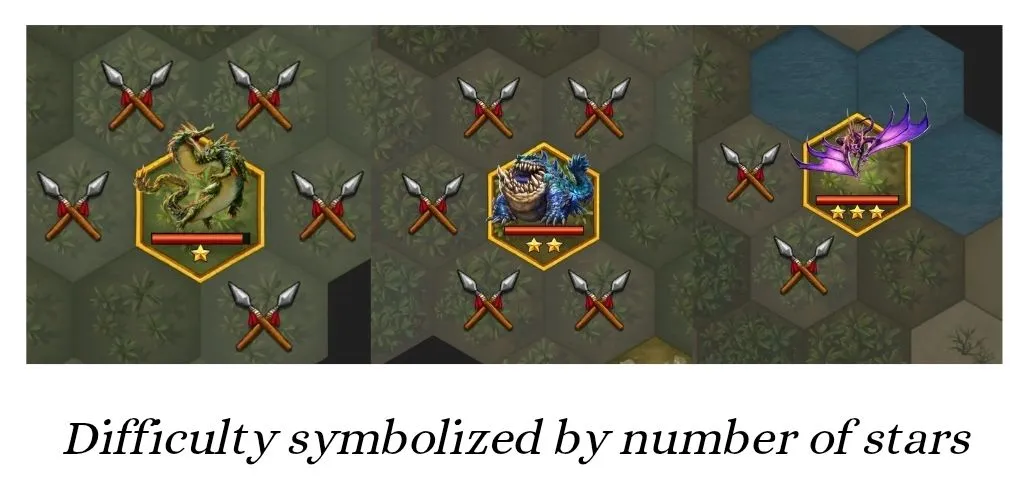
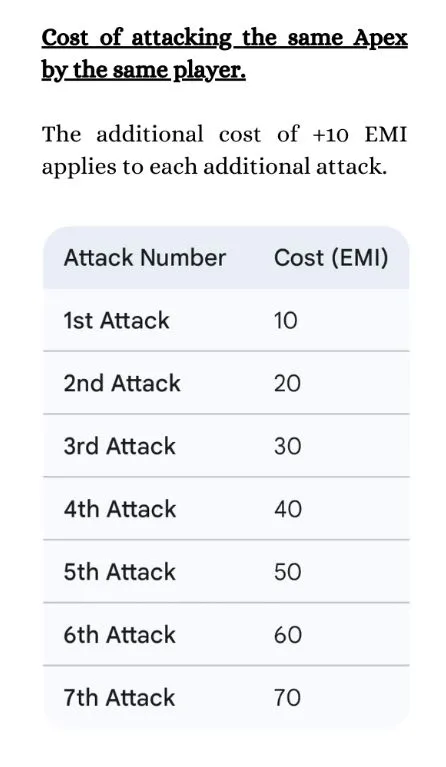
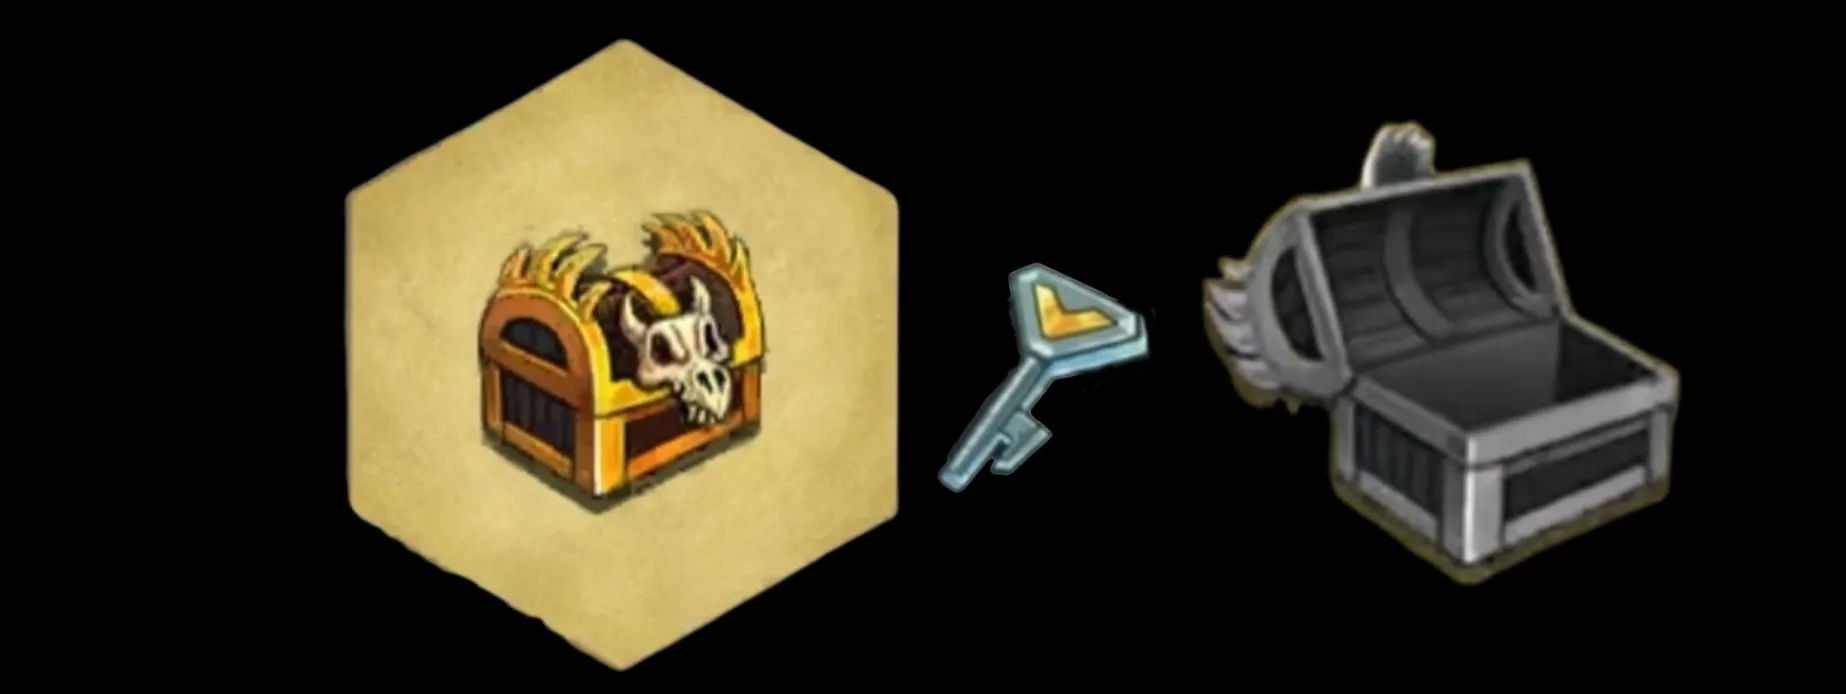
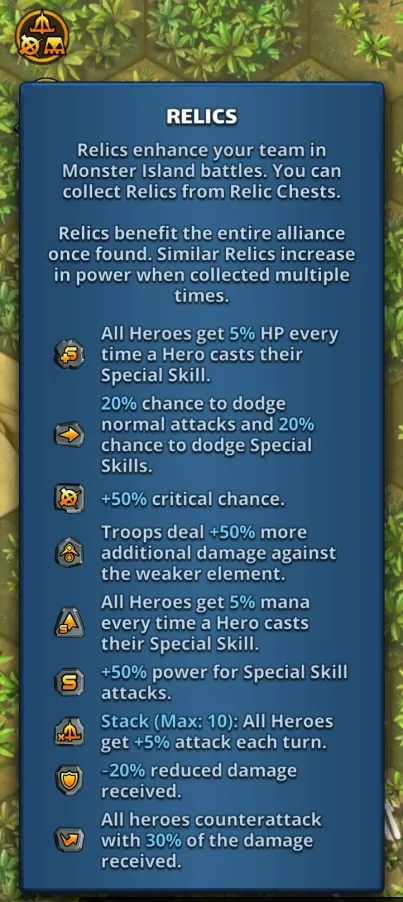
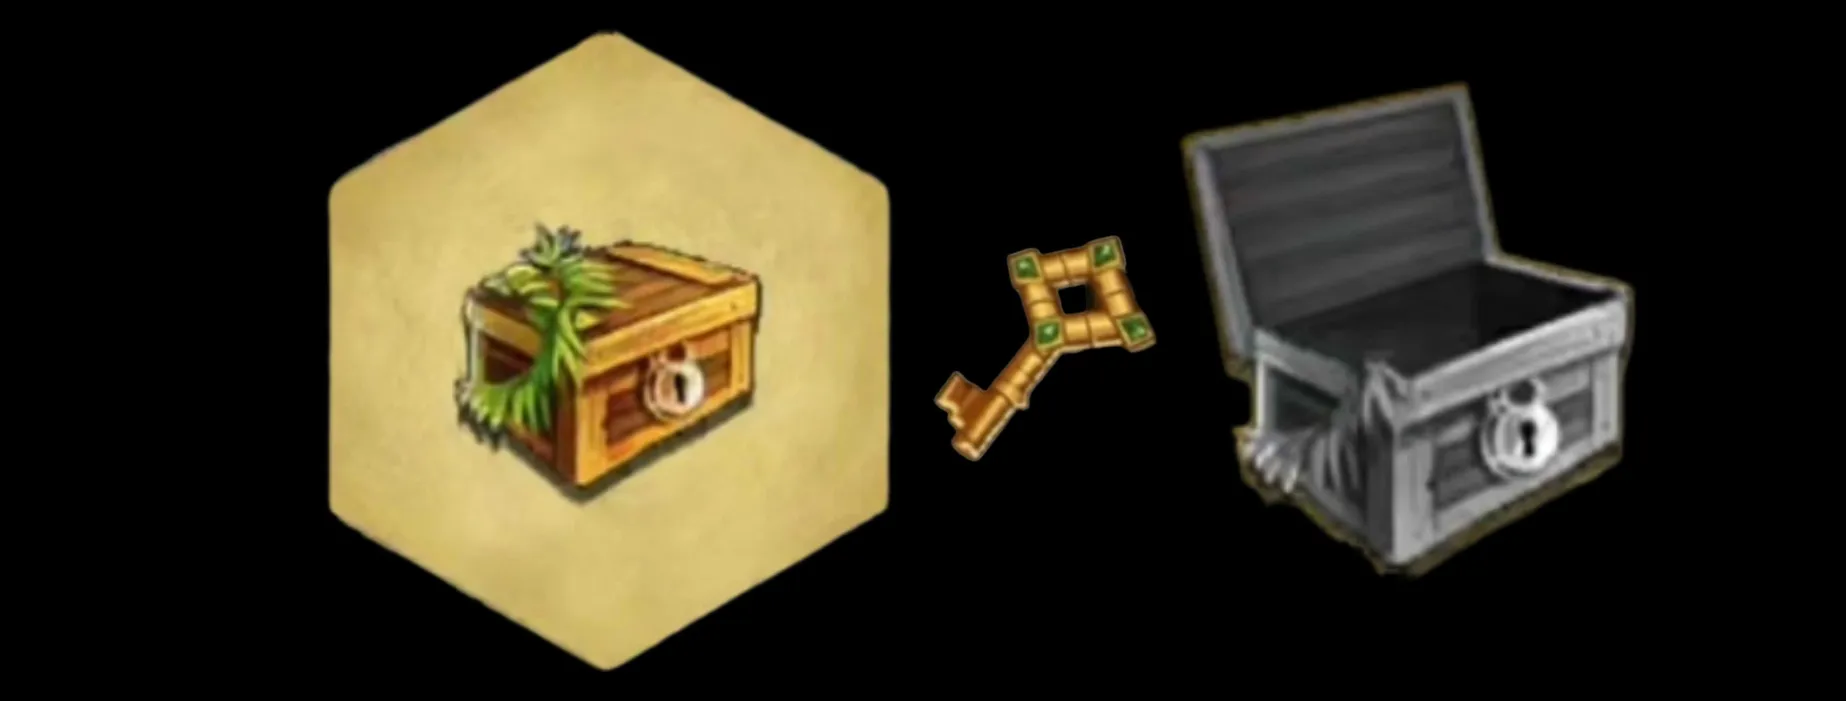
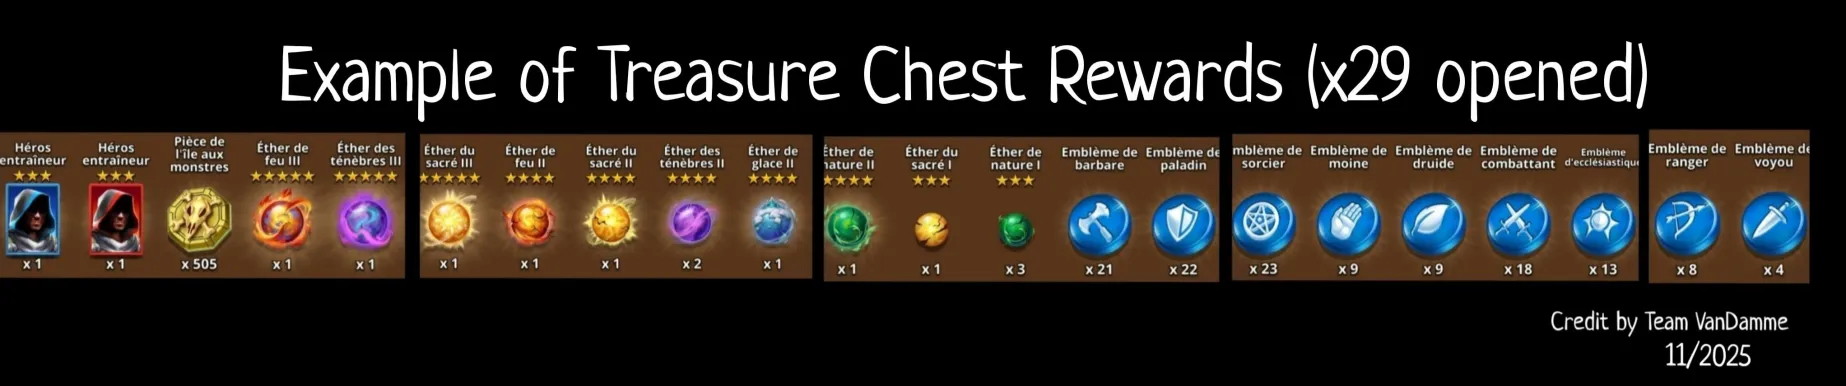
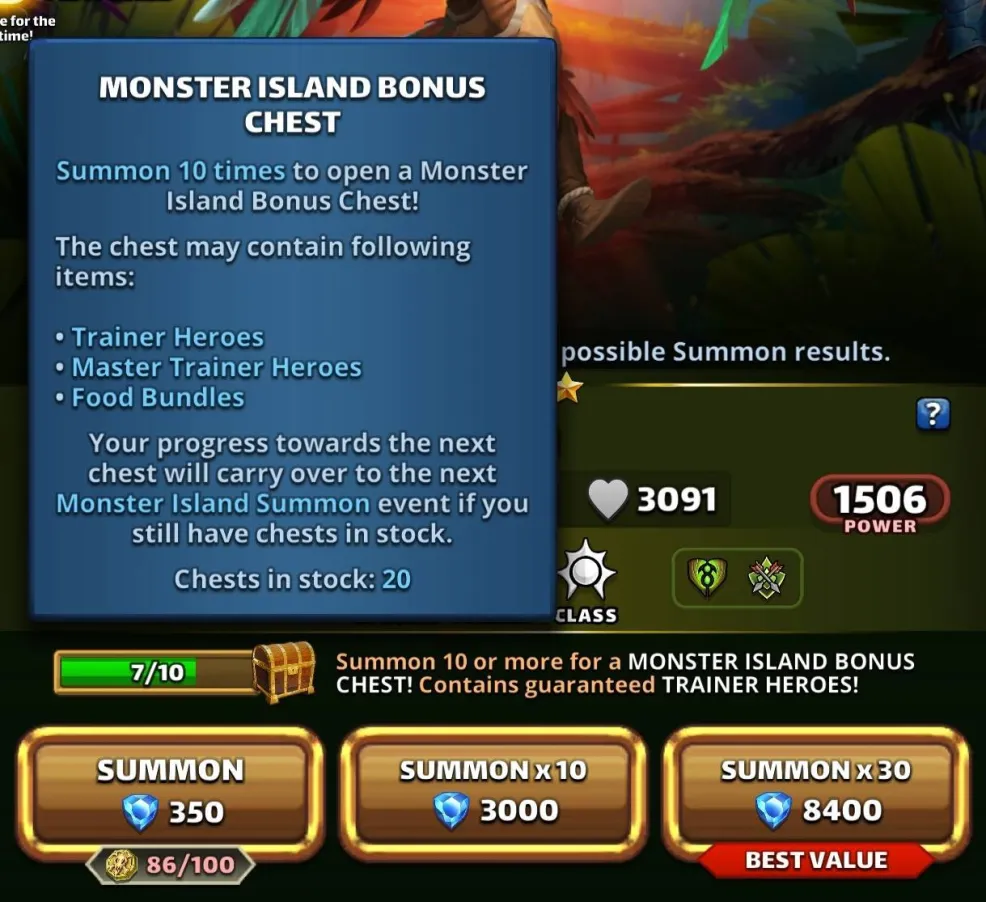
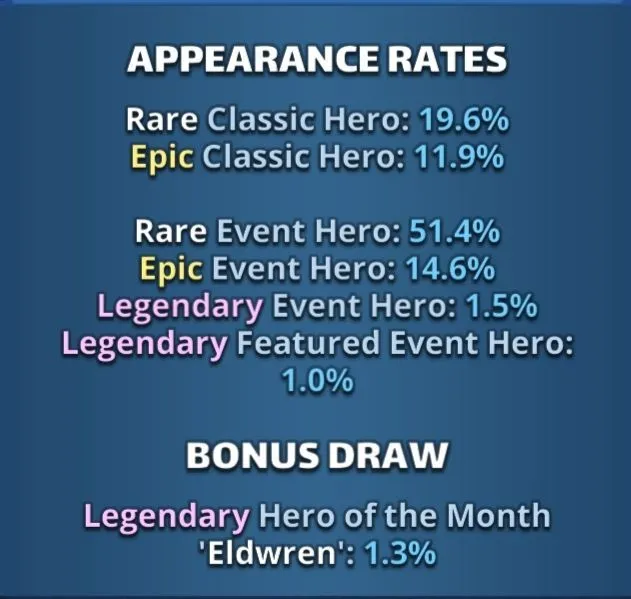
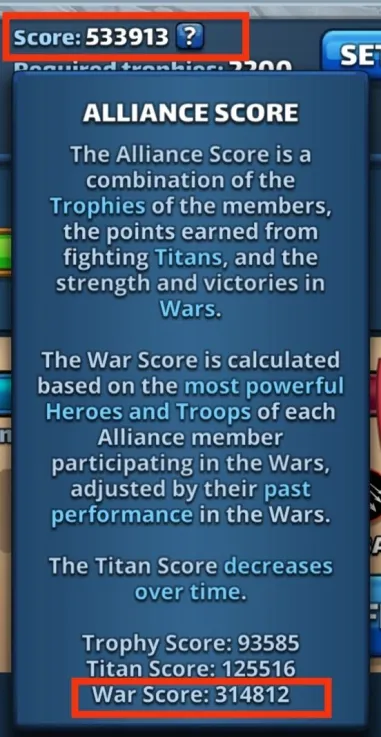
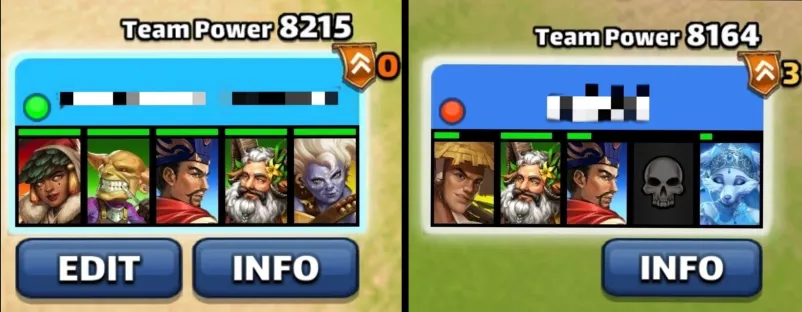
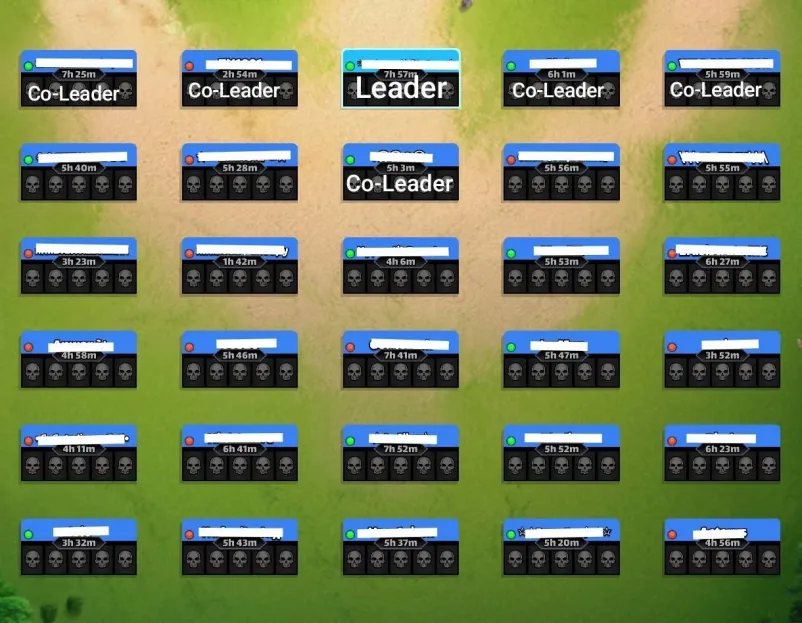
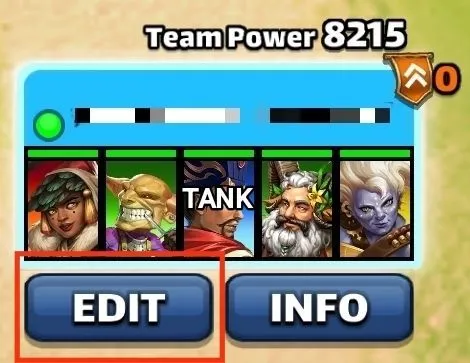
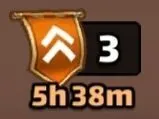
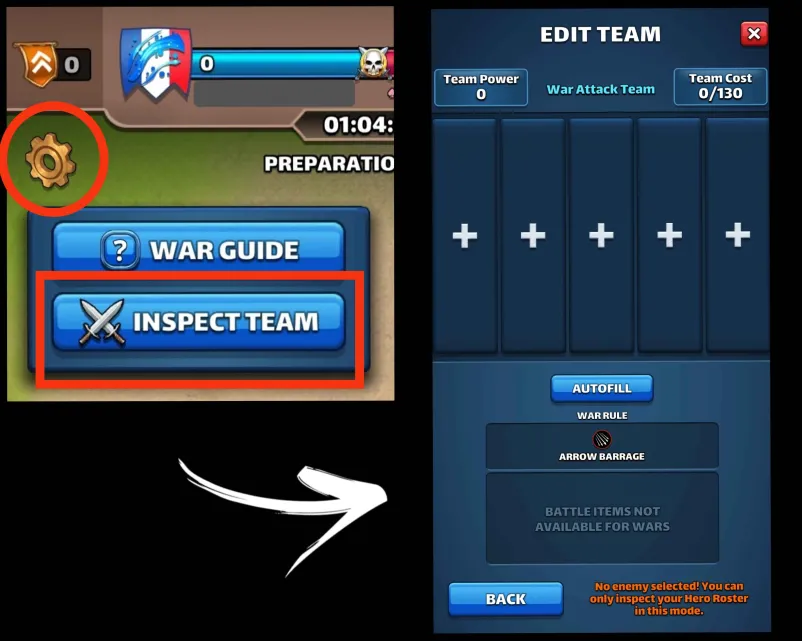
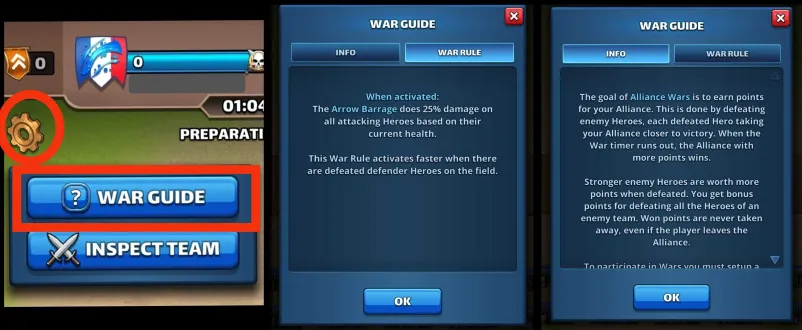
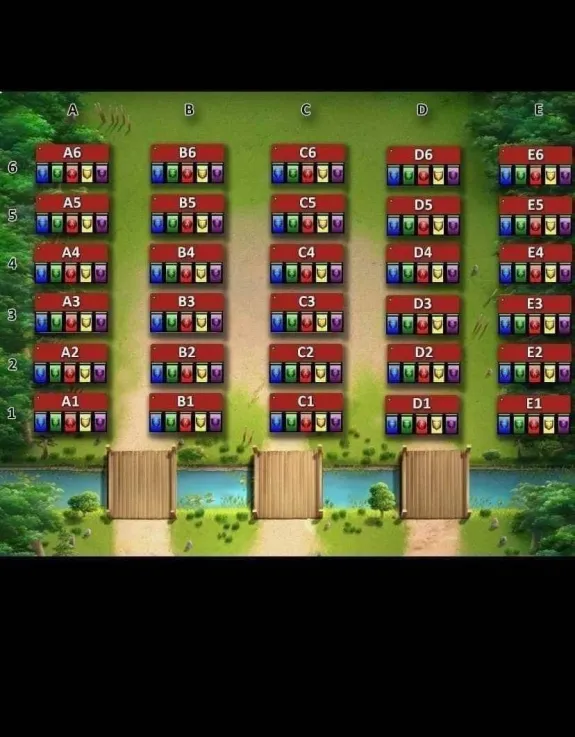
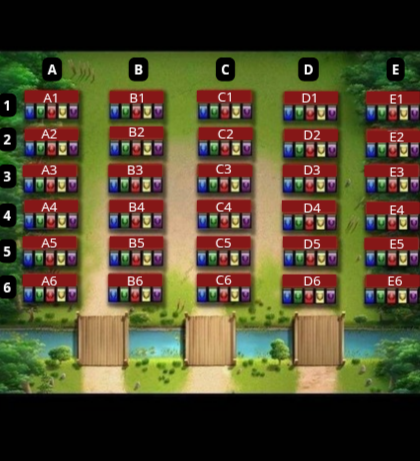
This topic discusses the Alliance event "Monster Island," which first occurred in November 2022. Table of Contents Overview Access Requirements and Difficulty Levels Interface The Map and Energy (EMI) Hero Management The Hordes The Apex Chests Rankings and Rewards Summoning Portal Monster Island Families Various Documents & Community Playlist I. Overview A. Exploration of the Mystery Island Monster Island is an alliance event based on cooperation, energy management, and team strategy on a large, unexplored island. Beta Status: This event is currently being tested; changes are still possible. Last updated: November 2025. All alliances explore the same base map and start at the base camp in the center. The position of specific gameplay elements is unique to each alliance. Find the color nomenclature for the map. B. Difficulty and Ranking Four levels are available: Easy, Medium, Hard, and Very Hard. Impact: This difficulty level determines the strength of the monsters on the island and affects alliance rankings (alliances are ranked only among themselves). C. Event Duration The event takes place in two distinct phases: Preparation Phase (24 hours): Players have 24 hours to join an alliance to validate their participation. Exploration Phase (48 hours): Exploration begins and lasts 48 hours. Important: Once the exploration phase has started, any alliance change (joining or leaving) excludes the player from the event. D. Your Objectives The main objectives are: Earning Points: Obtain these by scouting the map, overcoming Hordes (recurring foes), and challenging the mighty Apex (unique bosses). Looting: Discover Relic Chests (on-field support) and Treasure Chests (shared alliance bonuses). Ranking: Based on your final score and the portion of the island uncovered within your group. Rewards are issued once the event concludes. II. Access Requirements and Difficulty Levels A. Prerequisites for the Island Must be part of an alliance before the start of the event. The alliance score must be at least 10,000. B. Difficulty Options The event's difficulty is based on your alliance's power (measured by the Titan you defeat each day). Available Levels: Easy, Medium, Hard, Very Hard. This choice impacts: The strength of the monsters on the island. The ranking you participate in (and therefore the rewards you receive). III. Interface A. Top Banner (Status and Resources) Energy (EMI): Island-specific energy, capped at 1000 total. Recharge time is indicated. Keys: Two distinct counters: one for Treasure Chests and one for Relic Chests. Treasure Chests: Indicates the number of Treasure Chests found. Trophies: Indicates the number of points accumulated by the alliance. B. Left Banner (Menus and Navigation) Four main buttons are accessible on the Left Banner: Settings/Info: Opens a detailed menu: Activation/Deactivation of the alliance chat view. Island Information: official event information. Ranking: alliance ranking and alliances according to difficulty level. Rewards: projected rewards to be obtained. Alliance Information: event history and player points summary. Hero List: view your heroes and items available for the island and those that can be killed. You cannot change your team here. Relics: Indicates the details of the relics found, corresponding to combat bonuses for the alliance heroes. Navigation (Mini-Map): Preview: Open the map miniature. Estimation & Visualization: Click once on the desired zone (the white cursor) to see the energy cost (EMI) and visualize the elements (monsters, chests, teammates) present in that zone. Movement: A second click triggers movement to that zone. Warning: An accidental click can cause unintended movement and energy loss. Exploration: You must slide on the greyed-out zones. Island elements (chests, hordes, apex) are displayed with brighter areas. Safety: You can slide on the map safely without risk of movement (and therefore without energy loss). Profiles: You can view a teammate's profile (team used, items, remaining energy). C. Right Banner (Alliance Activity) News Feed: Displays the latest actions performed by players and the sector concerned. You can click on this area, which will open the detailed "Alliance Information" menu. Someone discovered a horde in “A2” Someone defeated a horde in… Someone discovered an apex monster in… Someone defeated an apex monster… Someone discovered a treasure chest… Someone discovered a relic chest… Someone discovered a key (for a chest)… Someone obtains a new relic for all alliance members Horde reappeared in… Sector: Indicates the sector you are currently viewing on the screen. D. Center and Bottom of the map Main game zone: map of the island to explore. Alliance Chat (bottom): a specific chat for the island can be activated or deactivated from the settings. IV. The Map and Energy (EMI) Credit by BirksG, Turan The island is very vast (more than 3000 tiles), of which about 1800 tiles are explorable. You start at the Base Camp on a black map. A. Exploration Cost and Points Exploration and movement consume dedicated energy (EMI). Each explored tile grants 750 points. Initial Cost (depending on tile type): Earth Tile: 5, 10 or 35 EMI. Desert Tile: 10, 15, or 30 EMI. Ice Tile: 15, 20, 25 or 35 EMI. Forest Tile: 15, 20, 25, or 30 EMI. Water/Rock Tile: 30 EMI Water zones are unexplorable. Reduced Cost: Exploring an already visited tile costs only 1 EMI. Exploration reveals adjacent tiles (which turn grey). Mountain tiles reveal a larger area (The size differs depending on the mounting type) B. Energy Management (EMI) Start: You begin the event with 500 EMI. Automatic Recharge: You receive 100 EMI every 2 hours and 25 minutes (2h25). Cap: The maximum cumulable is 1000 EMI. Any energy recharged beyond this cap is lost. Total Energy : 2,500 / player, or 75,000 energy for an alliance of 30 players. Find the energy respawn information here: V. Hero Management You must return to the Base Camp to change your team or replenish your items. A. Damage and Persistence Permanent Damage: 40% of the damage received during a fight becomes permanent (grey bar) and cannot be healed. HP Carry-over: The remaining HP (the green part) at the end of a fight is what the hero will start the next fight with. Minion Penalty: Heroes using Minions suffer 250% additional damage! Overheal: Disabled. It acts as a standard heal. Lost Hero: Any hero defeated at the end of a fight is lost for the rest of the event. Resurrection: You can bring a hero back during the fight with a Resurrection Scroll or a special resurrection skill, but their maximum HP is then permanently reduced by 50%. B. Event Heroes (Bonus) The Plains Hunter, Abyss Hunter, Jungle Hunter and Titan Hunter families benefit from statistical bonuses: Statistical Bonuses (Attack, Defense, HP): Legendary: +40% Epic: +90% Rare: +150% Survival and Skills: These heroes receive a reduction in the amount of permanent damage they suffer in combat. Their special skills are also enhanced, inflicting an additional ailment on all enemies. VI. The Hordes Hordes are composed of monsters of the same color. They are the main renewable source of points for the event. A. Size and Location Horde Size Small Horde (40 monsters): x 10 Medium Horde (100 monsters): x 10 Large Horde (180 monsters): x 10. Location: Difficulty increases as you move away from the Base Camp. The easiest Hordes are in the center, the most difficult toward the periphery. See the example of horde distribution, credit Team VanDamme Access: The Horde tile is limited in access by a single tile. Adjacent tiles are blocked (crossed spears symbol) until it is defeated. Teamwork: Several players can attack simultaneously. A small symbol appears on the square to show the presence of multiple players. It is therefore important to communicate in order not to waste attack energy. B. Attack Hordes Monster distribution by attack: Small horde: 4 attacks of 10 monsters Medium horde: 5 attacks of 20 monsters Large horde: 6 attacks of 30 monsters The battle is in a single wave. Up to 8 monsters visible, replaced until the total is eliminated. Attack Cost: The cost starts at 10 EMI. Each renewed attack by the same player increases the cost by 5 additional EMI (up to a maximum of 75 EMI). Time Limit: You have a maximum of 10 minutes per combat. Damage / Items: Hordes cause permanent damage. Battle items are allowed. Reward: You receive a season level type reward. Combat Points: Points are awarded. Hordes have a good chance of dropping the keys for Relic Chests. The total score is based on two key factors: a base point value determined by difficulty and a speed bonus. Base Points by Difficulty Small Horde: 6,520 points per wave (totaling 26,080 points over 4 waves). Medium Horde: 13,040 points per wave (totaling 65,200 points over 5 waves). Large Horde: 19,560 points per wave (totaling 117,360 points over 6 waves). Time Bonus In addition to the base points, a Time Bonus is applied. Your score increases based on your execution speed: the faster you clear a wave, the higher the bonus points awarded. Respawn (Repop): A defeated Horde is replaced after 12 hours (countdown displayed on the skull). C. Scoring & Economy Statregy Scoring Strategy Base Points: Every Horde awards points upon defeat. Focus on larger Hordes to maximize the points granted per kill. Speed Bonus: Speed is critical. A significant multiplier is applied based on how quickly the fight is completed. High Frequency: To maximize your ranking, aim to defeat Hordes both rapidly and repeatedly. Energy Economy The Increment Rule: Attack costs rise quickly (+5 EMI per strike). Efficiency: Limit individual strikes on a single target. It is more cost-effective to rotate attacks with other players to reset or offset rising costs. Sustainability: Prioritize taking turns to ensure everyone stays within the lower-cost brackets. Tactical Coordination Communication is Key: Avoid "blind" simultaneous assaults. The Finishing Blow Risk: If two players land the final hit at the same time, only the fastest player receives the points. Waste Prevention: Poor coordination leads to "ghost hits" where the second player spends their energy for zero reward. Always announce your targets. Discover [the strategy of the top 100 alliances]() by Alexa VII. The Apex The Apex are similar to Titans, unique and powerful. There are 10 Apex on the map (2 of each color), randomly distributed. A. Apex Skills They all possess this passive: 40% extra chance to resist all status effects, mana reductions, and buff dispels. Carapace Kaiju (Holy) – Blade Tail Swipe Deals 100% damage to all enemies. All enemies get -20% attack for 4 turns. The caster gets +40% defense against Special Skills for 4 turns. Passive: +30% defense. Megalocroco (Nature) Deals 100% damage to all enemies. All enemies get -10% mana generation for 4 turns. The caster gets +19% mana generation for 4 turns. Passive: +30% attack Bat Dragon (Dark) – Dragon Claws Deals 100% damage to all enemies. All enemies get -26% accuracy for 4 turns. The caster resists new negative mana effects for 4 turns. Passive: +30% chance to dodge Special Skill damage Behemoth Frog (Ice) – Venom Slash Deals 100% damage to all enemies. All enemies receive 584 Poison damage over 4 turns. The caster gets +26% defense for 4 turns. Passive: +30% HP Brimstone Brut (Fire) – Vockfall Bash Deals 100% damage to all enemies. All enemies get -20% defense for 4 turns. The caster is immune to new status ailments for 4 turns. Passive: +30% defense B. Attacking the Apex Access: The access tile is unique, adjacent tiles being blocked by "crossed spears" until the Apex is defeated. Difficulty: Symbolized by stars (1* to 3*). The island's difficulty category determines the Apex' HP. Quantity: 10 Apex are spread across the map regardless of the difficulty mode: 2 x Apex 1 3 x Apex 2 5 x Apex 3 The Apex colors are evenly distributed, with 2 of each color. Unique: Each Apex can be defeated only once. Attack Cost: The cost starts at 10 EMI. Each renewed attack by the same player increases the cost by +10 EMI. Time: You have 1 minute and 30 seconds of combat. Weak Point: Weak point present, allowing damage to be doubled when a tile lands on this weak point. Damage / Items: The damage dealt by the Apex to your heroes is permanent. Battle items are allowed. C. Apex HP They are rated by stars and vary in size depending on the difficulty level your alliance is ranked in. EASY mode 1 : 264 000 HP 2 : 420 000 HP 3 : 804 000 HP MEDIUM mode 1 : 2 : 3 : HARD mode 1 : 792 000 HP 2 : 1 684 000 HP 3 : 2 556 000 HP VERY HARD mode 1 : 1 387 500 HP 2 : 2 973 750 HP 3 : 4 537 500 HP D. Points and Strategies Damage Points: You score 0.25 point per damage dealt (1 point per 4 damage). Final Bonus: Fully defeating the Apex grants a bonus of 200,000 points. Reward: there is no individual reward either after each hit or when the apex is defeated. Energy Economy Strategies: To save energy (EMI), the alliance must aim to: Minimize the total number of attacks required to defeat the Apex. Minimize the number of attacks performed by a single player to avoid the increasing cost. Discover the strategy of the top 100 alliances: VIII. Chests There are 2 types of chests: the Relic Chest and the Treasure Chest. They are opened using specific keys obtained by fighting Hordes and Apex. To open a chest, you must move to its location. A. Relic Chests Number: 10 Content: Enhancement Relics that all heroes of the players used on the island benefit from immediately. Alliance Bonuses (Cumulative): Attack power: +25% Defense: +25% Critical: 50% Recovery amount (Heals): 5% Mana generation: 5% Accumulated attack power (up to 10 times): 5% Special skill power: 25% Melee damage to an enemy with an advantage: 50% Damage reduction: -20% Evasion: 20% Mana restored each turn (at 50% HP or less): 5% Mana recovery with each Special Skill activation: 5% HP recovery with each Special Skill activation: +5% Counterattack: 30% Strategy: It is crucial to open these chests as early as possible to quickly benefit from the advantages and facilitate fights against Hordes and Apex. B. Treasure Chests Number: 50 Content: Rewards that will be distributed to all players in the alliance who participated in the event. Distribution: The reward is identical for each player and is obtained at the end of the event. IX. Rankings and Rewards There are two categories of rewards: Alliance Ranking: Earnings are determined by your alliance's final rank within its difficulty category. Treasure Chests: These rewards are distributed evenly. Every active alliance player on the island receives the exact same loot. Check out the ranking statistics with @ Crazychemist : Find the Monster Island top 100 strategy by Alexia (7D): X. Summoning Portal Summoning Cost 1 Summon: 350 gems or 100 MI tokens 10 Summons: 3000 gems 30 Summons: 8400 gems Each summon in the portal credits a summoning chest. Every 10 summons, the retrieved chest grants rewards. You can only obtain a maximum of 20 chests per session. Appearance Rates The heroes available in this portal are: the heroes from the Monster Island families Season 1 heroes without costume.
-
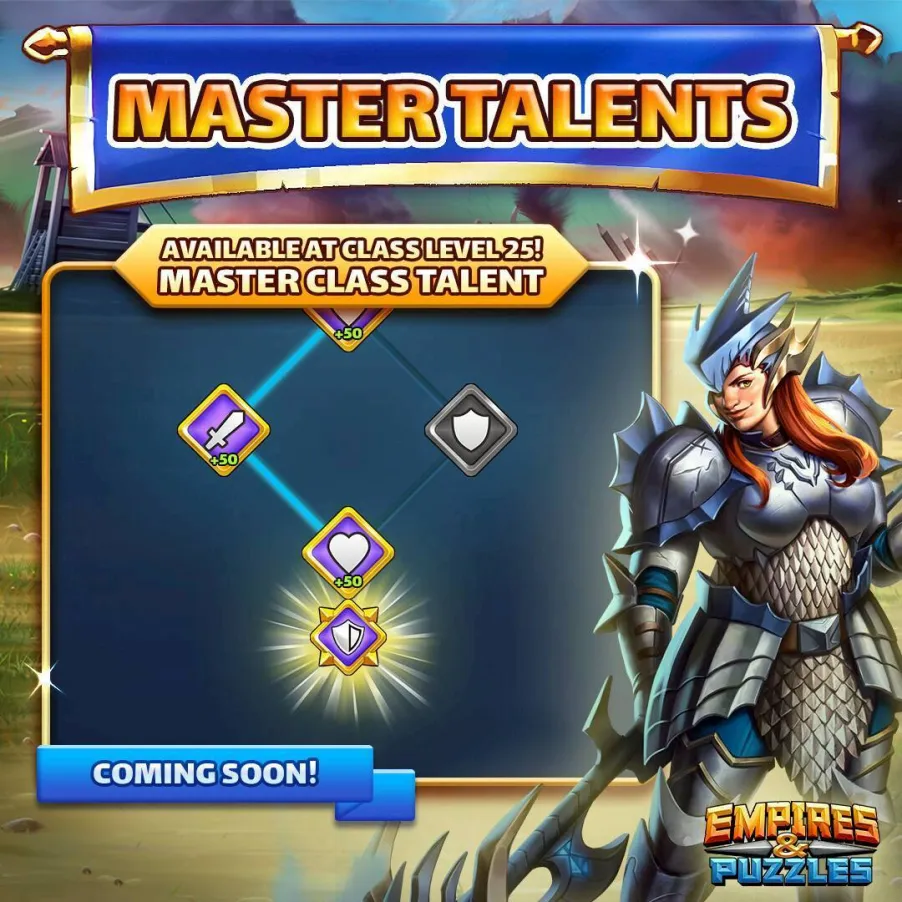
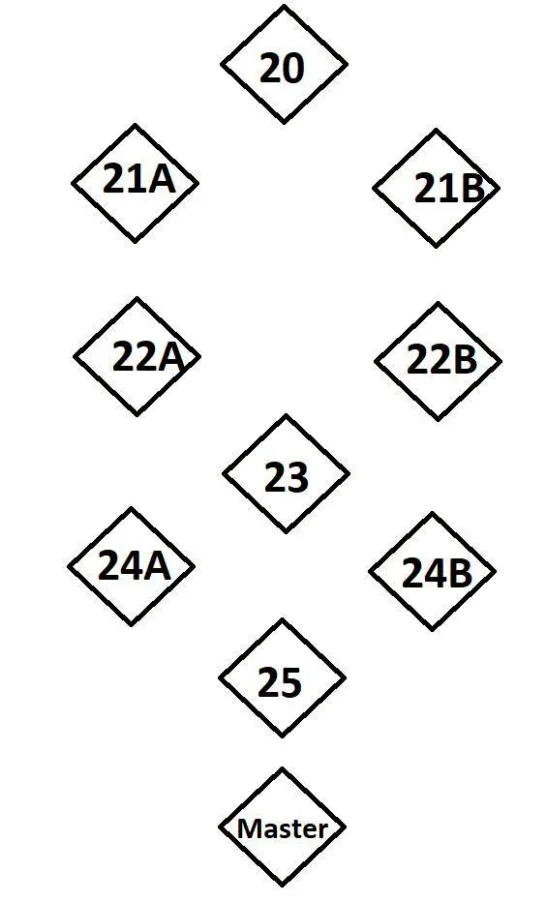
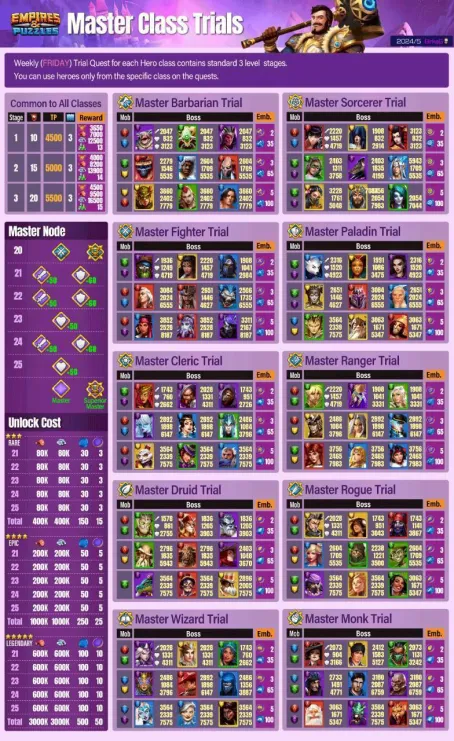
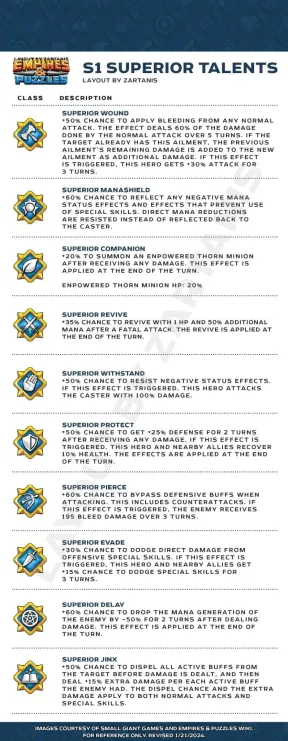
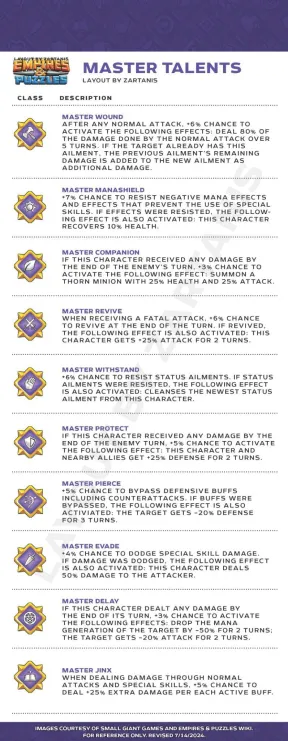
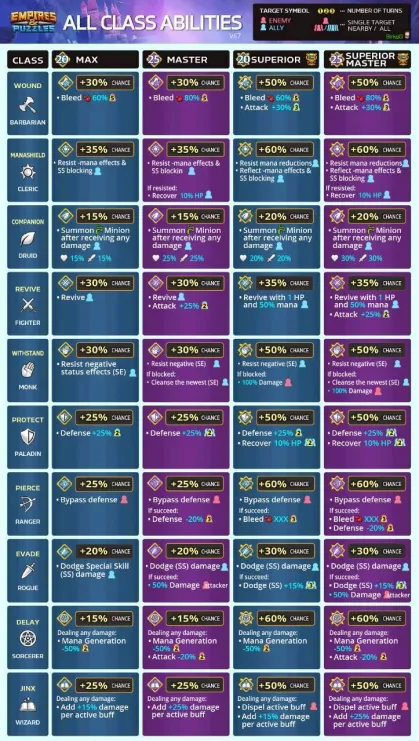
 Master information thread for the Master Emblems, Master Talents, Superior Master Talents Emblems The emblem is a resource that allows you to strengthen a hero's statistics and grant them an ability linked to their class. The cost of evolution in resources increases as the levels progress. This Subject will be developed later Master Talents / Superior Talents Master Emblems can be used to further emblem your heroes with 5 additional levels, which is unlocked if your hero is already has 20 emblems. There is a specific Master Emblem for each existing Hero class. Master Emblem nodes can be substituted by a single Golden Emblem like the normal talent nodes. Similarly to Golden Emblems, Master Class Emblems will not be returned when the Talent Grid is reset. The new talent nodes give Stat boost, and when you reach the 25th node, then your non season 1 hero will get a Master Talent, and Season 1 heroes are getting Superior Master Talent. See the desripton of these Master and Superior Master Talents in the next sections. Master Talent Layout Here is the Layout for Master Talent nodes. Master Talent Node Costs Each new talent node gives these stat boosts at the bellow cost. Each node cost food, iron and class specific Emblems and Master Emblems for the specific class. Rarity Node / Stat Boost / Food Cost / Iron Cost / Emblem Cost / Master Emblem Cost Common Uncommon Rare Epic Legendary Master Talents and Superior Master Talents When a Season 1 heroes and costumes receive his/her 25th Talent node, then that hero gets the Superior Master Talent while other heroes get Master Talent Talent skill description details Barbarian Cleric Druid Fighter Monk Paladin Ranger Rogue Master Class Trials and other Master Emblem sources Master Emblems can be acquired from Master Class Trial Quest. These trials are standard 3 level Quests. Each level can be played once. There is a Master Trial Quest for each Hero class. So there are 10 variations. You can use heroes only from the specific class on the quests. There is no further limitation. Prediction quest rotation Barbarian > Fighter > Cleric > Druid > Wizard > Sorcerer > Paladin > Ranger > Rogue > Monk (05/2024) Season 1 heroes by class for superior talent Barbarian Cleric Druid Fighter Monk Paladin Ranger Rogue Sorcerer Wizard GUIDES Guides by Zartanis, BirksG
-
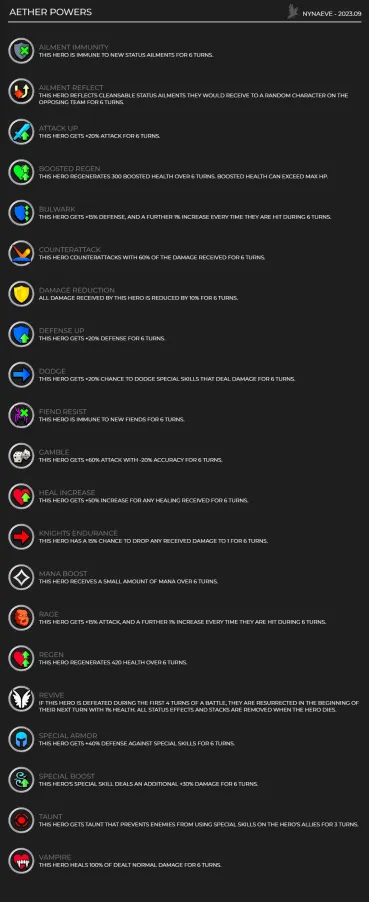
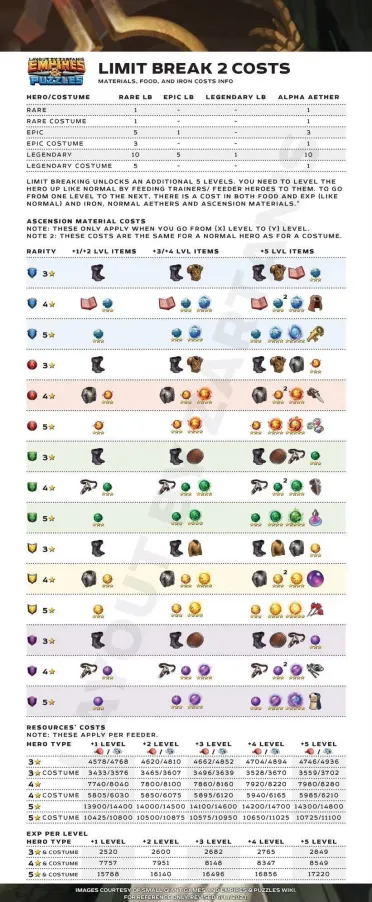
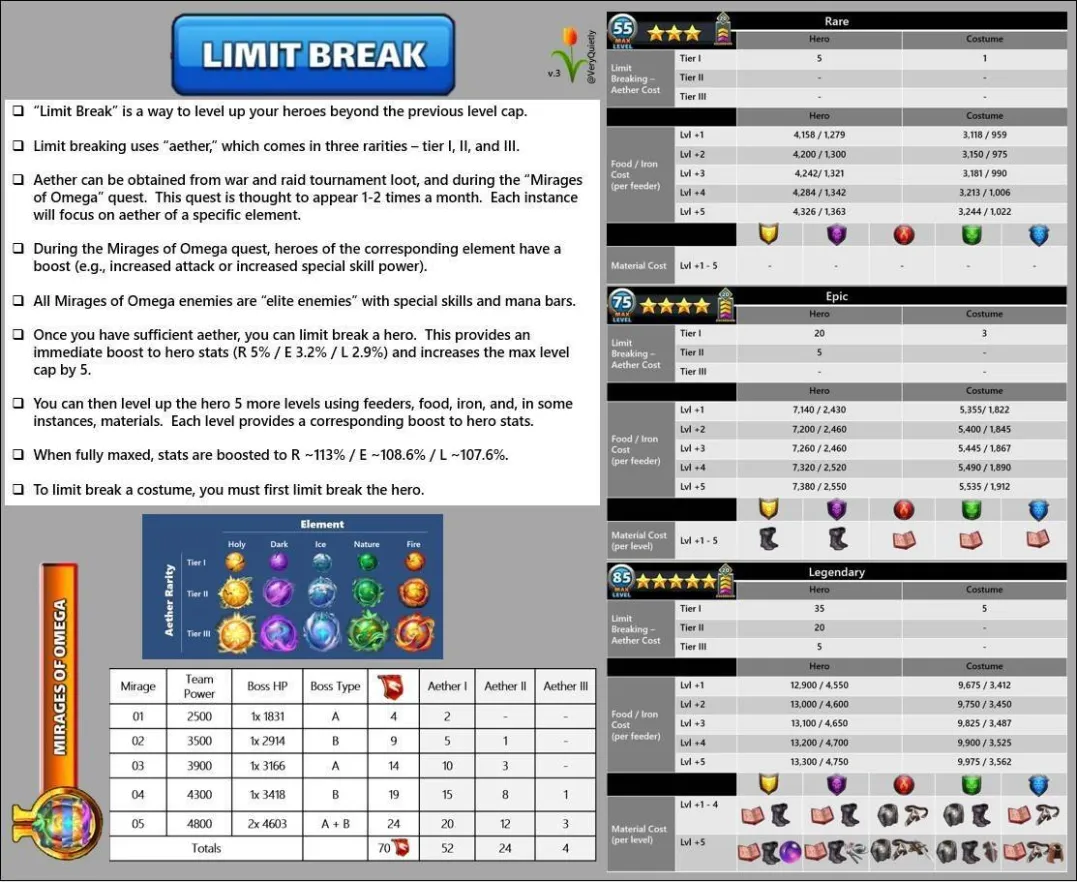
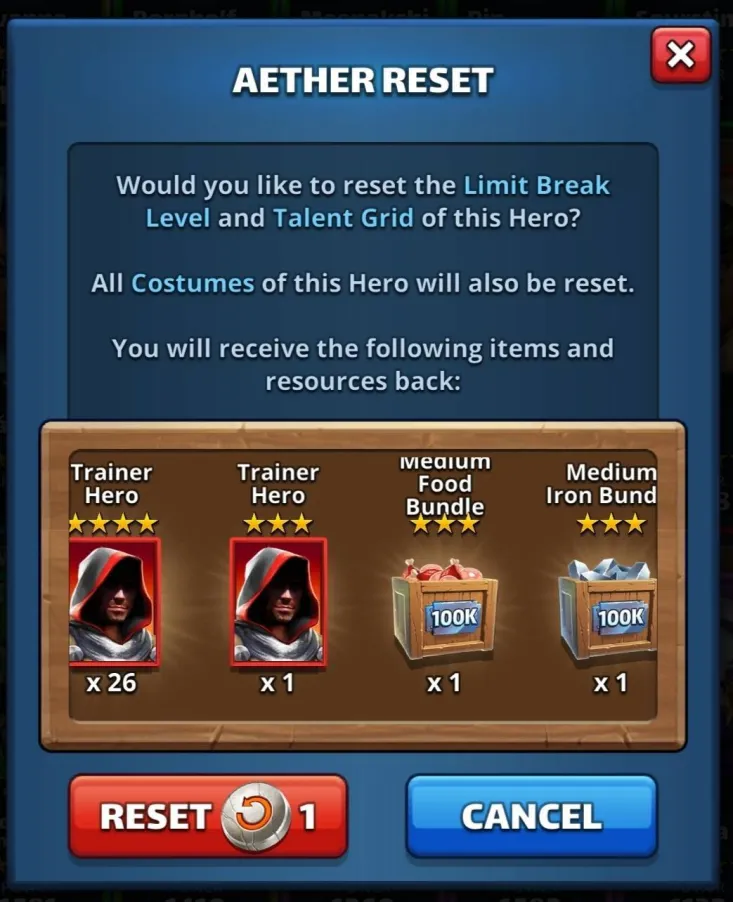
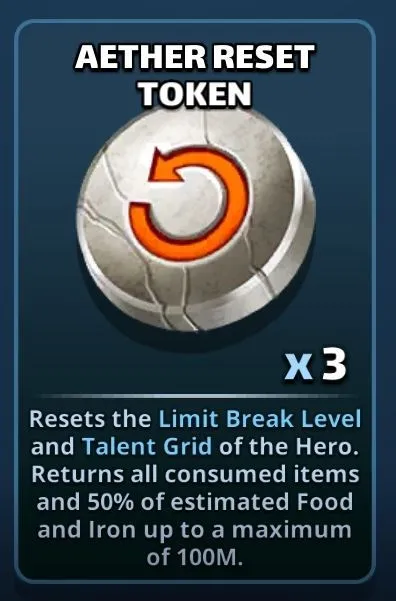
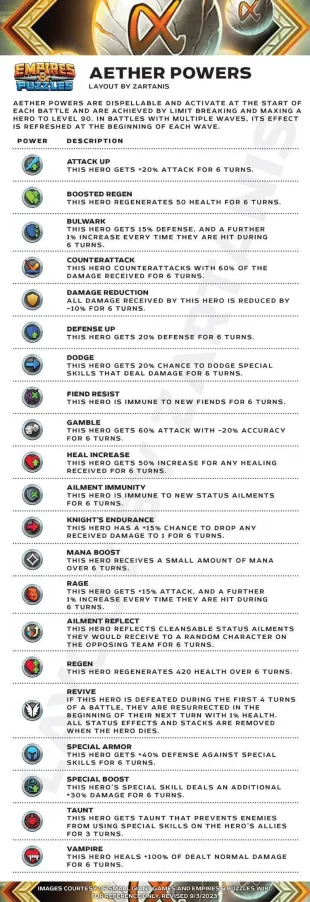
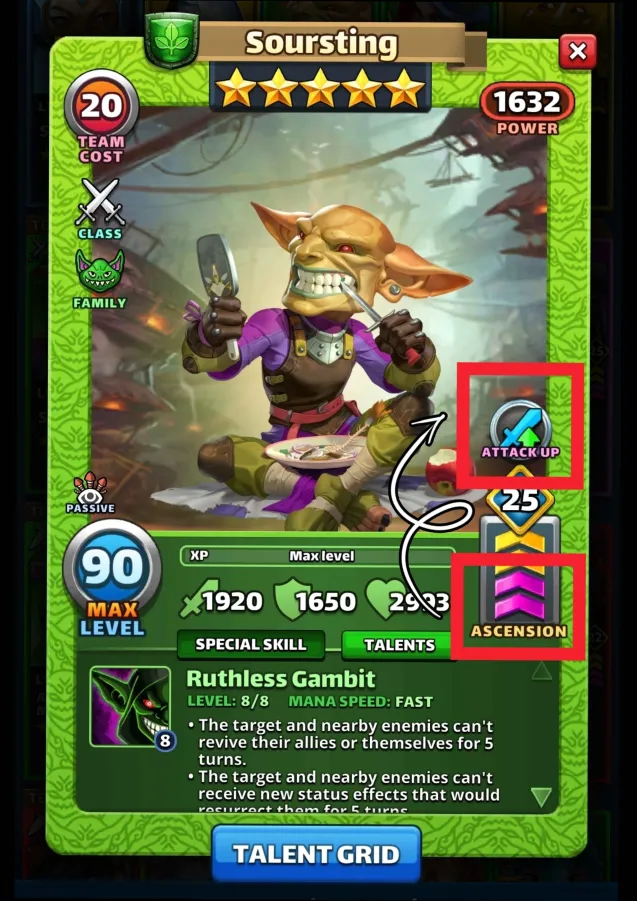
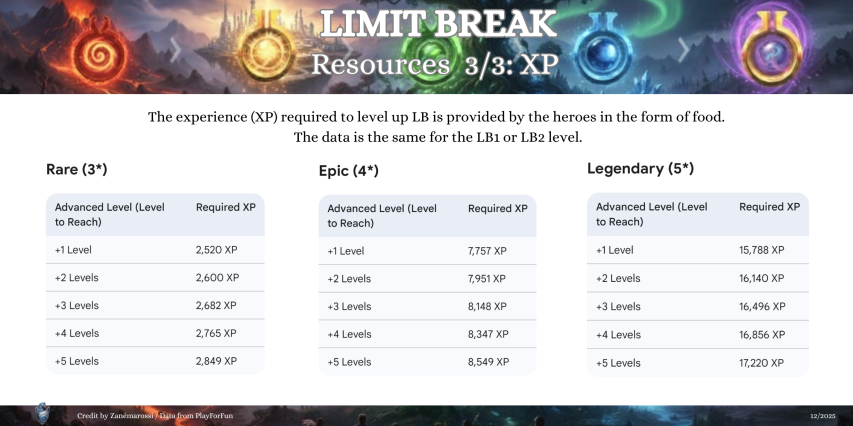
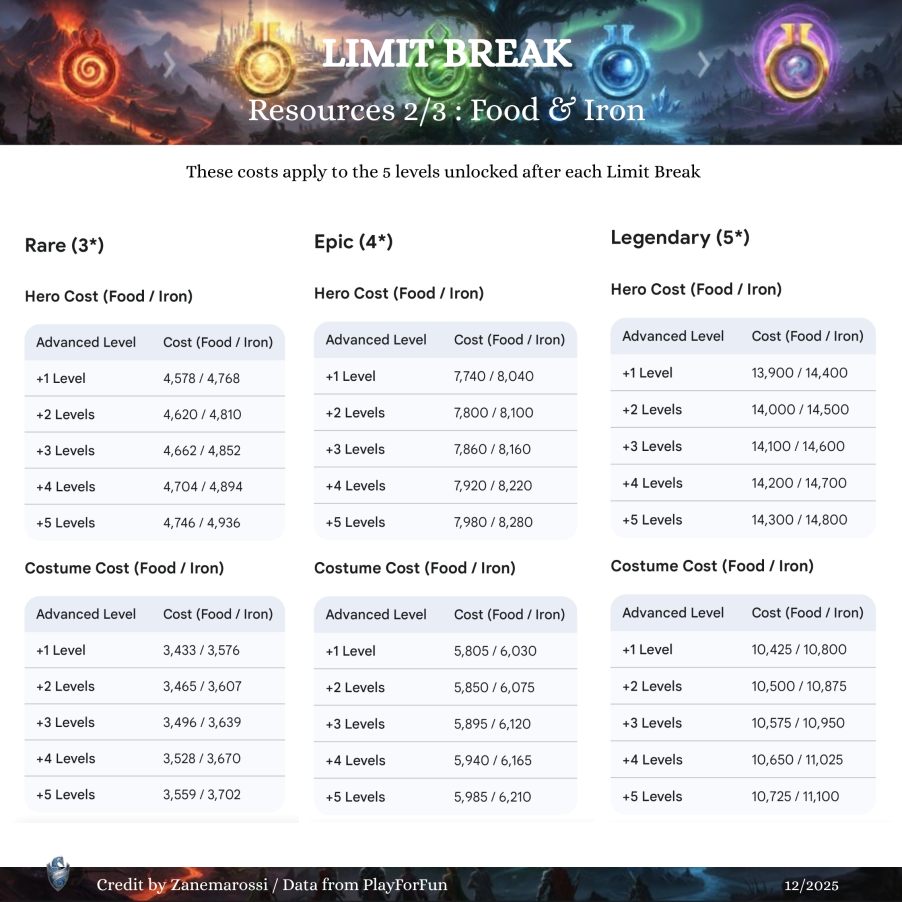
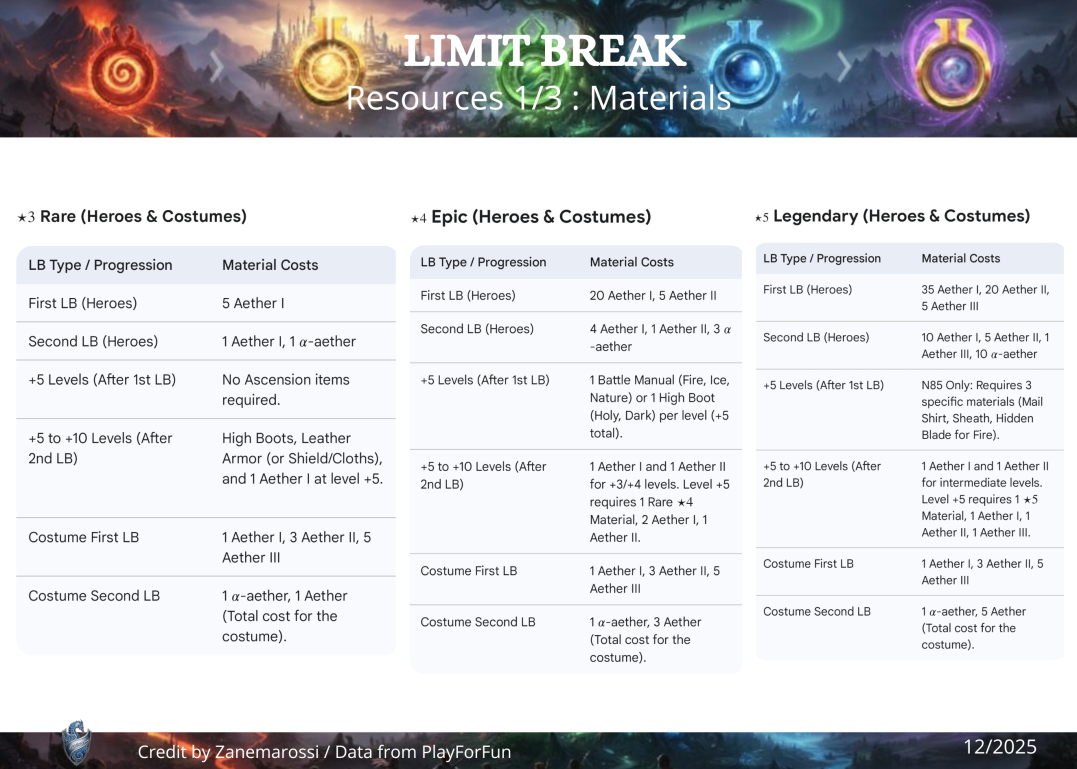
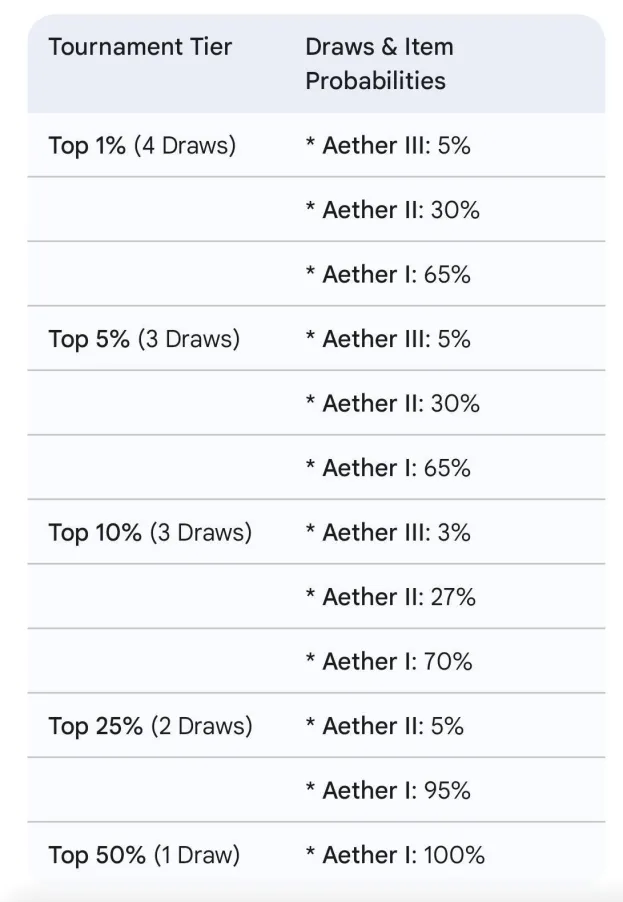
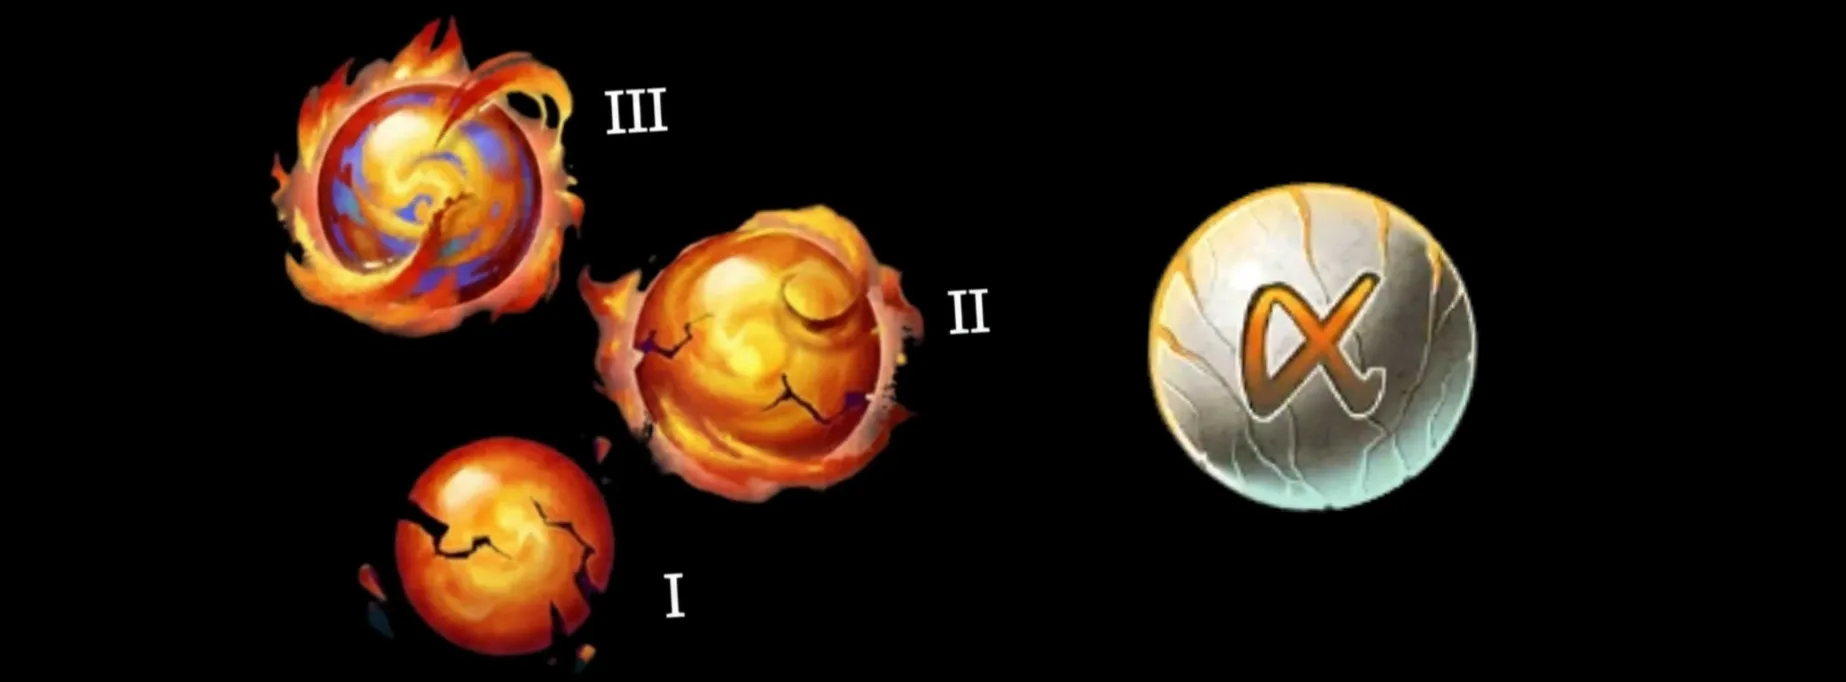
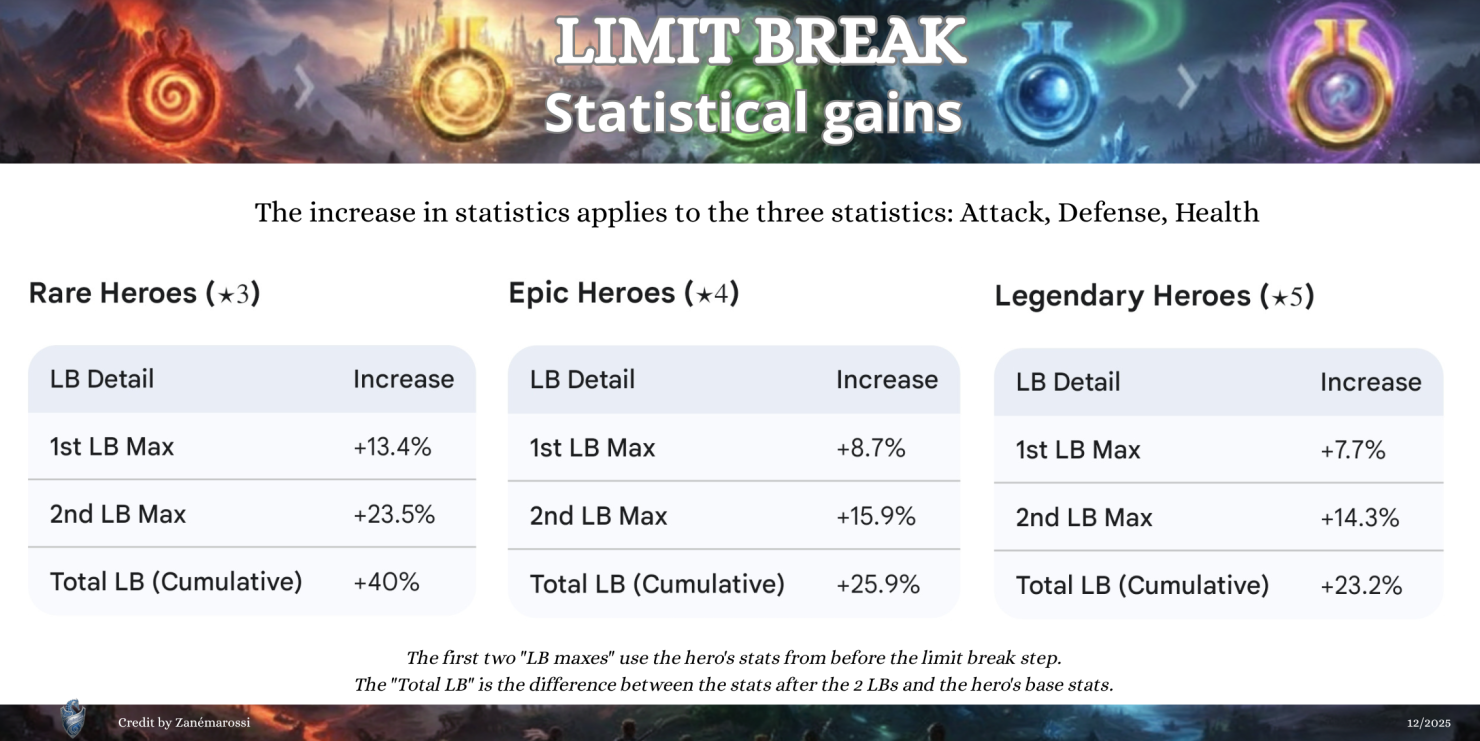
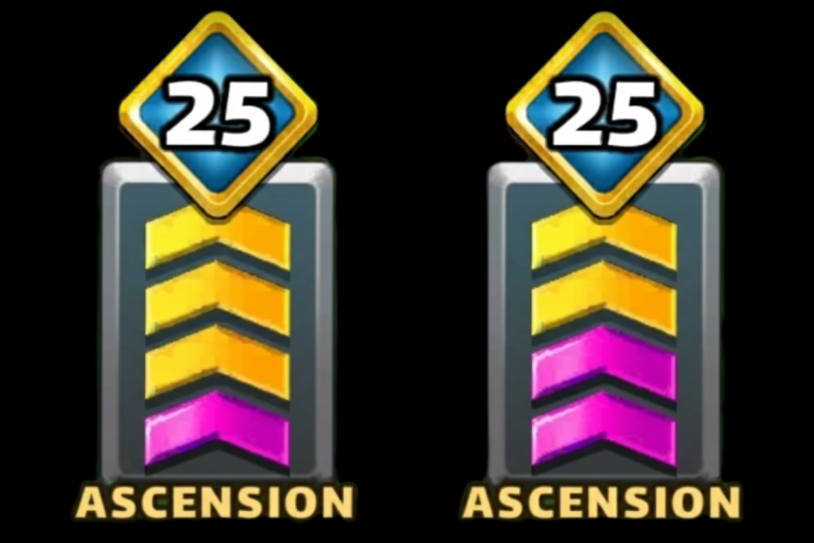
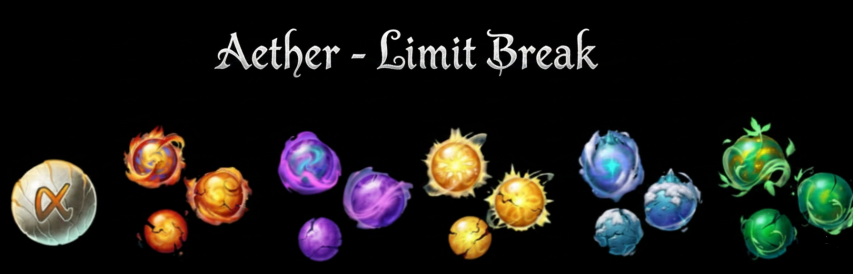
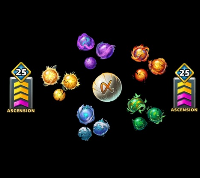
This overview details Hero enhancements allowing them to progress beyond their usual maximum level (Rare: level 50, Epic: level 70, Legendary: level 80). Last updated: June 10, 2023. Table of Content 1. Overwiew Limit Break 2. Limit Break Costs 3. Evolution Tomes 4. Aether Power 5. Ether Reset Token 6. Playlist Videos 7. Other Document 1. Overview Limit Break The feature was introduced in June 2021. The Second Limit Break, introduced in March 2023, unlocks the new passive skill "Aether Power". A. How Limit Break Works Using Ether materials unlocks the hero's maximum level. It is symbolized by a pink tier. Each Limit Break unlocks 5 additional levels. Post-unlock: The hero must be trained as usual, but requires Iron and Ascension/Improvement Materials in addition to food and EXP. Note: Certain Evolution Tomes allow you to save on some items or resources. See the relevant chapter. The LB allows for a stat increase for the hero. The total increase applies to all three stats (Attack, Defense & HP). At the 2nd LB, the Ether Power function is unlocked at the maximum level. It grants a skill bonus for 6 turns for the hero. B. Ether Materials There are three tiers of Ether for each Element : Aether I, Aether II, Aether III. Alpha Aether is a material required only for the second LB. Aethers must match the hero's attribute (element). C. Obtaining Ethers Aether can be obtained via: Omega Mirage Quest Aether Summon Raid Tournament ranking rewards. Alliance War Chest Participation in the War Chest of a minimum of 80% guarantees the obtaining of 2 Alpha Aether. Rare Quest Chests (Elemental) 2 Alpha Aether are guaranteed. Titans On Bounty Titans, achieving Rank C gives a chance to obtain an Alpha Aether as extra rewards: 3 rolls on Classic Titans, 4 rolls on Rare Titans Mystic Vision Dragon Delivery (Probabilities by delivery level). According to [MrChief's Infographic] Aether Chest Hero (Quest and Season Rewards Probabilities) Alpha Ether: 0.01% AE I: 0.9% AE II: 0.4% AE III: 0.03% Various Path of Giants Chests, Valor Chests, Summon Gate Chests, Event Rewards, etc. 2. Limit Break (LB) Costs A. Material Costs B. Food/Iron Costs These costs apply to the 5 levels unlocked after each Limit Break. C. XP Costs The experience (EXP) required to progress from one level to the next in the +5 advanced levels after Limit Break is: D. Others documents . 3. Evolution Tomes Evolution Tomes, whether specific or not, allow your heroes to gain levels while saving basic resources (Food, Iron, and Experience). Epic Experience Tome Advantage: Adds 1 level to the hero. Note: This Tome is less effective after Limit Break, as it normally adds 5 levels for a hero. Legendary Experience Tome Advantage: Adds 5 levels to the hero. Note: This Tome is less effective after Limit Break, as it normally adds 80 levels for a classic hero. Limit Break Tome I Advantage: Allows the hero to pass the First Limit, moving them to the first post-LB evolution stage, without requiring Ether materials or other ascension costs. Major Type (Element) Experience Tome Advantage: Adds 5 levels for a hero of the corresponding element. 4. Aether Power (Unlocked after 2nd LB max) All Aether powers are dispellable and activate at the start of the battle after a hero has reached level 90 and Aether level 10. In battles with multiple waves, its effect is applied from the beginning of the first wave. Aether Power is a passive skill that activates for 6 turns at the start of every battle. Power & Description Defense & Damage Mitigation 1. Bulwark: Gains +15% defense, with additional defense stacking over 6 turns. 2. Defense Up: Gains +20% defense for 6 turns. 3. Special Armor: Gains +30% defense against special skills for 6 turns. 4. Damage Reduction: Reduces all incoming damage by 10% for 6 turns. 5. Knight’s Endurance: 30% chance to reduce received damage to 1 for 6 turns. 6. Dodge: 20% chance to dodge special skill damage for 6 turns. Control & Protection 1. Taunt: Forces enemies to target this hero with special skills, protecting allies for 3 turns. 2. Fiend Resist: Immune to new fiends for 6 turns. 3. Ailment Immunity: Immune to new status ailments for 6 turns. 4. Ailment Reflect: Reflects cleanseable status ailments back to enemies for 6 turns. Survivability & Recovery 1. Regen: Regenerates 420 HP over 6 turns. 2. Heal Increase: Receives +50% healing from all sources for 6 turns. 3. Vampirism: Heals 100% of normal attack damage dealt for 6 turns. 4. Revive: If defeated within the first 4 turns, revives with 1 HP (all effects removed). Offense & Counter Pressure 1. Counterattack: Counterattacks for 60% of damage received for 6 turns. 2. Rage: Gains +15% attack, with additional attack stacking over 6 turns. 3. Gamble: Gains +50% attack with -20% accuracy for 6 turns. 4. Special Boost: Special skill deals +30% damage for 6 turns. Utility Mana Boost: Gains a small amount of mana over 6 turns. Infographic by Zartanis Nynaeve . 5. Arther Reset Token The Aether Reset Token is an extremely rare item that allows you to completely undo a Hero's progression. Reset Functionality This token acts similarly to the Talent Reset Emblem: It completely reverses the Hero's progression. It resets their Limit Break levels and their Talent Grid. Items Restored When used, the token restores: All items consumed during power-up (Aethers, Emblems, etc.). 50% of the Food and Iron spent (with a cap of 100 million). The Trainer Heroes consumed. Availability This token is not available in the game as a reward or in offers. Three copies were distributed to players in May 2023 to compensate for a major imbalance that occurred during Update 58. It may be granted exceptionally on an individual basis as compensation for a hero significantly modified by the developers after release.
-
21. Occurence ...
-
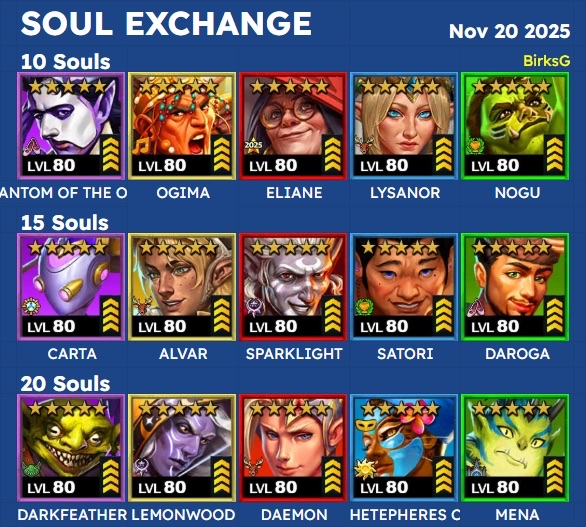
11. Occurence 12. Occurence 13. Occurence 14. Occurence 15. Occurence Quick Takes from Dom Phantom of the Opera (TP 955): Dated but serviceable hit-3. Consider only if you want an offensive dancer (e.g., countering Gooric). Ogima (TP 837): Once the best minion killer, now outdated. May be worth keeping for a future costume. Eliane (TP 1066): Strong recent HotM. Excellent synergy with burn heroes to accelerate her effect. Lysanor (TP 953): High revive chance, but outdated stats. Nogu (TP 1000): Fast green hitter with bleed; dated but works well in fast green stacks (e.g., Sun Erniang, Pip). Carta (TP 1040): Underrated healer with Silence immunity — surprisingly relevant in today’s meta. Alvar (TP 1084): Newer hero, average-speed hit-all. Solid but unspectacular. Sparklight (TP 977): Black Friday 2023 debut; hit-3, steals buffs/heal, applies burn. Slightly dated but still versatile for events. Satori (TP 982): Average hit-all with conditional double damage vs dispellers/cleansers. Pure hitter—fades quickly.- **Daroga (TP 1022): Fast bleed hitter; great synergy (Sun Erniang, Pip). Top-tier for Mythic Titans due to strong attack stacks Darkfeather (TP 940):Top pick — powerful support hero, great for Titans/Mythic Titans. Excellent heal, growth, and lasting damage buff. Lemonwood (TP 1013): Former meta sniper; damage dropped but mana cut remains handy. Daemon (TP 992): Still elite — very fast dispel and buff/ailment block make him a top Bernadette counter. Hetepheres Costume (TP 1011): Strong percentage healer with blind — great in “veggie” meta. Mena (TP 1049): Fast green hitter with mana cut; decent synergy but fading impact. 16. Occurence Find the selection process proposed by SG for this occurrence : here. 17. Occurence 18. Occurence 19. Occurrence 20. Occurence
-
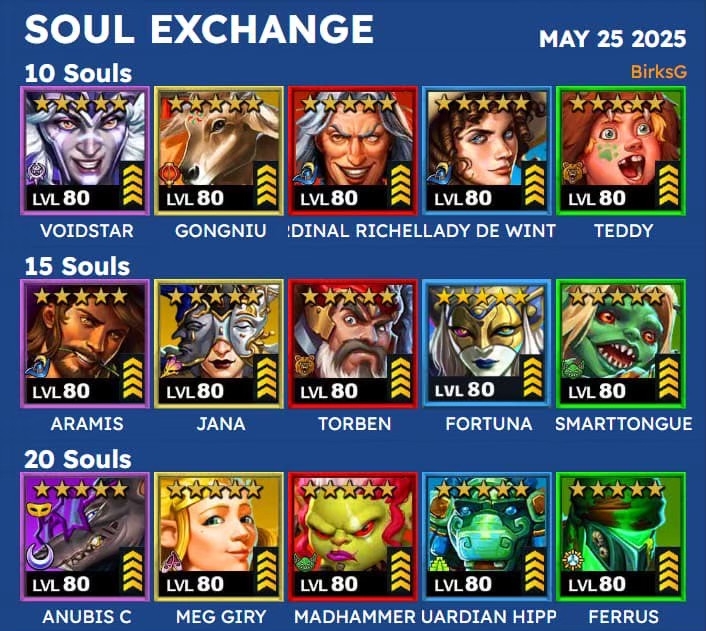
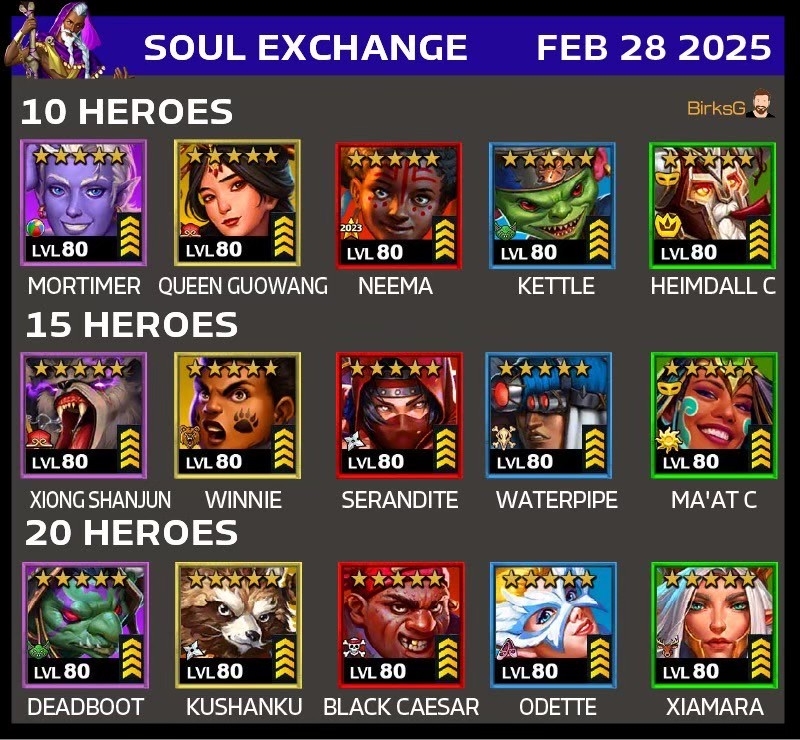
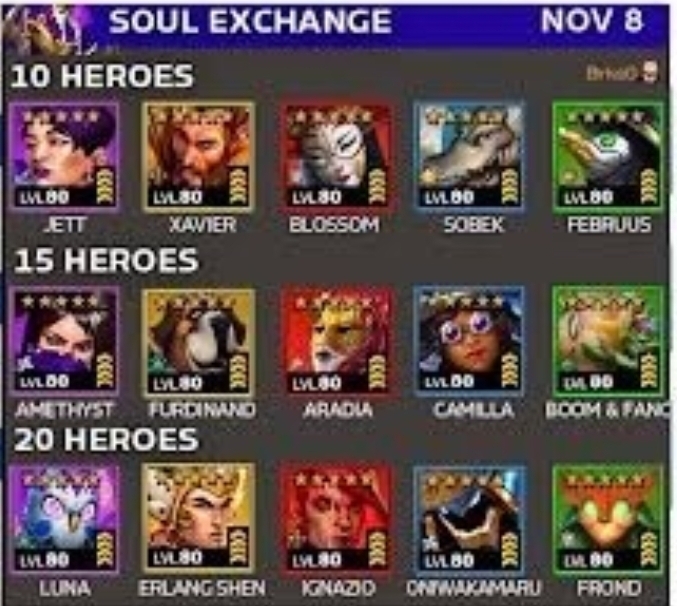
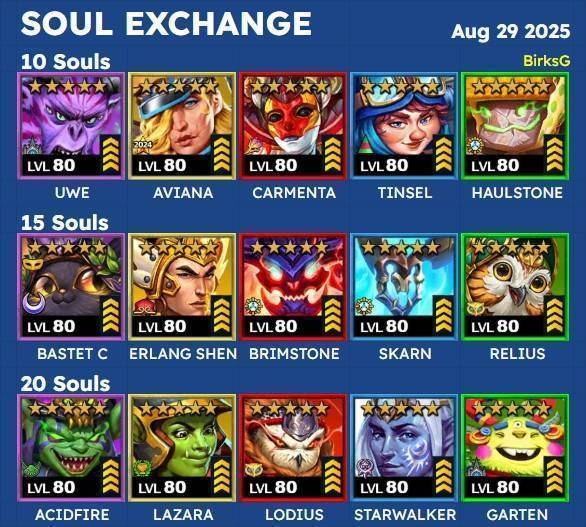
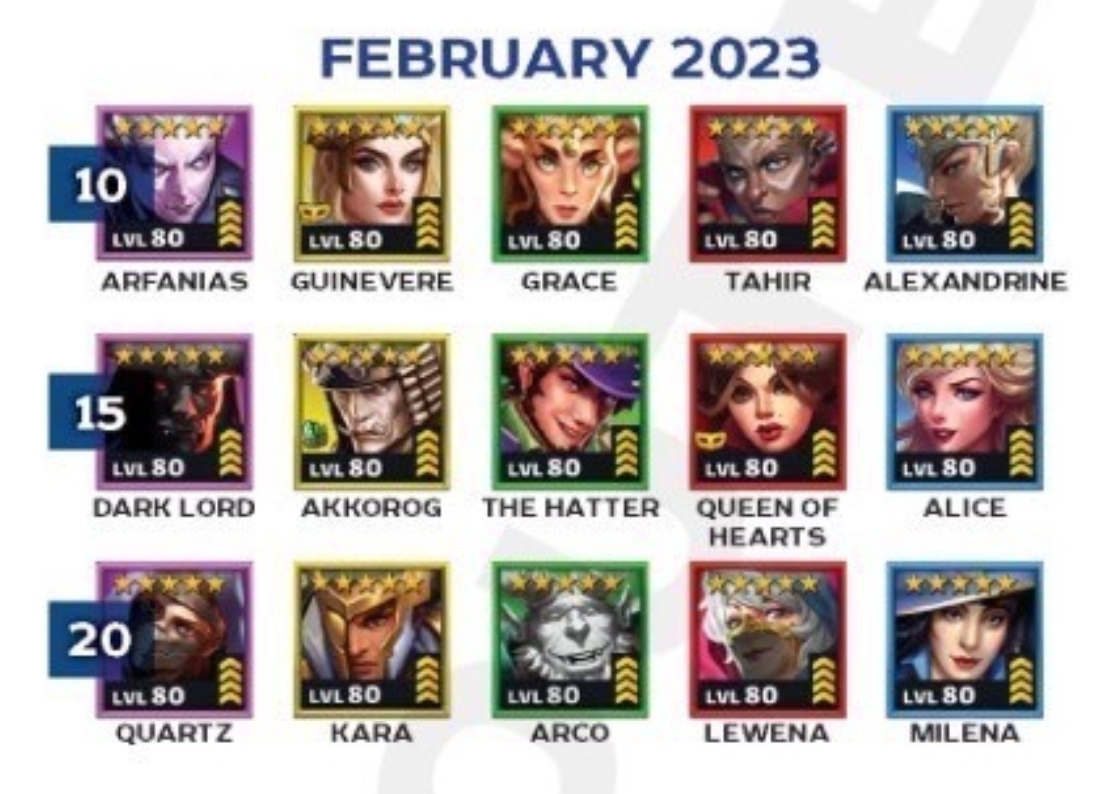
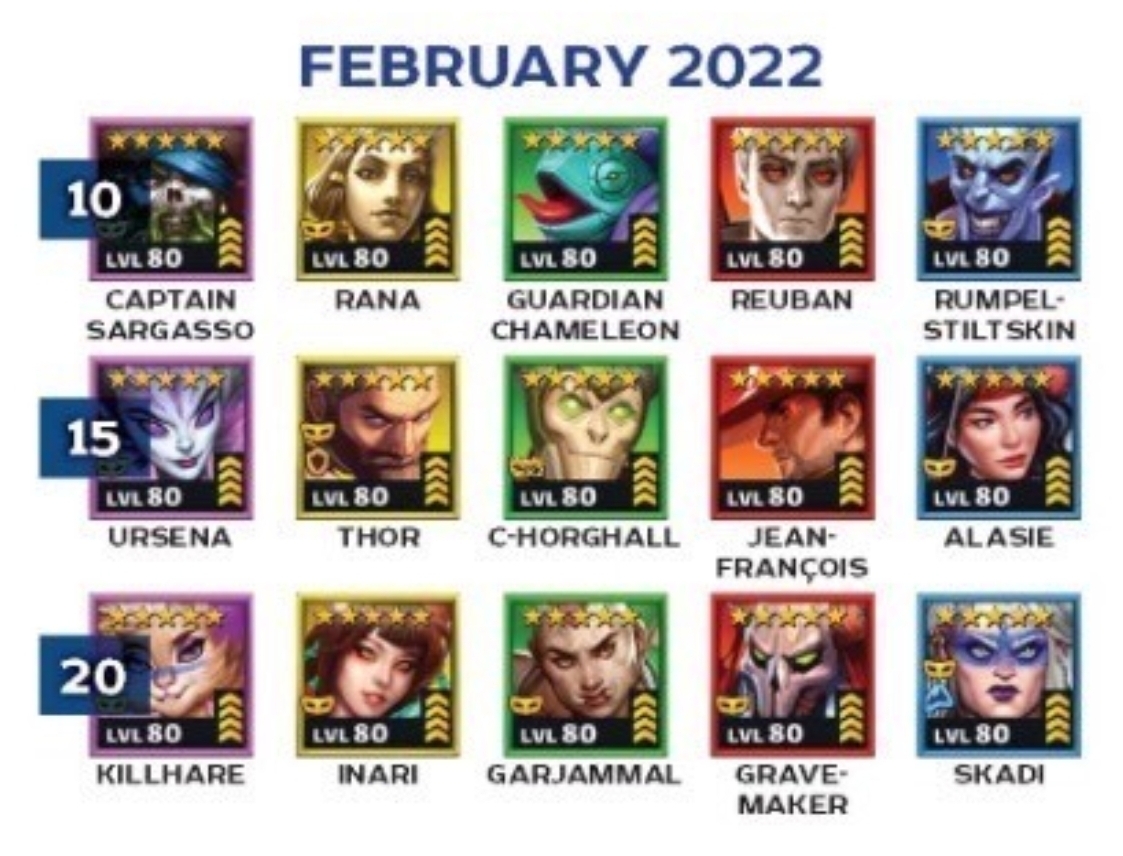
Soul Exchange Overview Purpose *Master discussion & information thread for the Soul Exchange feature, added to Empires and Puzzles in Version 45.* General Info The Soul Exchange {SE} is a feature added to empires and puzzles as an attempt to partially solve the "duplicate hero" issue that most long-term players have. The feature allows you to exchange some of your excess Legendary Heroes {5*} for one from a list of options. The list of heroes is the same for everyone and is split into 3 tiers of "goodness" {or percieved goodness by SGG really}. Each tier costs more "souls" to exchange; 1 soul = 1 hero: Tier 1 = 10 souls Tier 2 = 15 souls Tier 3 = 20 souls How it works! Pretty simple really; the Soul Exchange will appear as a "pop-up" on your Base screen, and remain there for 2 days. 1) Open the Soul Exchange by tapping the pop-up 2) Select the heroes you're trading in. If you select too few, you will be unable to choose the desired hero... vice versa, if you choose too many for the desired hero, you'll be prompted to return to "deselect" a couple of them. 3) Select the hero you want from the list 4) Hit OK & confirm your choices. And that's it! You are now the owner of a level 1-1 copy of the selected hero! Heroes Available Check post below. Some Things to Note Slash answers to common questions. You can only make 1 (ONE) exchange per Soul Exchange... so choose wisely! Yes the list is identical for everyone Yes the Soul Exchange will return down the track {based on SGG's communications}. It's unconfirmed how often but they indicated "a few" times per year (so 3-4 times). SGG also indicated that the heroes available would change each appearance. All heroes received will be at 1-1, regardless of the level of heroes you put INTO the exchange. You will be prompted to confirm an additional time if you have selected a hero which is levelled (partially or fully). You need to have "unlocked" a hero before you can select it in the exchange... Favourited heroes will still be unselectable so no need to worry about accidentally picking your +20 LB'd Alfrike! This can be done from the "selection" screen in the Soul Exchange, so still be a little careful. You will NOT get the costume for a hero unless it specifically states you will get it in the Soul Exchange {Example in #1, it shows Costume Horghall so you get the costume and hero. Rana however does NOT show her costume so you don't get it.} History of Soul Exchanges Excerpt from infographics by Zartanis 1. Occurence 2. Occurence 3. Occurence 4. Occurence 5. Occurence 6. Occurence 7. Occurence 8. Occurence 9. Occurence 10. Occurence
-
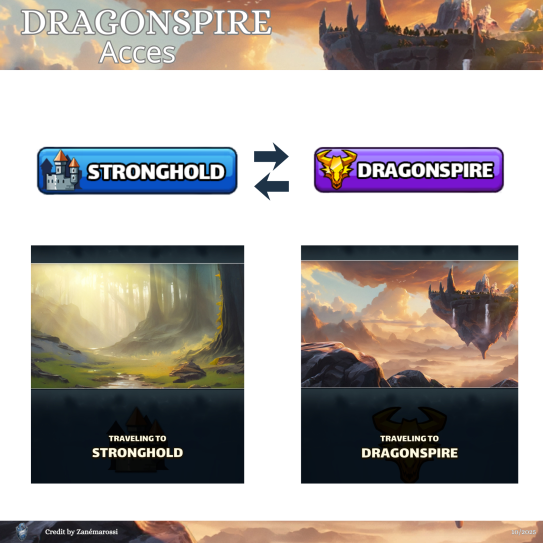
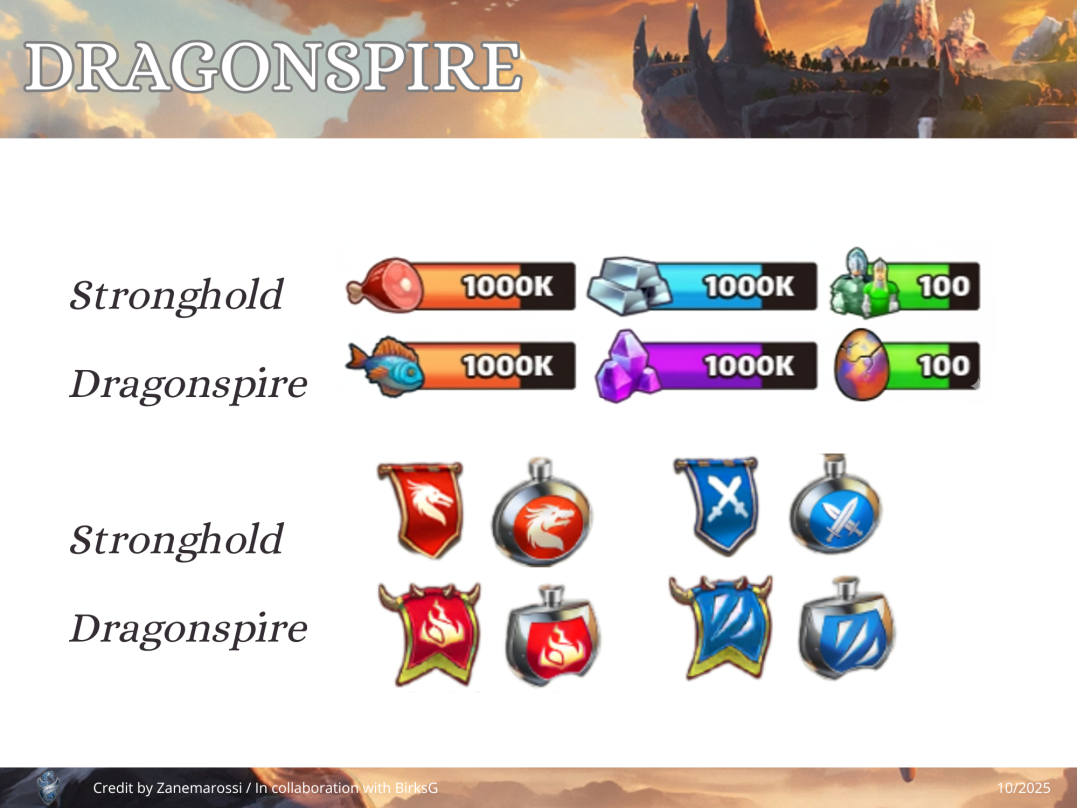
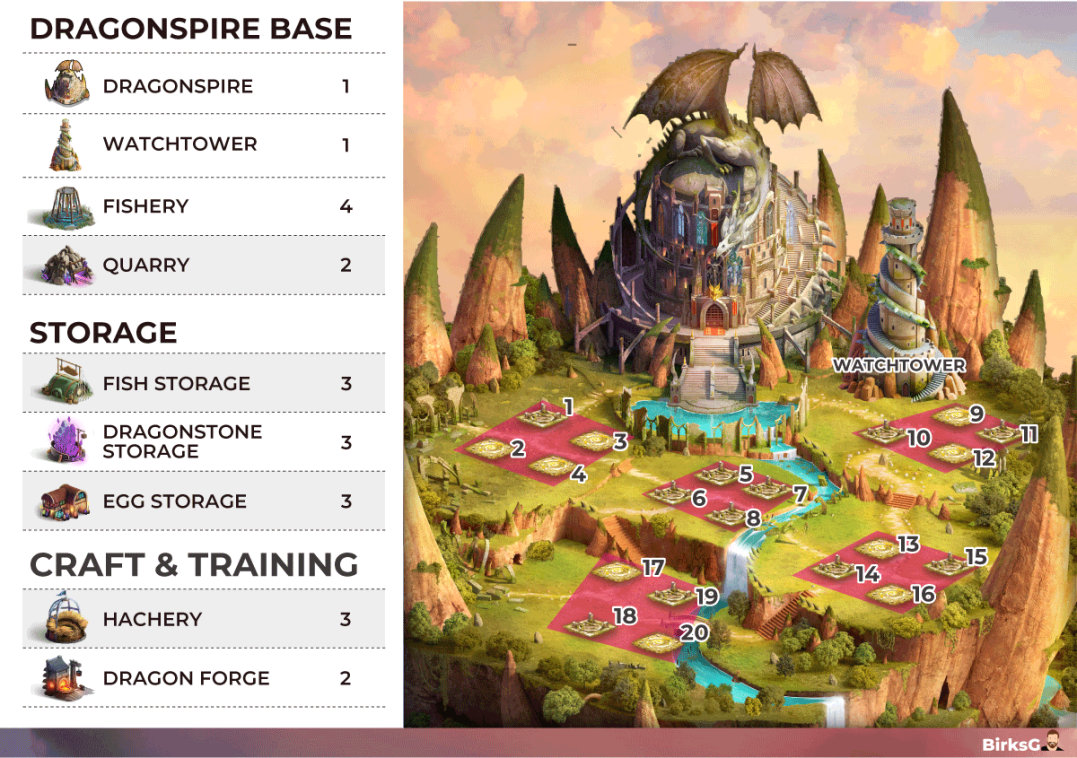
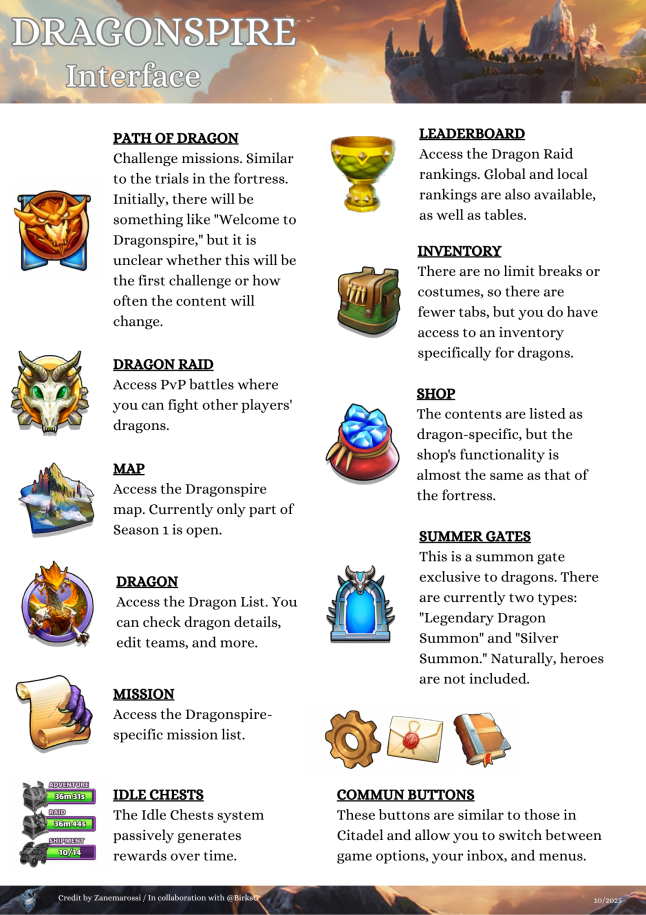
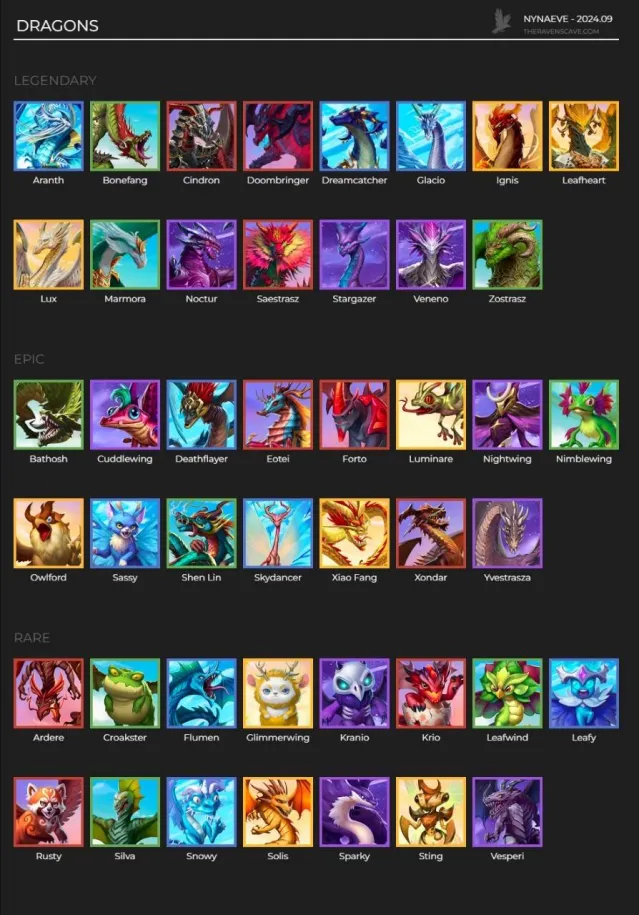
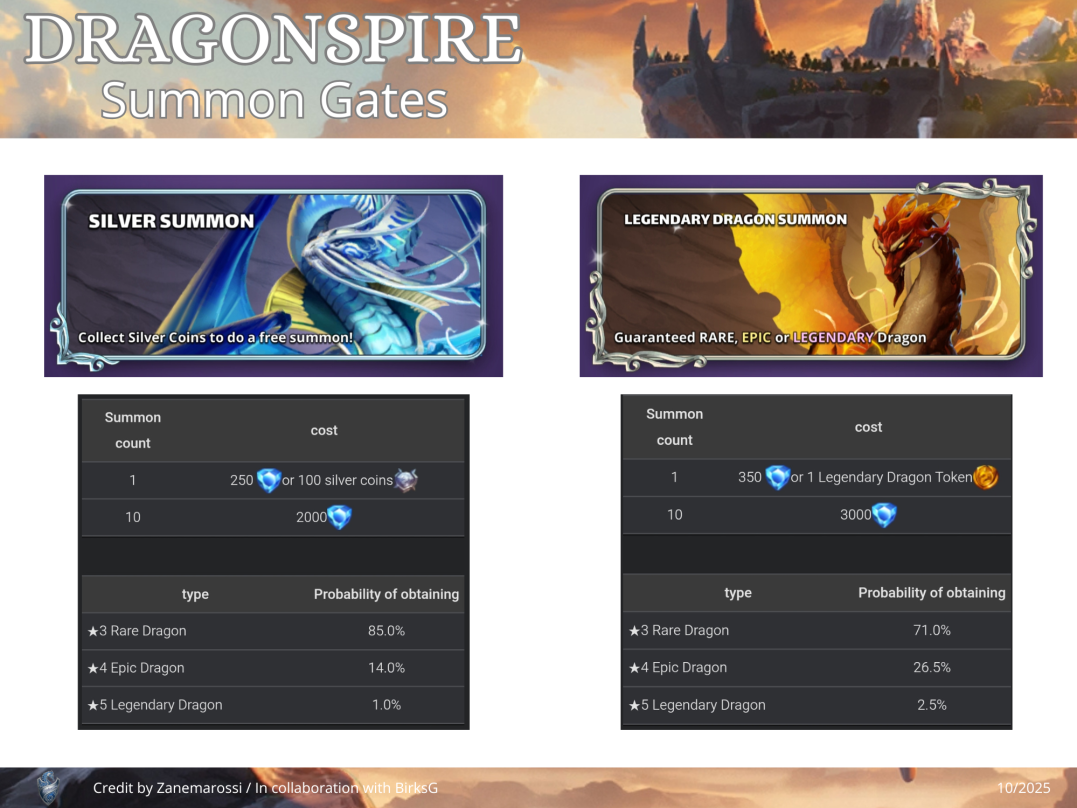
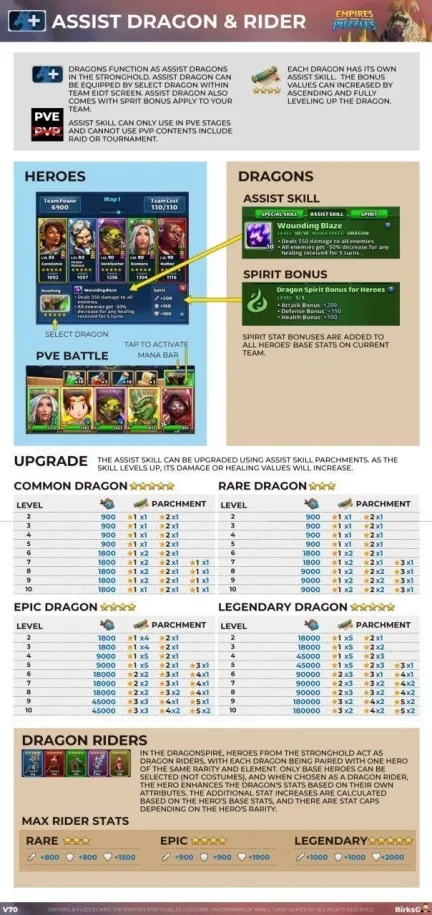
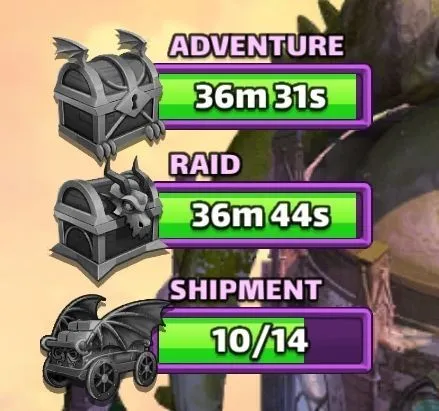
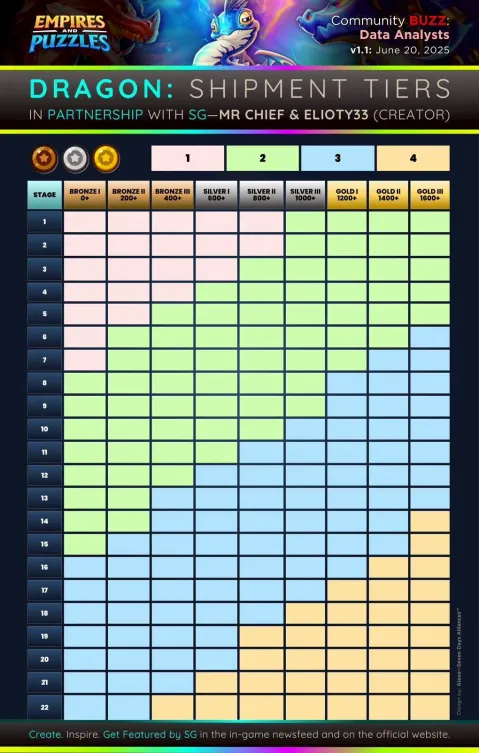
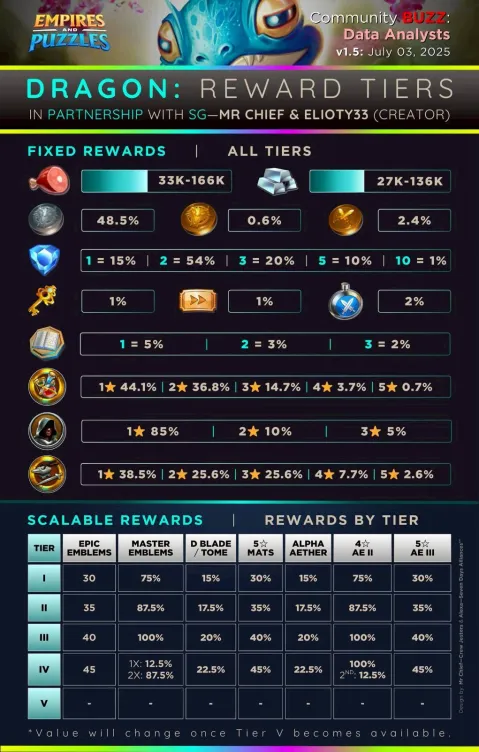
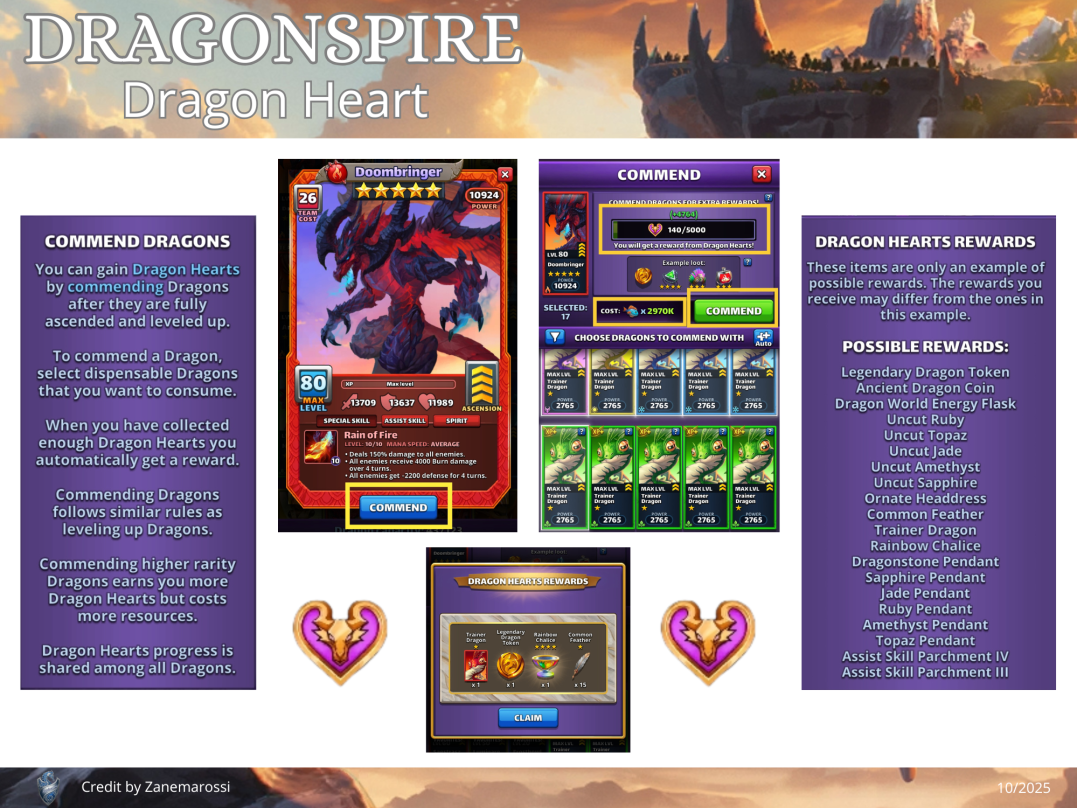
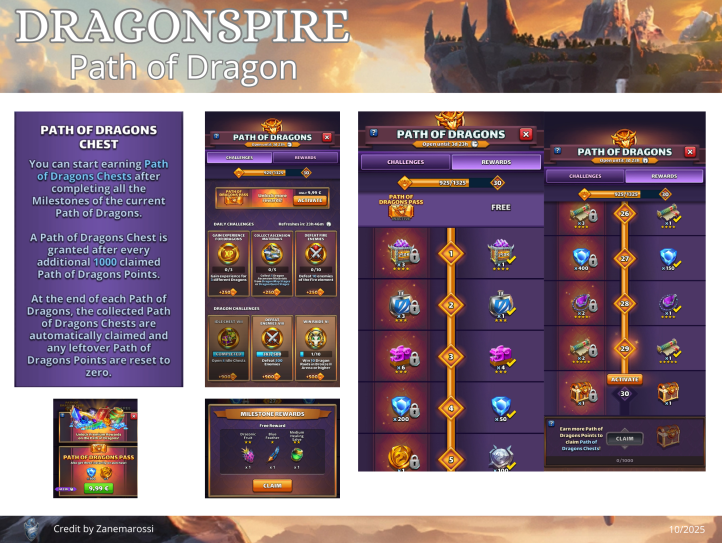
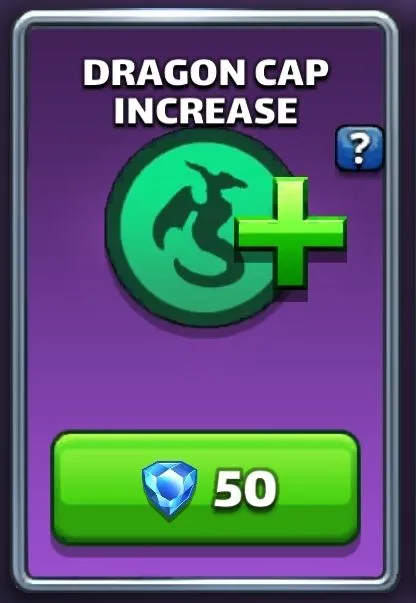
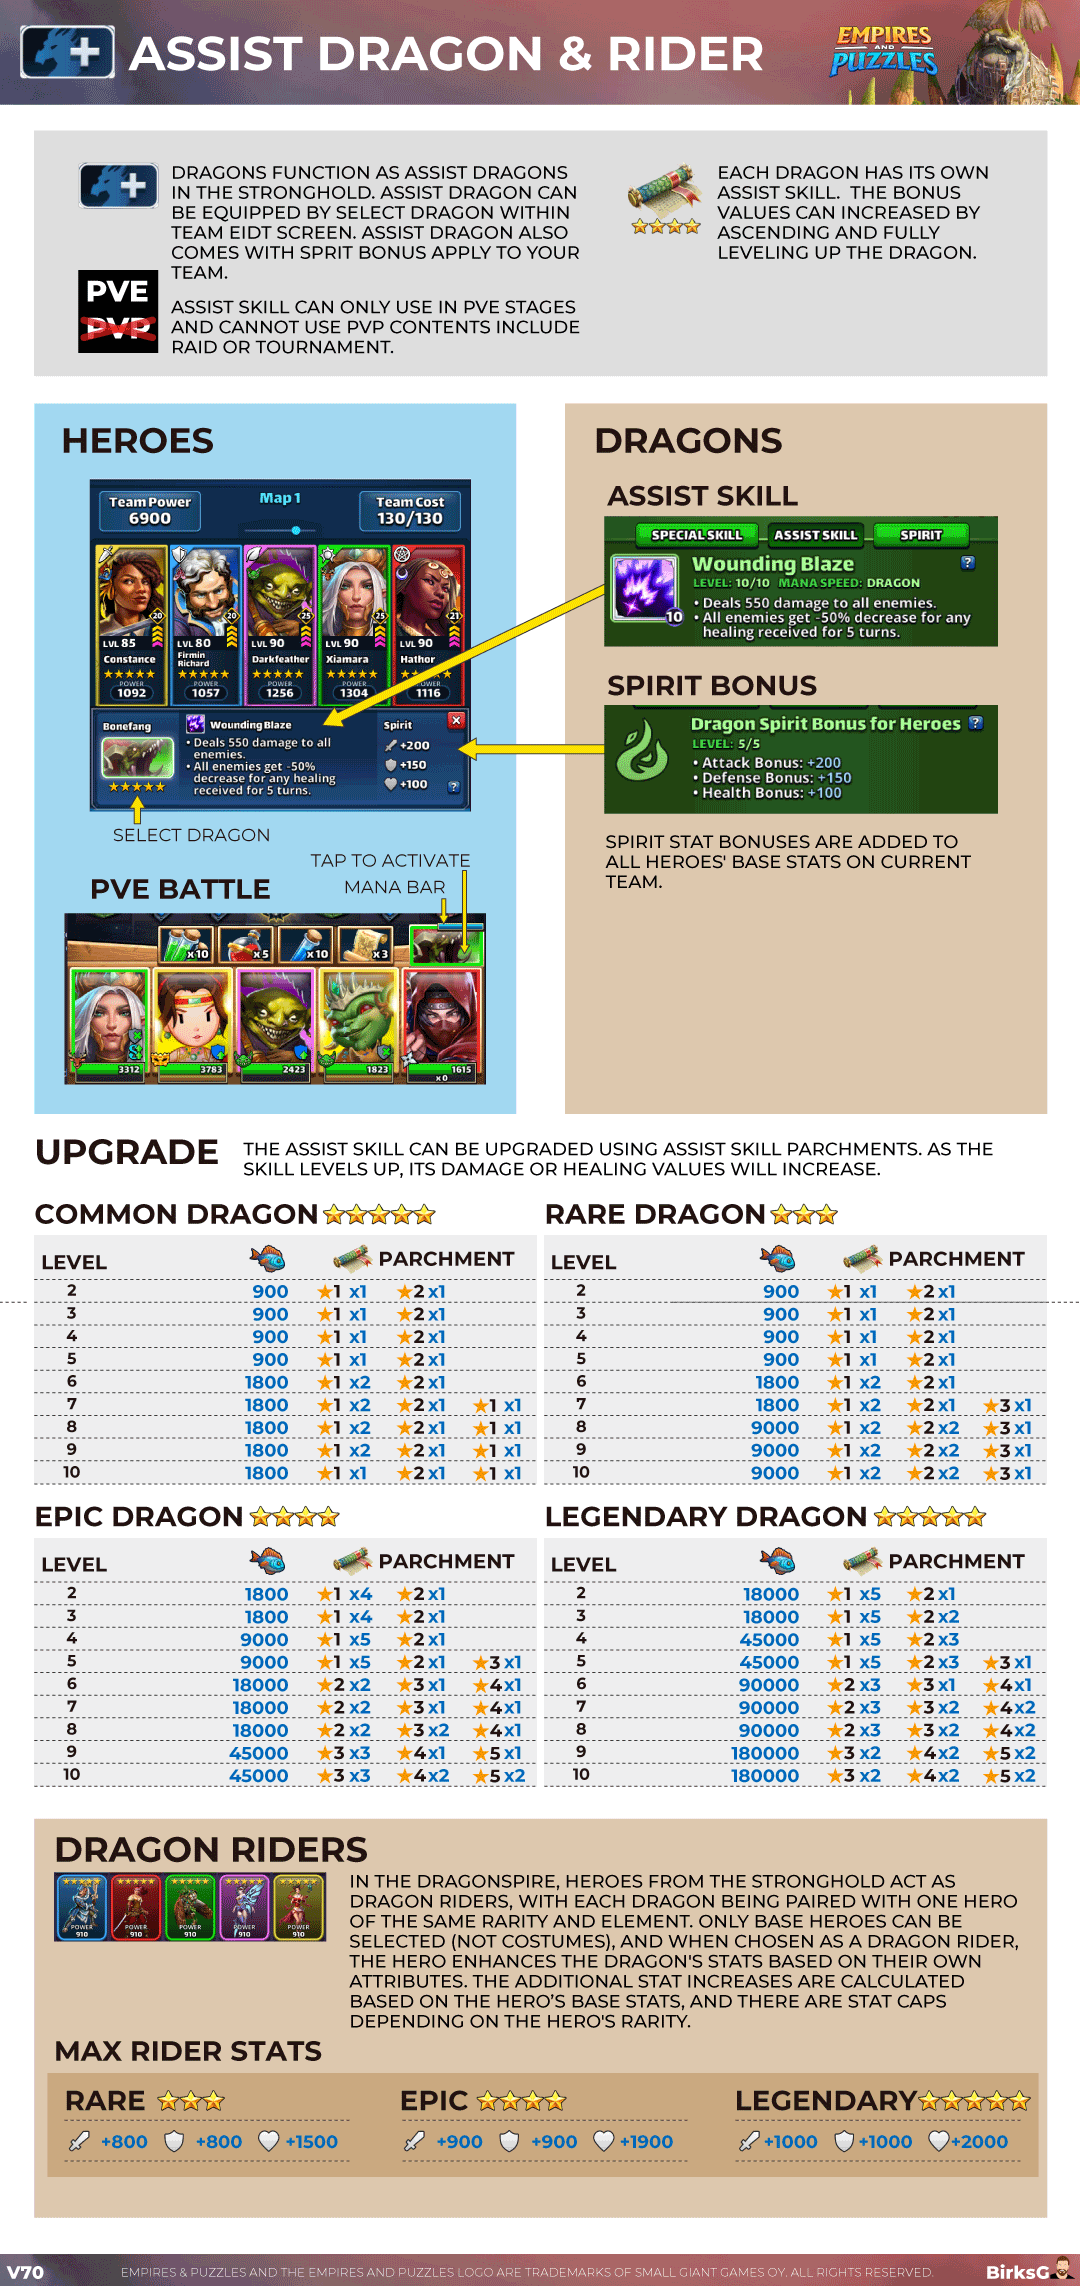
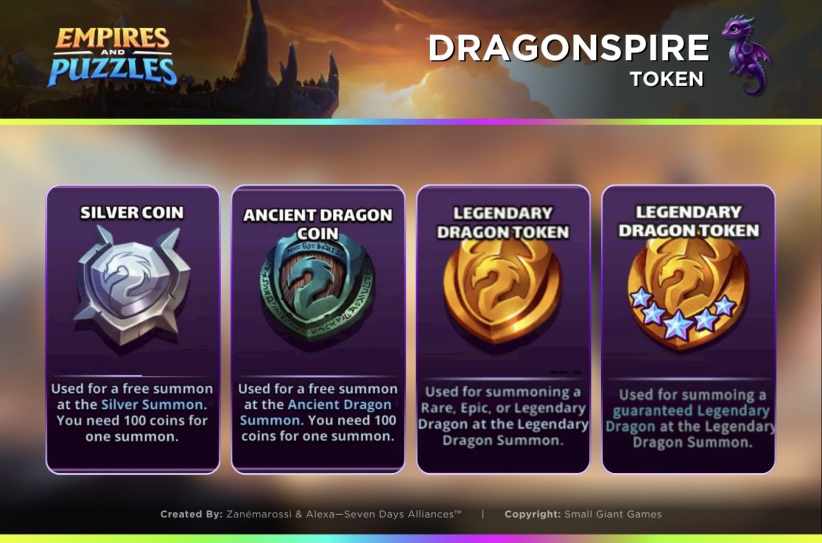
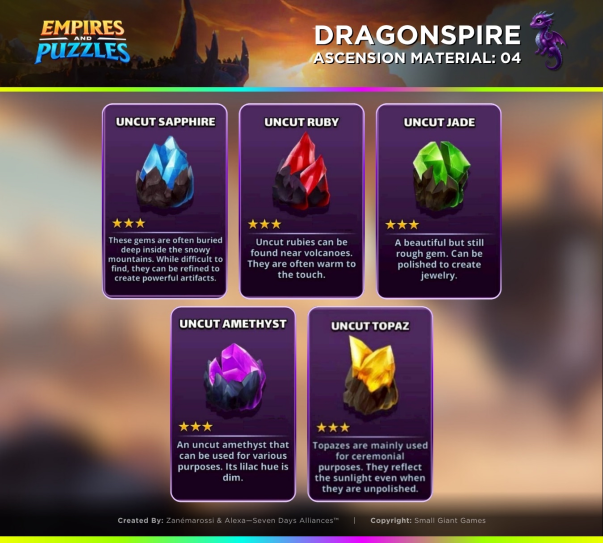
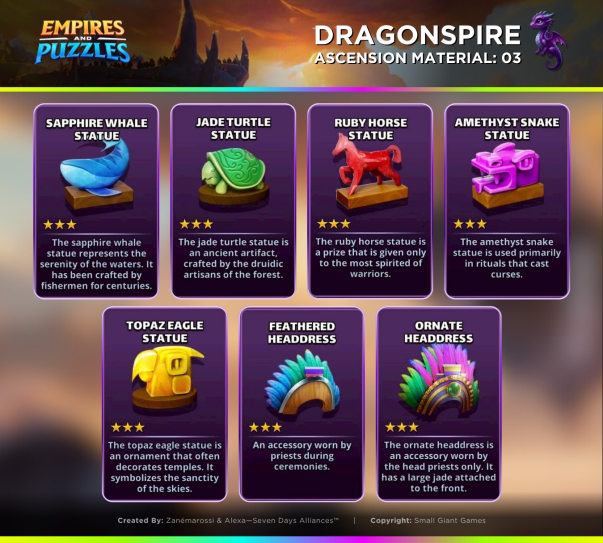
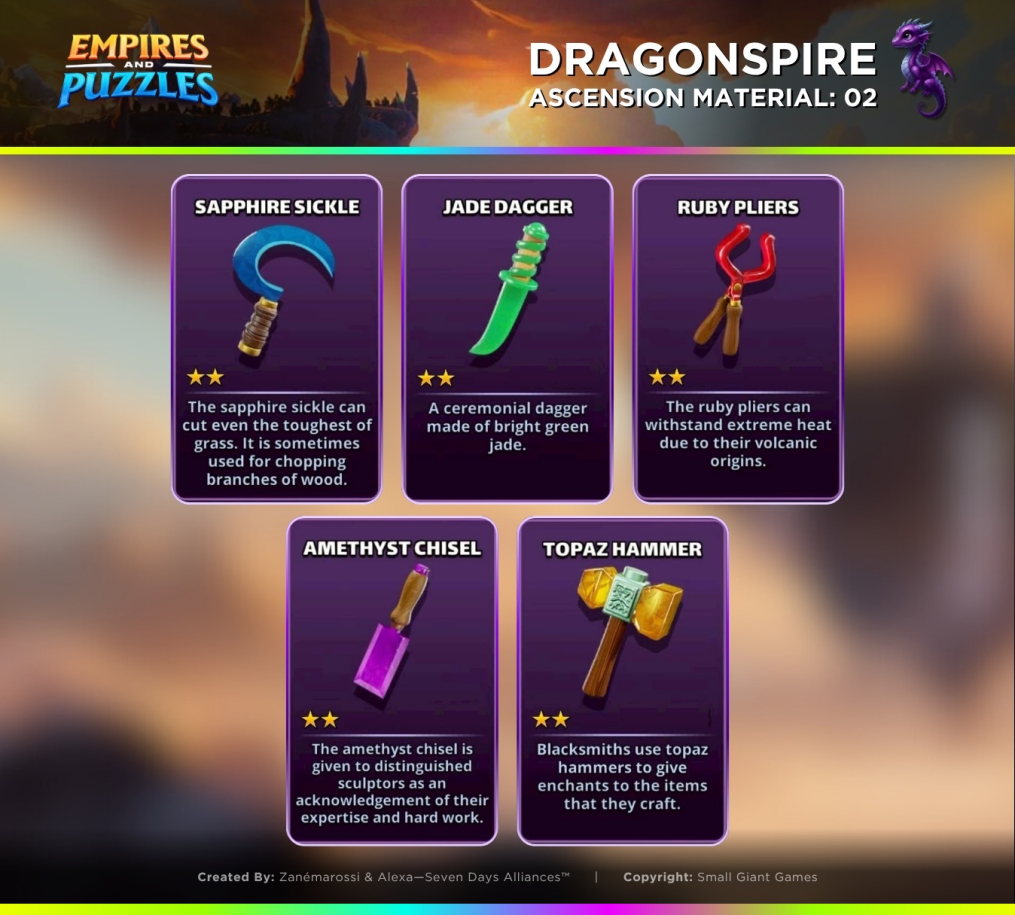
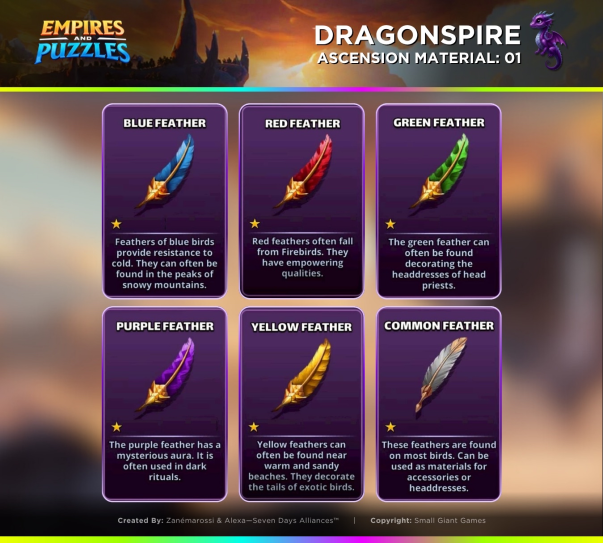
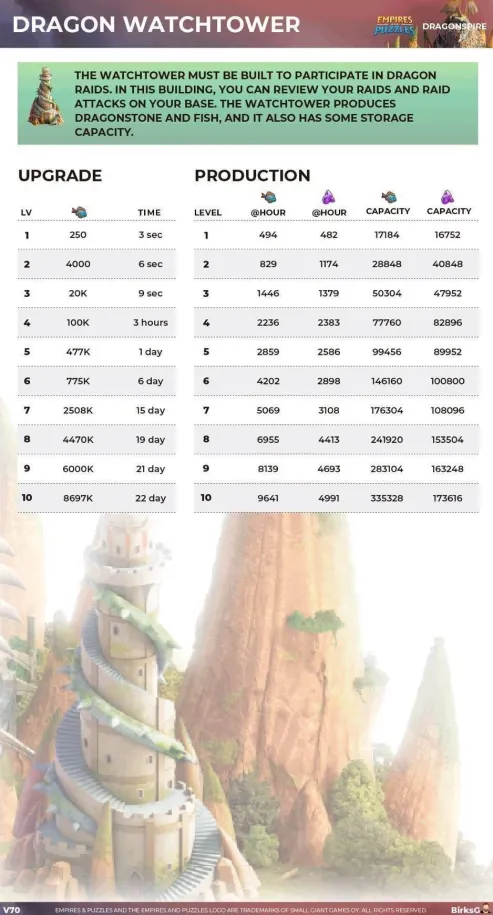
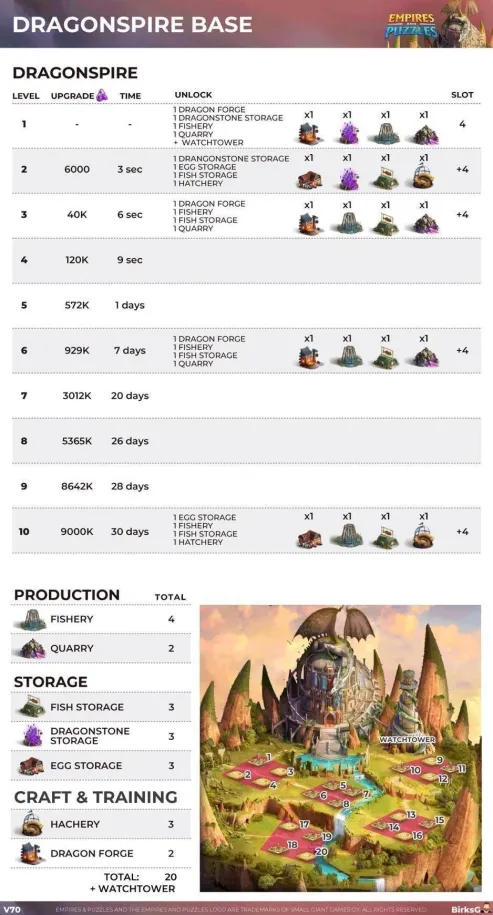
Dragonspire is a new, dragon-based world built on the traditional fortress-based world of Empathy. Table of content 1. Dragonspire Overview 2. Fortress 3. Buildings 4. Interface 5. Dragon and Portal summon 6. Dragon Assist and Rider 7. Raising a dragon 8. Dragon Map 9. Dragon Raid 10. Dragon Missions 11. Dragon Heart 12. Dragon Quests 13. Inventory 14. Path of Dragon 15. Get a slot 16. Others Documents 1. Dragonspire Overview Dragonspire: The New World of Dragons Dragonspire is like a game within the game! It is a parallel world to your main Fortress, where everything revolves around dragons. New Base: You build and manage a dedicated base with buildings and resources that are totally independent of those in your Fortress. Content and Activities: You explore a large map, launch dragon raids against other players (with a separate leaderboard), complete missions, and summon new dragons via special portals. Dragons vs. Heroes: Dragons train differently. They are simpler than heroes: no emblems, no costumes, no classes. On the other hand, their special skill can level up to 10 (instead of 8). The Links Between the Two Worlds: Despite their independence, the two worlds help each other: Help for Heroes: Your dragons can provide passive or active support skills to your hero teams. Help for Dragons: Your heroes can be equipped as Riders for your dragons to boost their combat stats in the Dragonspire world. 2. Fortress To go to Dragonspire, simply press the "Dragonspire" button at the bottom left of your Fortress screen (your usual base). Conversely, there is also a button in Dragonspire to return to the Fortress. You can switch between the two at any time. Credit Zanémarossi The Dragonspire world works a bit like your usual Fortress but is independent in terms of resources. It has its own energy. The amount of energy is the same as the amount of energy in the Fortress. However, the use of the energies is independent of one another. Credit Zanémarossi There are three basic materials: "Meat," "Iron," and "Recruits." These correspond to "Fish," "Dragon Stone," and "Baby Dragon" in Dragonspire. These are displayed at the top of the base screen. 3. Buildings Credit BirksG 9 buildings are available in Dragonspire : Dragonspire Watchtower Dragonstone Storage Egg Storage Fish Storage Fishery Quarry Dragon Forge Hatchery You can place the buildings in a similar way to a fortress. 20 buildings can be constructed depending on the level of your Dragonspire. For details on each building, please refer to the respective page : Dragonspire Buildings 4. Interface Credit Zanémarossi and BirksG 5. Dragon and Portal summon Dragons The Dragons featured in Dragonspire represent the "basic" units, comparable to the heroes from Season 1. Their trigger speed classification ranges from Fast to Slow. These dragons are available for summoning through two dedicated, permanent Portals. Credit by Nynaeve Portals summons Here are the summoning probabilities and costs of the two permanent portals to summon the basic dragons. Credit Zanémarossi Others Portails Currently, only one other portal is accessible with specific dragons. Find all the information about this quest and portals on the topic: Ancien Underoot Quest Dragon feeders A new feature has been implemented since V83 with the possibility of obtaining a dragon during summons similar to the functioning of HOTM. It changes every week. The summoning rate is 1.3%. 6. Dragon Assist and Rider Assist Skills Each dragon has two types of powers: The Special Skill: This is its main attack, the one it uses when you play with it in the Dragonspire world. The Assist Skill: This is a special bonus that activates when you use that dragon with your hero team in the Fortress (the classic game mode). For this Assist Skill to be as powerful as possible, you must level it up to the maximum level, which is 10. Dragon Rider To make your dragons stronger in Dragonspire, you can assign a hero to them as a Rider. What's the Purpose? Riders replace the classic troops and give a stat bonus to your dragon. The hero's special skills are useless here; only their base stats matter! Rarity Rule: Be careful! The rarity of your dragon determines the maximum rarity of the hero you can pair with it as a Rider (a 4* dragon will only accept a 4* hero or lower). Best Choice: Always choose the hero of the correct rarity that has the best stats for maximum power! Cap: There is a cap on these stat bonuses. For the exact details, please refer to the document created by BirksG. Credit BirksG 7. Raising a dragon Leveling up a dragon is less hassle than training a hero in the Fortress. Dragons do not need: Classes, Emblems Costumes "Limit Break" (no extreme evolution) Dragon Key Features: Their Special Skill (the attack they use in Dragonspire combat) levels up to level 10 (instead of 8 for heroes). They provide Assist Skills that your heroes can use in the classic game world (the Fortress). They also grant a Spirit Bonus (a permanent stat bonus). Note: The "Special Skill" is used in Dragonspire combat, while the "Assist Skill" is the bonus for your heroes. Find the evolution of a dragon in the subject: Dragon Roster and Ascending Credit BirksG 8. Dragon Map The Dragonspire map system is very similar to the one in your usual Fortress. Current Content: The map is divided into 22 regions of 10 stages each, plus outposts, making a total of 220 stages! More regions will be added with updates. Gameplay Difference: The combat board is slightly different. You will find special tiles (boosters) that allow you to deal more damage. The way you use boost items also changes. Find information about the map in the topic: Dragonspire Map Credit BirksG 9. Dragon Raid The Dragon Raid is like the classic Raid in your Fortress, but with dragons! How Does It Work? Preparation: You must build a Watchtower to participate. Combat: You battle the dragon defense teams set up by other players. Energy: Each battle consumes Dragon Raid Energy. You can store up to 6 of these. Leaderboard and Arenas Competition: There is a dedicated leaderboard (global, local, alliance). If you win, you gain cups and resources (Fish, Dragon Stones). If you lose, you lose them. Arenas: The arena tier system is very detailed (Bronze I to Diamond III). The higher you climb in the arena (by gaining cups), the more generous the rewards you find in the abandoned treasure chests are. Cup / Arena Name 0 Bronze I 200 Bronze II 400 Bronze III 600 Silver I 800 Silver II 1000 Silver III 1200 Gold I 1400 Gold II 1600 Gold III 1800 Platinum I 2000 Platinum II 2200 Platinum III 2400 Diamond I 2600 Diamond II 2800 Diamond III` 10. Missions Basic missions They currently only allow you to collect gems. Credit BirksG Wanted Missions There are two Wanted Missions in the Dragonspire game mode: Adventure Chest Raid Chest Idle Chests The Idle Chests system passively generates rewards over time. After a 24-hour period, the chest reaches its maximum reward generation capacity and becomes available for opening. The chest cannot be accessed or opened before the expiration of this 24-hour timer. Reward quality is scaled based on the highest province reached in both Dragon Adventure and Dragon Raids. Dragon Loot VIP The Dragon Loot VIP status provides a bonus to the loot received from Idle Chests for the duration of the active VIP period (30 days). Dragon Shipment Opening Dragon Idle Loot Chests contributes toward sending a Shipment to your Stronghold. A shipment can be dispatched after opening a total of 14 Dragon Idle Loot Chests. A notification will confirm when your shipment is ready for dispatch. The tier of rewards received from a Dragon Shipment is enhanced based on your current Dragon Raid Tier and the highest area reached in Dragon Adventure. The reward tier for the Dragon Shipment is definitively determined at the moment the shipment is sent. For the full article, please follow this link: Wanted Missions and Dragonspire Loot VIP Credit Alexia, MrChief and Elioty33 11. Dragon Heart Dragon Hearts are acquired by commending Dragons after they have reached their maximum ascension and level status. Once a sufficient quantity of Dragon Hearts has been collected, a corresponding reward is automatically granted. Commending Dragons of higher rarity yields a greater number of Dragon Hearts but requires a proportionally larger expenditure of resources. The progress of Dragon Heart collection is unified and shared across all Dragons. For comprehensive information on this topic, please refer to the following resource: Dragon Heart Credit Zanémarossi 12. Dragon Quests Dragonspire It hosts quests for crafting items, combat, ascension... You also obtain summoning coins from the various dragon portals. Find each quest below : Dragon Cave Quest Ancient Underroot Quest Legendary Dragon Quest Amethyst Cavern Quest Ruby Cavern Quest Topaz Cavern Quest rainbow Cavern Quest Scroll Cavern Quest Jewerly Cavern Quest Sapphire Cavern Quest Jade Cavern Quest Rescue Dragonlings Quest Night of items Quest River of Ressources Quest Other one-off quests round out the game offerings. 13. Inventory Across the game offerings (seasons, quests, raids, loot...), a number of items are distinct in Dragonspire. Find the complete inventory in the dedicated thread: Dragonspire Inventory 14. Path of Dragon The Path of Dragons is a new game event, which is similar to Path of Valor It's a 28 day long event similarly to Path of Valor, during which there are Daily Challenges and Dragon Challenges. This is not a Stage-based Event, unlike Challenge Events and Seasonal Events. It's about completing Challenges in various parts of the game. There isn't new playable World Map/Quest content. For comprehensive information on this topic, please refer to the following resource: Path of Dragons Credit by Zanémarossi 15. Get a slot In the event your Dragon Roster is full, the acquisition of new creatures is suspended. Space can be freed up using the following methods: Consuming existing dragons. Extending the space via the shop: 5 slots for 50 Gems (the cost is subject to progressive increase). Purchasing additional slots via specific offers (+5 slots). 16. Others Documents - Find details of all dragons by Elioty33 with translation of files into several languages : Drive Dragons Elioty33 Guide written in collaboration with BirksG.
-
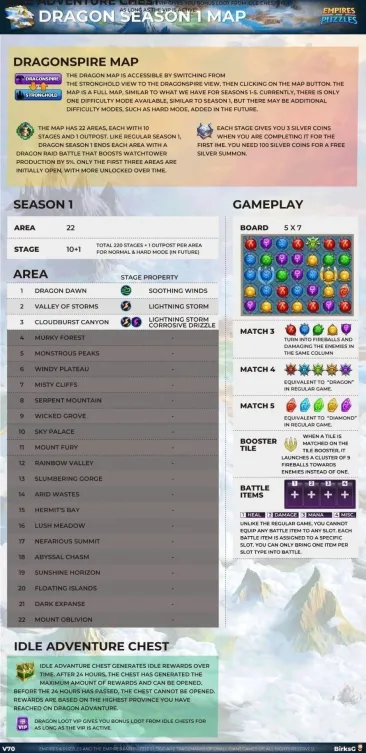
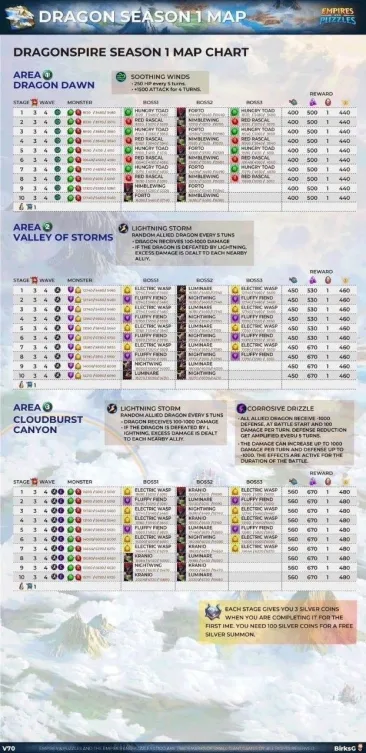
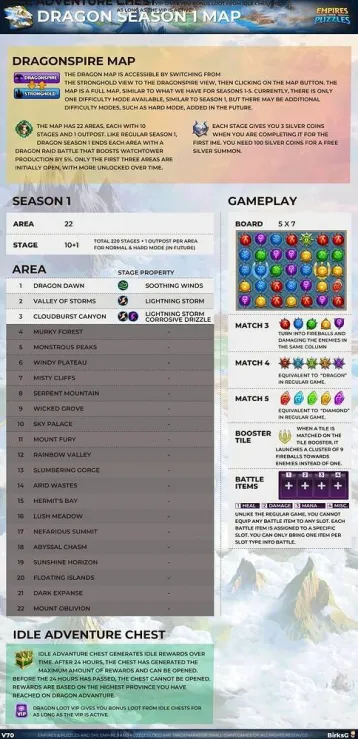
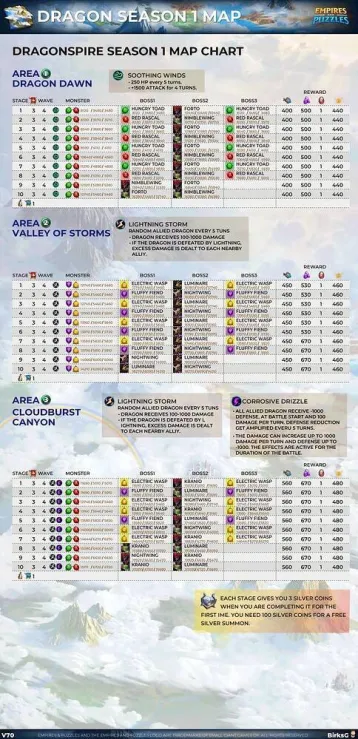
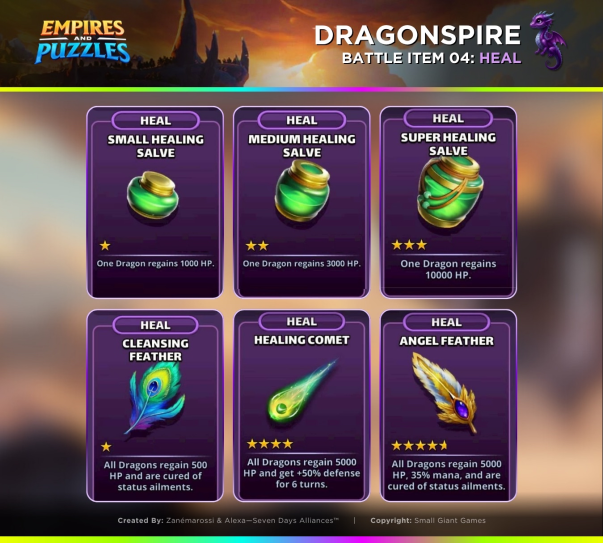
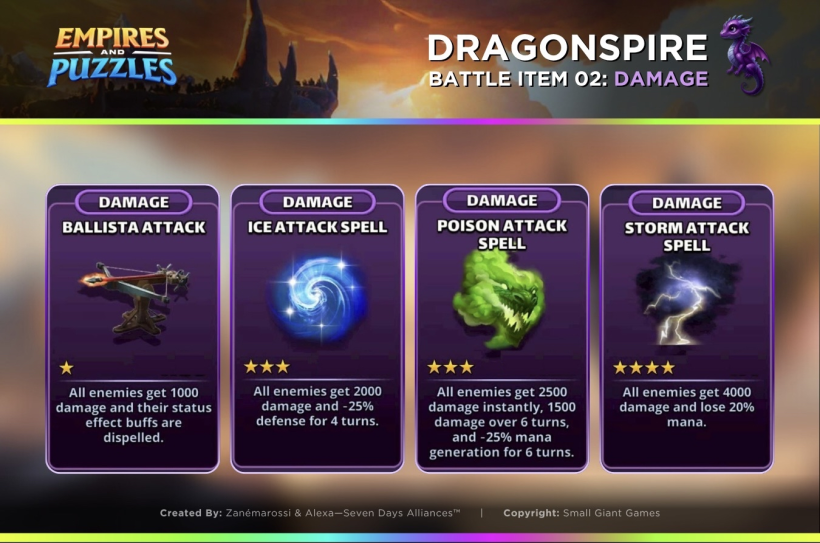
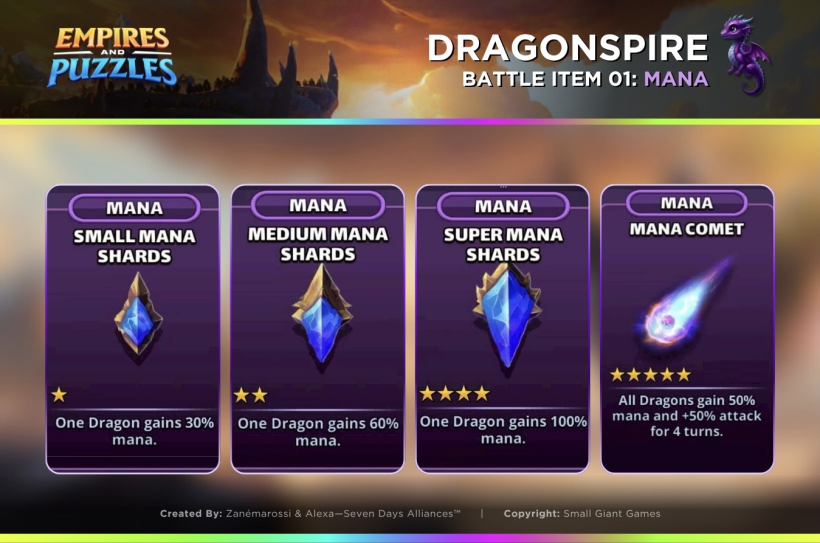
Sep 2024 This thread is to provide early insights on the Dragon Map Area and Gameplay. Dragon Map Overview Dragon Map is accessable if you switch from Stronghold view to Dragonspire view, and you click on the Map button. The Map is a full Map like what we have for Season 1-5. There is only 1 difficulty mode like in Season 1. The Map consist of 22 Areas, and each Area has 10 stages + 1 Outpost. Similarly to Season 1 each Area now ends with and Outpost, which is a Raid battle, and it gives +5% production increase for Wathctower. You need to have a Watchtower build to complete this stage. So there are 220 stages in total +21 Outposts (if there is no Outpost at the end of the last Area). The Areas have got an own name. You can only complete stages in order. Tile Boosters The Map stages boards consist of tiles in 5 rows and 7 columns. You can match at least 3 tiles from the same element. When tiles are matched they turn into fireballs and they damaging the enemies in the same column. If you match 4 tiles, then you get a special tile like the “Dragon” in the regular game, and if you activate it, then the tiles above, below, left and right are also explode. If you match 5 or more tiles, then you get a special tile like the “Diamond” in the regular game, and if you activate it, then the tiles In the third row the second and the sixth tiles is a “Tile Booster”. When a tile is matched on the Tile Booster, it launches a cluster of 9 fireballs towards enemies instead of one Battle Item Slots There are 4 Battle Item Slots similar to the regular game, but unlikely to the regular game you can not equip any battle items to any slot. Each Battle Item has a Slot Type assigned to them: Heal: Small Healing Salve, Medium Healing Salve, Super Healing Salve, Cleansing Feather, Healing Comet, Angel Feather Damage: Ballistae Attack, Ice Attack Spell, Poison Attack Spell, Storm Attack Spell, Mana: Small Mana Shards, Medium Mana Shards, Super Mana Shards, Mana Comet Misc: Veil of Attack, Veil of Protection, Veil of Eternity You can bring only one item per slot type into battle. Enemies Each enemy is brand new, and all of them have Special Skills. Dragon WE Costs The stages consume Dragon World Energy. The WE Costs for the first 3 visible Areas is 3. Silver Coins Each stage gives you 3 Silver Coins when you are completing it for the first ime. You need 100 Silver Coins for a free Silver Summon. Missions There are no Avatar missions for the Dragon Map yet. Area Properties Each Area has an own Level property, which are the following. Unique Dragon Boss Stage 10 of Area 9, 11, 13, 15 and 18 Features a Unique Dragon Boss. This battle takes places against an Unique Dragon Boss. The Unique Dragon Boss heals itself and buffs are dispelled from the Dragons every 5 turns. This is a like fighting against a Titan (with Weak spot which paralises it) after couple enemy waves. Area Completion rewards You can collect rewards after you have finished all stages and the outpost level for each area. Guides by BirksG
-
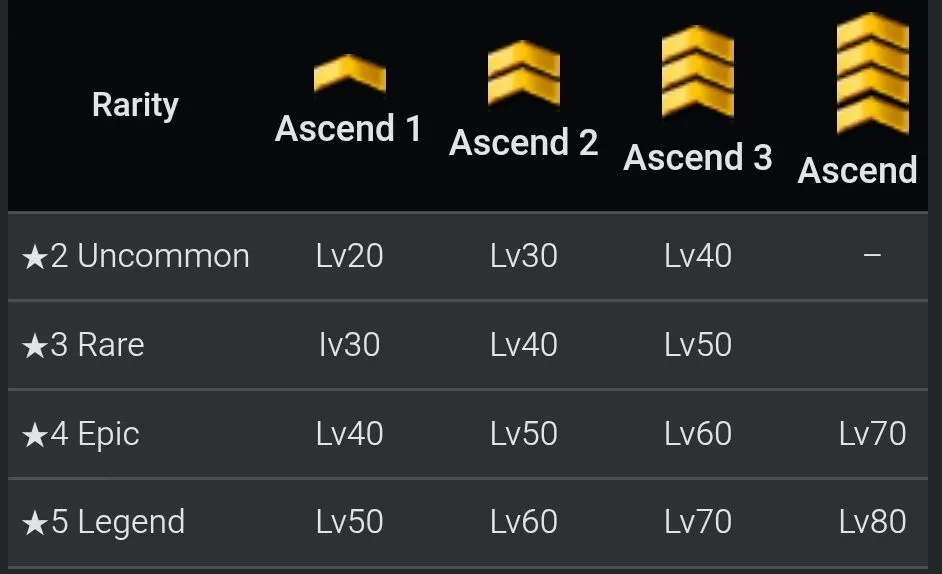
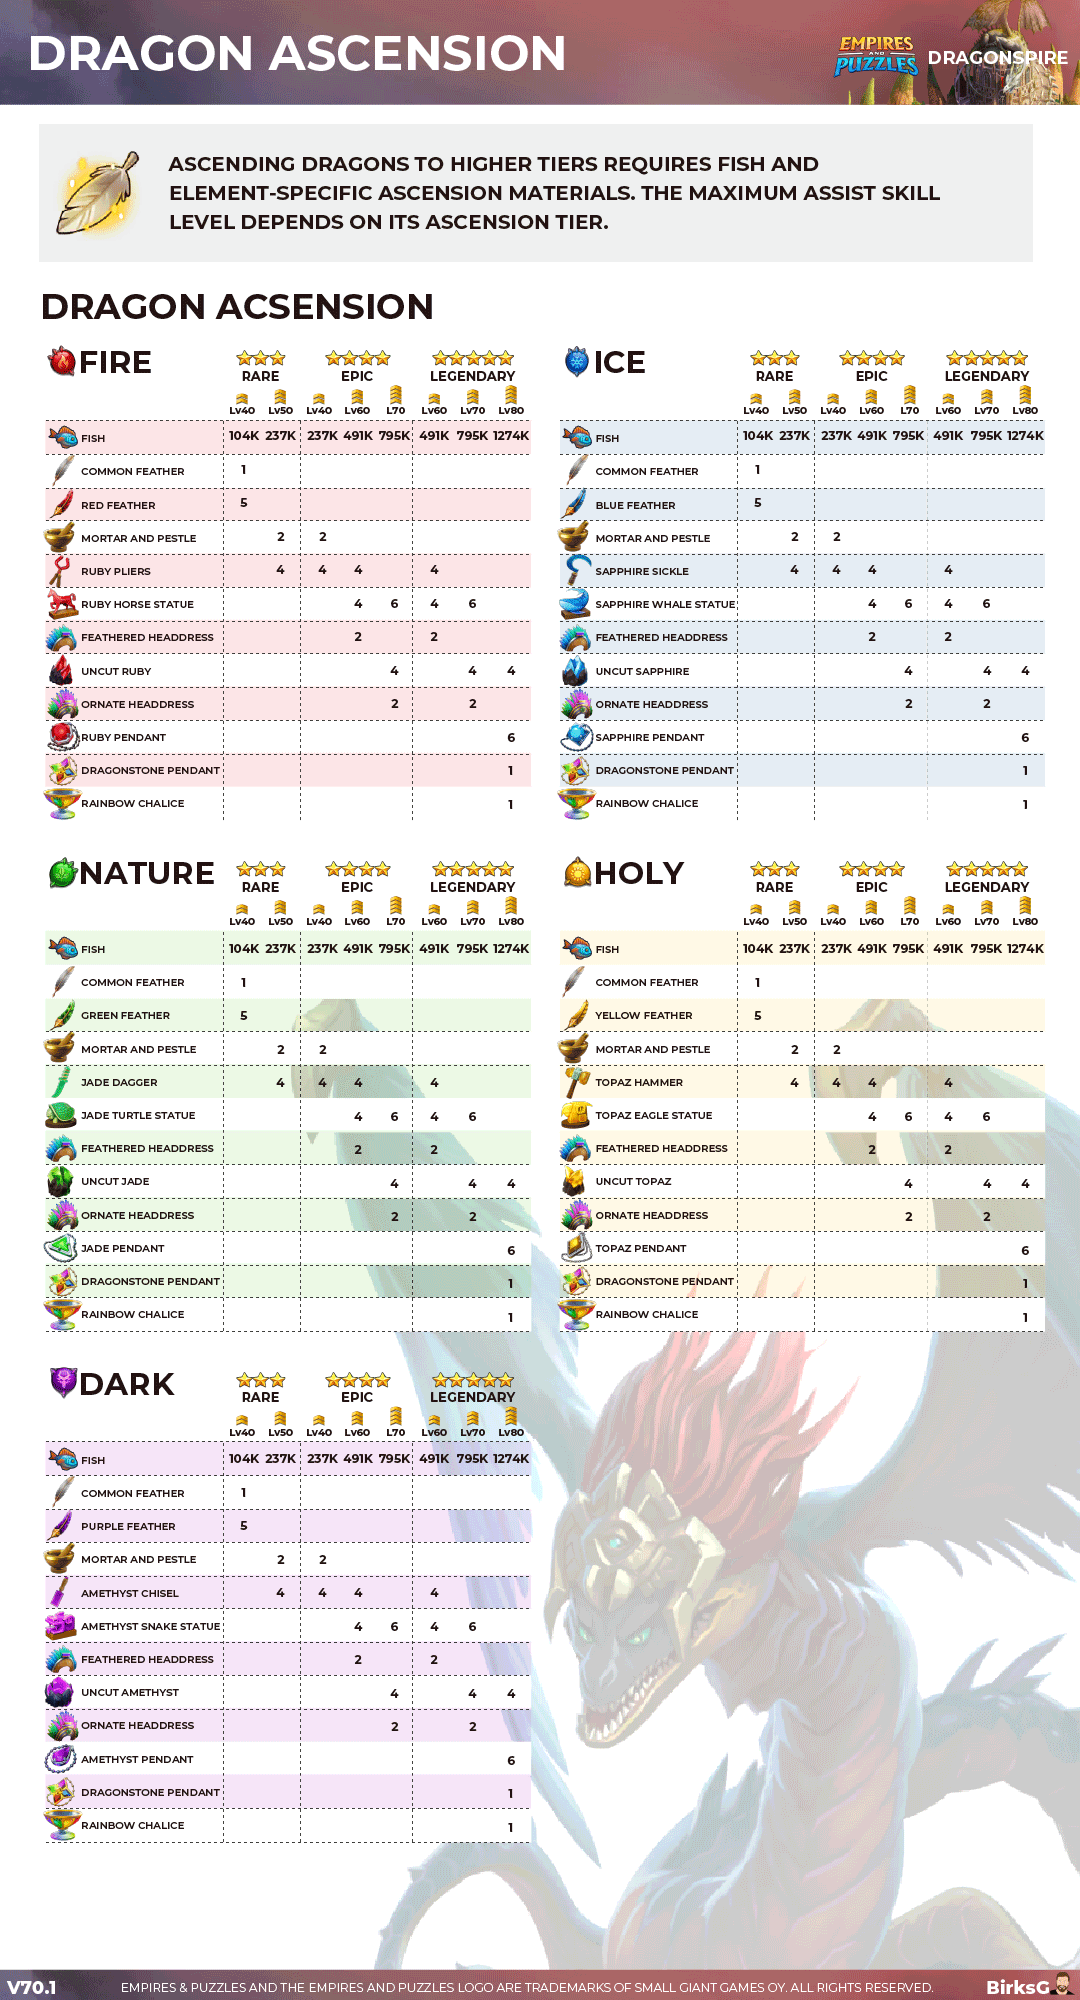
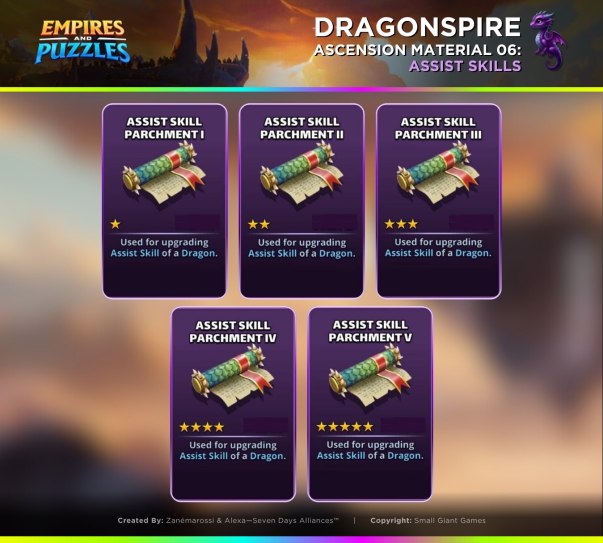
This thread is to provide insights and discussion on the Dragon Roster, Dragon Ascending, Assist Skill Upgrade and Leveling Up Costs Dragon Roster You can browse and level up your dragons here, and you can also edit your teams. The Dragons can be sorted by Power, Rarity, Elements and Name. The list is prioritized by your teams. Scroll helper and disabling Prioritizing your teams is not available here. There are no regular Common Dragons added to the game. Just trainer dragons are available for these rarities. Similarly to the regular game there are Uncommon, Rare, Epic and Legendary Dragons, and they have the same ascension tier as the heroes. 3 for Uncommon and Rare Dragons. 4 for Epic and Legendary dragons. The maximum level per rarity at the final tier for Dragons is the same as for heroes. 40 for Uncommon Dragons. 50 for Rare Dragons. 70 for Epic Dragons. 80 for Legendary Dragons The Special skill has 10 levels instead of 8. Each dragons have an Assist Skill, which can be leveled up. The maximum allowed level for the Assist Skill depends on the ascension tier of the Dragon and the. XPs provided by feeder Dragons during leveling A feeder Dragon in same element gives 20% higher XP than a different rariry. If you level up with the same dragon, then the Special skill level up chance is higher. The Special Skill level up chance is also higher if the hero has reached max level, but the - Special Skill has not reached the max level yet. Rarity/ Same element ? / XP provided / Special Skill level up chance (Before max level) / Special Skill level up chance (At max level) Dragon level progression The Dragons require Fish to be leveled up, and of course feeder dragons. - Uncommon Dragons - Rare Dragon - Epic Dragon - Legendary Dragon Uncommon Dragons Ascend 1 progess Ascend 2 progess Ascend 3 progess Rare Dragons Ascend 1 progess Ascend 2 progess Ascend 3 progess Epic Dragons Ascend 1 progess Ascend 2 progess Ascend 3 progess Ascend 4 progess Legendary Dragons Ascend 1 progess Ascend 2 progess Ascend 3 progess Ascend 4 progess Ascending the Dragon’s Ascension tiers Ascending dragons to higher tiers need Fish and Ascension materials. The Dragon’s maximum Assist Skill level is depends on the Ascenion tier. The Ascension Materials are depends on the Dragon’s element too. Here are the table for these data. Guide by BirksG Assist Skill Upgrade The Assist Skill can be Upgraded if you swtich to the Assist Skill tab, and you click on Upgrade. The opened screen contains the these information Assist Skill Name Level [from] → [to] Current Maximum Level (The maximum Assist Skill level is 10, and it can be reached only when the Dragon is at its maximum Ascension Tier). Assist Skill at current level Assist Skill at next level If the next Assist Skill level is locked, then this text appears: Ascension Level X is required for next upgrade. The Asisst Skill upgrade nest fish and Assist Skill Parchments (=ASP) . Here is the table for the required ASP materials per Assist Skill level. Guide by BirksG
-
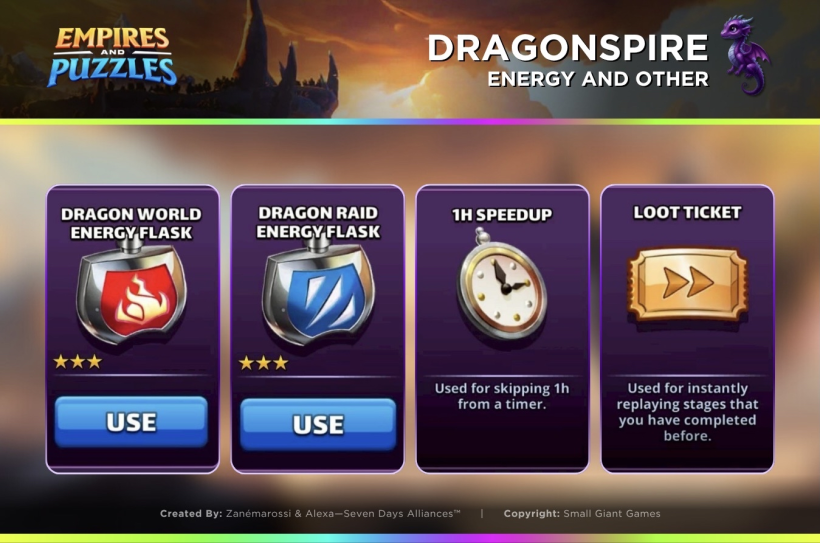
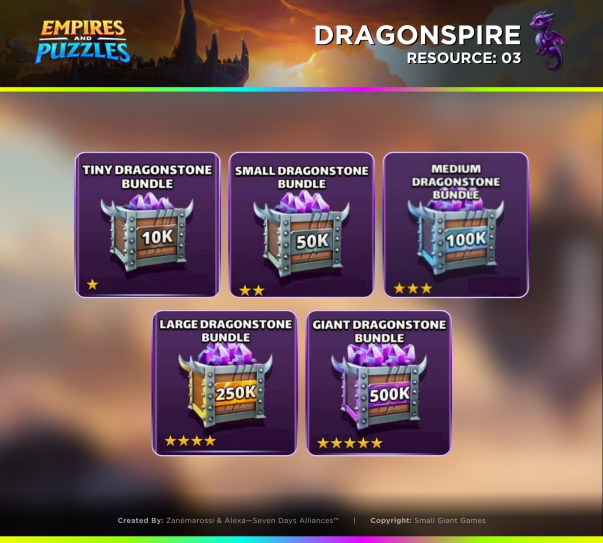
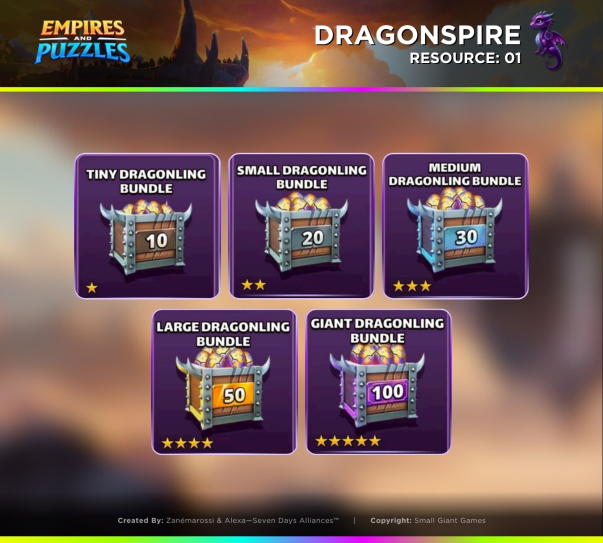
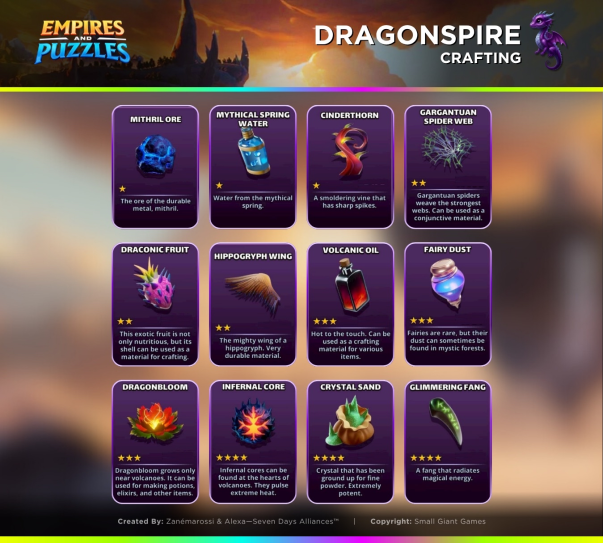
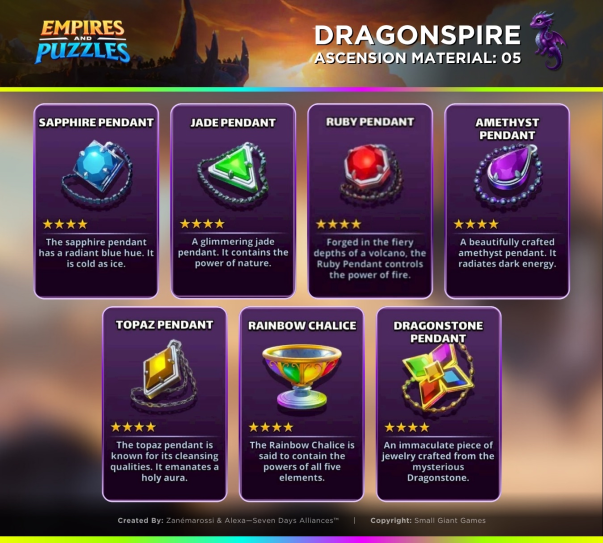
This thread is to provide insights and discussion on the Dragonspire Inventory (Ascension, Assist Skill, Battle Items, and Crafting Materials, General Items) Dragonspire Inventory This Inventory is similar what we have in the game, but it contains only Dragonspire related items. There are 3 tabs in the Inventory Materials: there 3 subtab for the materials: Ascension Assist Skill Crafting Battle Items Utility items Dragon Ascension Materials These are needed to Ascend your dragons. They have rarity similar to the Ascension Materials that exists in the game. Some are tied to an element, while other are needed to ascend different element of Dragons. You can see their purpose at the Dragon Leveling topic : Dragon Roster and Ascending Some of them are needed for Training Dragons in Hatchery. Assist Skill Upgrade Materials These are needed to Ascend your dragon’s Asist Skill. You can see their purpose at the Hero Leveling topic : Dragon Crafting Materials These are needed to Craft Battle Items in Dragon Forge. Dragon Battle Items There are 12 new Craftable batlte items in Dragon Forge, and 3 more which are not craftable, and they are available in the Shop only: Angel Feather Mana Comet Veil of Eternity You can bring only 1 battle item from each Slot type to battle. Mana Damage Heal Utiliy Items So far we have seen Dragon Resource Bundles, Energy Refill Flasks and Summon Token / Coin. The Resource Bundles are usable similarly as they are usable in the live game. The Summon tokens and coins can be used in portals Resource Token Energy Other
-
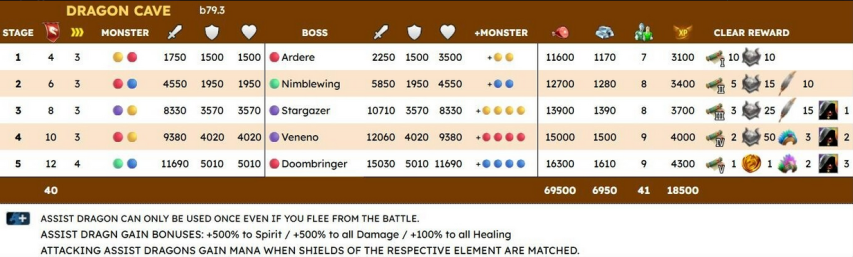
This is a 3 day long 5 stage quest in the regular game, where Dragons can be used, and gives loot mostly for Dragonspire game mode. Special Rule: Assist Dragon Mastery Assist Dragons can only be used a limited number of times. Assist Dragons are considered used when you start a quest battle. The battles will get increasingly difficultt, so plan your Teams carefully ! Assist Dragones usage limit for this quest: All Dragons: 1 Special Rule: Dragon Cave Assist Dragons are enabled in this quest. Attacking Dragons goind the following bonuses: 500% more Spirit Bonuses 500% more Damage 100% more Healing Attacking Assist Dragons gain mana when shields of the respective element are matched.
-
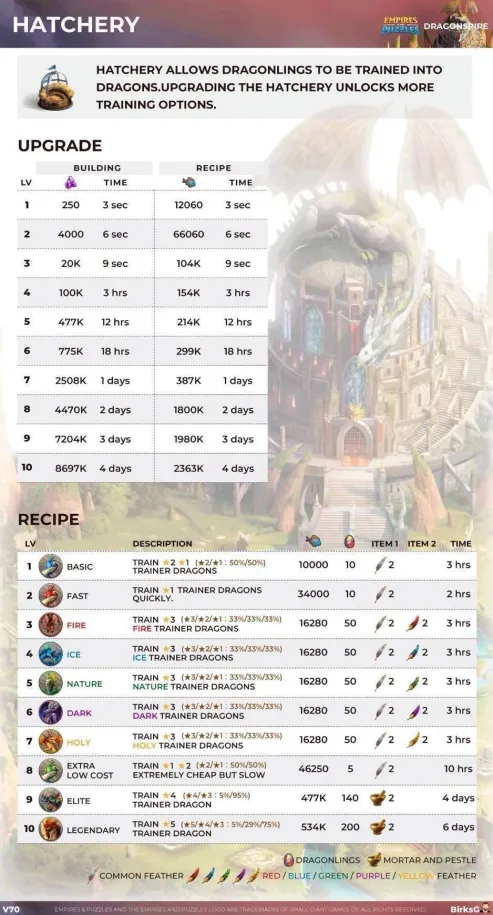
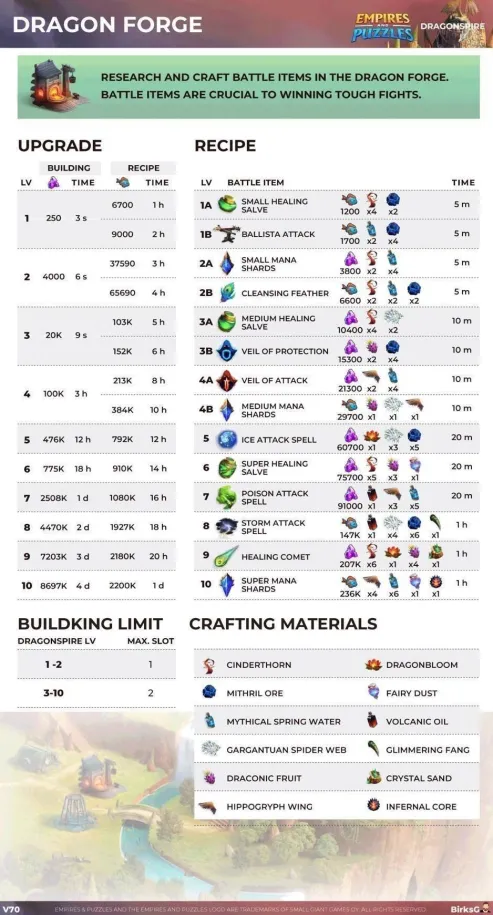
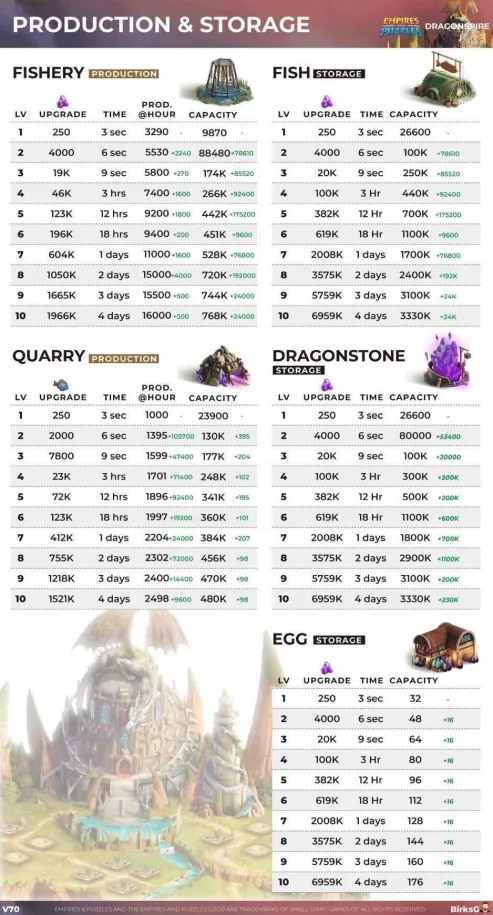
This thread is to provide early insights and discussion on the new Dragonspire Buildings Overview and each bulidings itself (Watchtower, Storage buldings, Hatchery, Dragon Forge, Quarry and Fishery) The following 9 buildings are availabe in Dragonspire Each building have exactly 10 levels. You can place buildings in a similar way to a fortress. There is a limit to the number of buildings you can place depending on the level of your Dragonspire. There are no other building such as ""Mystic Vision Tower"" in Dragonspire view. The second builder from VIP pass is applies here too. Speedups can be used to reduce crafting, training and building times. List of new available Dragonbase buildings Dragonspire The base of operations of your Dragon empire. Watchtower Watchtower stores the resources collected from captured Outposts and you can capture more to increase the production rate. The storage capacity is only used by the Watchtower. Storage Buildings Dragonstone Storage A building used to store Dragonstone. The storage capacity adds to the base maximum capacity. Egg Storage A building used for housing Dragonlings. The storage capacity adds to the base maximum capacity. Fish Storage A building used to store Fish. The storage capacity adds to the base maximum capacity. Production Buildings Fishery A building that produces Fish. The storage capacity is only used by this building. Quarry A building that produces Dragonstone. The storage capacity is only used by this building. Dragon Forge A building where various Dragon Battle Items can be crafted. Hatchery Hatchery allows Dragonlings to be trained into Dragons. Dragonspire Credit by BirksG The base of operations of your Dragon empire. Similarly to Stronghold this building has storage capacity too: 10000 Fish 10000 Dragonstone 30 Dragonlings Upgrading the Dragonspire unlocks more are for buildings and increases the maximum level for their upgrades. None of the others building can have higher level than the Dragonlings. Total numbers of Buildings per type Watchtower: 1 Dragon Forge: 2 Dragonstone Storage: 3 Egg Storage: 3 Fish Storage: 3 Fishery: 3 Hatchery: 3 Quarry: 2 Maximumum storage capacity of your base: Fish: 10 Million Dragonstone: 10 Million Dragonlings: 558 Watchtower Credit @BirsG Watchtower stores the resources collected from captured **Outposts** and you can capture more to increase the production rate. The storage capacity is only used by the Watchtower. This building is similar to the Watchtower in the Regular base. If you wish to participate in dragon raids, you must construct this building, because without it, dragon raids and dragon raid energy are disabled. You can view your raids and attacks carried out on your base in these buildings. You can avenge successful attacks against your base and view the teams used for each raid. This building produces dragon stone and fish, and it has some storage capacity. The storage capacity is used solely by the Watchtower. You can collect the dragon stone and the fish produced once per hour. As in season 1 of the normal game, at the end of each zone there is an outpost, and each one increases production by 5%. There are 22 zones, but we probably only have 21 outposts, so the maximum production increase is +105%. buildings related to storage There are three buildings classified as warehouses. Credit by BirksG Dragonstone Storage A building used to store the Dragon Stone . Its storage capacity is added to the base maximum capacity. You have a total of 3 dragonstone warehouses in your base. 1 starting from level 1 of the Dragonspire building 2 starting from level 2 of the Dragonspire building 3 when viewed from level 6 of the Dragonspire building Egg preservation Building used to house dragonets. Its storage capacity is added to the base maximum capacity. You have a total of 3 egg storage slots in your base. 1 starting from level 2 of the Dragonspire building 2 starting from level 6 of the Dragonspire building 3 when viewed from level 10 of the Dragonspire building Fish preservation A building used for fish storage . Its storage capacity is added to the base maximum capacity. You have a total of 3 fish storage units in your base. 1 starting from level 2 of the Dragonspire building 2 starting from level 3 of the Dragonspire building 3 when viewed from level 10 of the Dragonspire building Production-related buildings Credit by BirksG Fishery A fish production building . The storage capacity is used exclusively by this building. You have a total of 3 fisheries in your base. 1 starting from level 1 of the Dragonspire building 2 starting from level 3 of the Dragonspire building 3 when viewed from level 10 of the Dragonspire building Career Building producing dragon stone . Its storage capacity is used exclusively by this building. You have a total of 2 careers in your base. 1 starting from level 1 of the Dragonspire building 2 starting from level 3 of the Dragonspire building Dragon Forge Credit by BirksG A building where various items for fighting dragons can be crafted . The first 4 levels allow you to unlock the crafting of two different combat items. You can find the effect of handcrafted combat items in the Dragon Inventory topic: (placehorder) You have a total of 2 Dragon Forges in your base. 1 starting from level 1 of the Dragonspire building 2 starting from level 3 of the Dragonspire building Hatchery Credit by BirksG The hatchery allows you to train dragonets to becomedragons. La mise à niveau de l'incubateur débloque davantage d'options de formation. Le niveau 10 de l'écloserie débloque le bouton « Tout réclamer » pour toutes vos écloseries. Vous disposez d'un total de 3 incubateurs dans votre base. 1 en commençant par le niveau 2 du bâtiment Dragonspire 2 en commençant par le niveau 6 du bâtiment Dragonspire 3 vu du niveau 10 du bâtiment Dragonspire Écrit par Playforfun Guides de crédit par BirksG
-
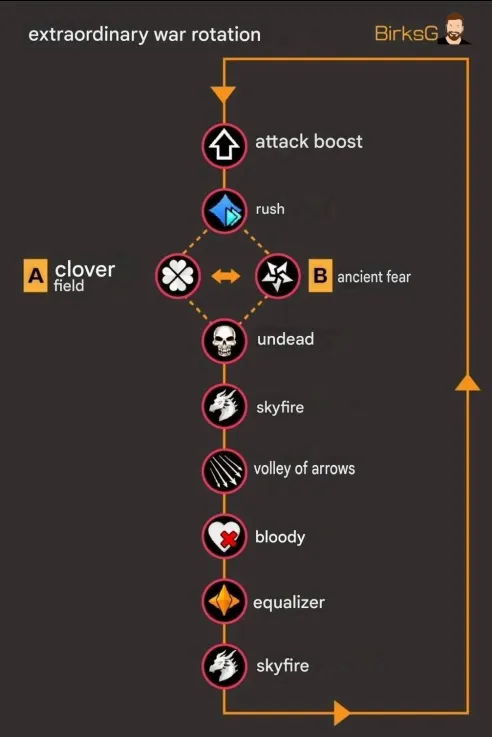
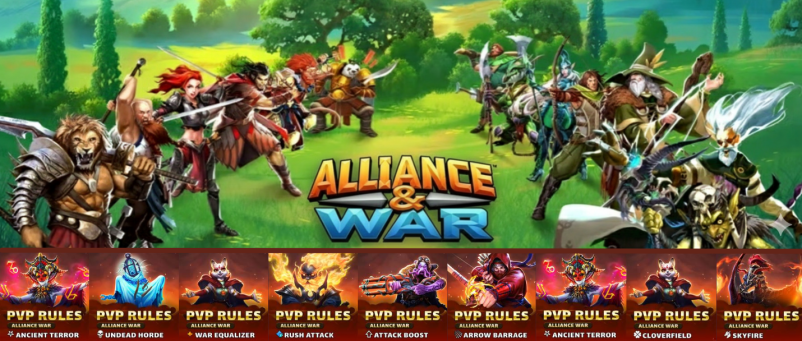
VIII. War Playlist Find content creator video guides for each type of war Find all the infographics from the top 100 wars (Strategies for defeating certain heroes...) by Heyalexa here: [placeholder] CLOVER FIELD Psycrowsis : Général J : BLOODY WAR General J : Psycrowsis : ARROW BARRAGE Zanemarossi : Psycrowsis : MISCELLANEOUS Psycrowsis : zanemarossi : WAR EQUALIZER Zanemarossi : Psycrowsis : ATTACK BOOST ANCIENT TERROR Psycrowsis : RUSH ATTACK General J : Psycrowsis : UNDEAD HORDE Psycrowsis : SKYFIRE Claythor : Psycrowsis : Général J : ATTACK BOOST Psycrowsis :
-
This thread is about Alliance Wars (Parameters, specific features, gameplay, tips…) Table of Contents I. Basics of Alliance Wars II. Participation Conditions and Requirements III. War Schedule IV. War Phases : Matchmaking V. War Phases : Preparation Phase VI. War Phases : Battle Phase VII. Advanced Warfare : Mechanical War Support VIII. War Playlist I. Basics of Alliance Wars Alliance Wars are direct competitions between teams (Alliances). The battle principle is similar to regular Raids, but you use a specific War Energy unique to this mode. Rewards All participants, whether they win or lose, receive points. These points are accumulated and stored in a War Chest, which you open once it is full. II. Participation Conditions and Requirements To take part in an Alliance War, you must meet these conditions: Alliance Membership Player Level: Reach or exceed level 12. Hero Roster: Own at least 30 heroes. Participation Declaration: Confirm your participation during the Matchmaking Period. III. War Schedule The Alliance War cycle takes place twice a week: From Wednesday to Thursday. From Saturday to Sunday. Note: The war start time may vary depending on the alliance size. Specific support wars take place. The alternation occurs every 2 wars. The current rotation is: Credit BirksG IV. War Phases : Matchmaking The Matchmaking Period begins 24 hours before the official start of the war. This is the only window to confirm your participation. Participation Criteria Opponents are automatically matched based on Alliance Strength. ALLIANCE STRENGTH CALCULATION It is determined by the War Score, which is based on the strength of the top 30 heroes and the army power of participating members, as well as historical performance. MINIMUM ALLIANCE SCORE An alliance with an aggregate score below 3250 is ineligible to participate. ALLIANCE OPT-OUT OPTION Alliance Leaders can opt out of the war for the entire alliance. If they do, individual members can still choose to join. INDIVIDUEL PARTICIPATION A countdown shows when matchmaking begins. You must check yourself in before this countdown to take part in the war. You can toggle your participation after matchmaking without affecting the current war. Your choice will apply to the next one. NUMERICAL UMBALANCE Discrepancies have been observed between the total number of opposing members during encounters. These disparities may arise from various factors. Participant Management Enabling or disabling a player’s participation during the “Searching for Opponent” process in matchmaking can cause a numerical imbalance. War Score Fairness Significant differences in alliance war scores can also affect team size. The alliance with the higher overall score may have fewer members, resulting in a reduction of six potential strikes during the confrontation. V. War Phases : Preparation Phase (24 Hours) Each player registered for war is displayed with a small blue tag (Our alliance) or red tag (opposing alliance) showing: Player Name Status – Indicated by a green (Online) or red dot (Offline) Team Power – Indicates the team’s total strength (heros, troops, support dragons) Defence heroes – The five defence heroes are displayed. If a hero is killed, they appear with a skull. Hero Health – The green bar above the hero displays their current Health (HP). War Energy – Represented by an orange flag. 1. PLAYER POSITIONING During the preparation phase, each member’s position on the battlefield may change randomly with each new login. Despite this randomness, a member’s rank change (promotion or demotion) forces an automatic position adjustment. LEADERSHIP PLACEMENT The Alliance Leader is always placed in the center, front row. Co-leaders stand next to the Leader in the front row or are distributed on subsequent rows if numerous. Once the attack phase begins, positions are locked. The only exception allowing position changes after the war begins is a change in rank. TARGET IDENTIFICATION TOOLS Reading grids are available for mapping target positions with different reading layouts. These tools can be essential for developing attack strategies, coordination, and tactical communication within the Alliance. 2. SETTING UP THE DEFENSE TEAM Each player must specifically compose a Defense Team of five heroes for Alliance War by clicking the “Edit” button below their defense. The “Info” button allows viewing a full defense setup (including troops and hero cards). The defense is paramount. The Tank hero (in the center) is one of the keys. Choose it wisely (based on its color, its type, or its skills). Alliance strategies regarding the defensive composition are often encountered. BY DEFAULT If no action is taken, the heroes and troops from the previous war are automatically reused. If no defense heroes were ever set, it may appear grayed out until the player takes action. MODIFICATION RESTRICTION Once the war begins, the defense team composition cannot be changed. Any upgrades to heroes or troops during the war have no effect on the ongoing war’s results. TEMPORARY EXIT FROM ALLIANCE You may leave the Alliance, but it is risky. When you leave, even temporarily, your name in the defense will be replaced with “[Ex-member]”. If you leave while checked in for a war, you’ll receive a message showing the deadline to return and still participate. If you don’t return in time, you’ll remain marked as “[Ex-member]” and won’t be able to use your flags in that war. Even if you return on time, a bug may still prevent participation. Leaving the alliance after the battle starts means your remaining flags will be lost to your Alliance. VI. War Phases : Battle Phase (24 Hours) 1. GENERALITIES Battles can be launched at any time during the war using available War Energy. FLAGS Each participating player receives six (6) attack flags (attempts). Initial Flags: Three (3) available at battle start. Increment: The remaining three (3) are added 12 hours later. USAGE LIMITATIONS Each hero can only be used in one battle per war. A total of 30 heroes is required to maximize the six war battles (5 heroes × 6 battles = 30 heroes minimum). No battle items can be used. RESURRECTION Defeated defenses revive after a set time. A defeated opponent revives after 6 hours; after a second defeat, revival takes 8 hours, with an additional 2 hours per subsequent revival. If the entire enemy defense team is defeated (total wipeout), the opposing team is instantly and fully revived regardless of the delay. BATTLE TIME LIMIT Like raids, battle duration cannot exceed 10 minutes. A countdown is shown during the final 5 minutes. Damage increases each turn. ATTACKING When you press “Attack” on an enemy position, that target is temporarily reserved. During this time, it cannot be selected by other teammates. Note: If you exceed the setup time for your offensive team, the target reservation is released automatically. You must press “Attack” again to secure it. You can simulate your attack team setup without reserving and blocking a target via the configuration icon (gear) in the upper left corner. ATTACK VOCABULARY The vocabulary used during the attacks are generally: OS (One shot): Action of attacking and defeating a target using a single war energy flag. This is the most sought-after action and the most rewarding in points. FAIL: Action of attacking without being able to defeat a target using a single energy flag. FINISH: Action of attacking a target that has been partially defeated. 2. SCORING SYSTEM DEFENSE POINT DISTRIBUTION The war board totals 1,500 points, distributed among defenses based on their total HP (including heroes and troops). Example: For an alliance of 30 participating members (“checked in”) with identical HP defenses, each defense would be worth 50 points (1,500 ÷ 30). If fewer than 30 participants, points are still distributed among existing defenses to reach a total of 1,500. COMBAT POINTS ALLOCATION Points are granted based on attack performance and inflicted damage. Points are earned for each hero killed or significantly damaged, as well as for full target elimination. It is possible to consult the war log showing the detail of the points acquired by the 2 alliances. ATTACK HYSTORY : Allows you to view the details of the attacks TOP ATTACKERS : Allows you to view each player's ranking based on individual points obtained in attack. DETERMINING THE WINNER The alliance with the highest score after 24 hours wins. The score remains unchanged even if members leave mid-war. Victory or defeat grants points to the War Chest as follows: - Victory: 5 points per war - Draw: 3 points - Defeat: 1 point per war WAR TREASURE CHEST Accumulating 25 points across multiple wars guarantees a War Treasure Chest reward. Example: 5 victories or 25 defeats ensure a reward. The Alliance War Chest now calculates participation based on a maximum of 25 points, regardless of excess points from the final war. Surplus points carry over to the next chest. *(New rule effective 11/03/25)* At least 80% participation in the War Chest guarantees 2 Alpha Aethers as a reward upon opening. Additional rewards include ascension items, emblems, tomes, aethers, coins, etc. Warning: Your participation level will reset if you leave your alliance and take part in the war of another Alliance. VII. Advanced War : Mechanics War Support The War mode includes a feature called War Support, which automatically applies reinforcements to teams during defensive battles. The war support rotation changes periodically. It alternates every 2 wars following the current rotation: Effect: Grants all heroes a chance to become “Lucky,” allowing them to activate their Special Skill twice consecutively. Chance: 35% for attackers, 25% for defenders. Find special video war guides by content creators: [War Playlist] Effect : Disables all healing, revival, and similar effects. Find special video war guides by content creators: [War Playlist] Effect: Both alliances’ defenders gain Arrow Barrage Support, inflicting 25% damage to all attacking heroes based on their current HP. Activation: Depends on the number of remaining defenders: 5 heroes: 7 turns 4 heroes: 6 turns 3 heroes: 5 turns 2 heroes: 4 turns 1 hero: 3 turns Find special video war guides by content creators: [War Playlist] Effect: Removes all status effects and stacks from all heroes. (Growth and Wilting effects are not removed.) Activation: Every 3 turns. Find special video war guides by content creators: [War Playlist] Effect: Supports defenders of both alliances. All defender heroes receive +10% attack upon activation, increasing with each subsequent trigger. This effect cannot be dispelled. Activation: Every 6 turns. Find special video war guides by content creators: [War Playlist] Effect: Inflicts 20 Insanity on all enemies and 10 on all allies. Insanity Mechanism: Increases the chance of special skill targeting inversion. Insanity is reduced by 10 when healed by a direct Special Skill. After activation, Insanity resets to 0. Activation: Every 5 turns. Find special video war guides by content creators: [War Playlist] Effect: Sets all heroes Mana Speed to Very Fast. Fast speed corresponds to 6.5 tiles. Charge-based heroes (Ninjas, Magic, Styx, etc.) will charge more slowly. Use them carefully. 1 charge: 6.5 tiles 2 charges: 13 tiles 3 charges: 19.5 tiles Find special video war guides by content creators: [War Playlist] Effect: Supports all heroes by summoning a Skeleton Minion that inherits 10% attack and 10% HP from its owner. Activation: Every 5 turns. Find special video war guides by content creators: [War Playlist] Effect: Activates Assist Dragons for all teams. Each dragon can be used once per attack. Skyfire Specifics Attacking Assist Dragons Stronger than their defensive counterparts. Gain cumulative +10% bonuses to Spirit, Damage, and Healing with each use. Mana is gained when matching shields of the respective element. Defending Assist Dragons Gain small amounts of mana each turn and when heroes of the same element are hit. Find special video war guides by content creators: [War Playlist] Find general and specific information about the game by going to the settings in the top left corner.
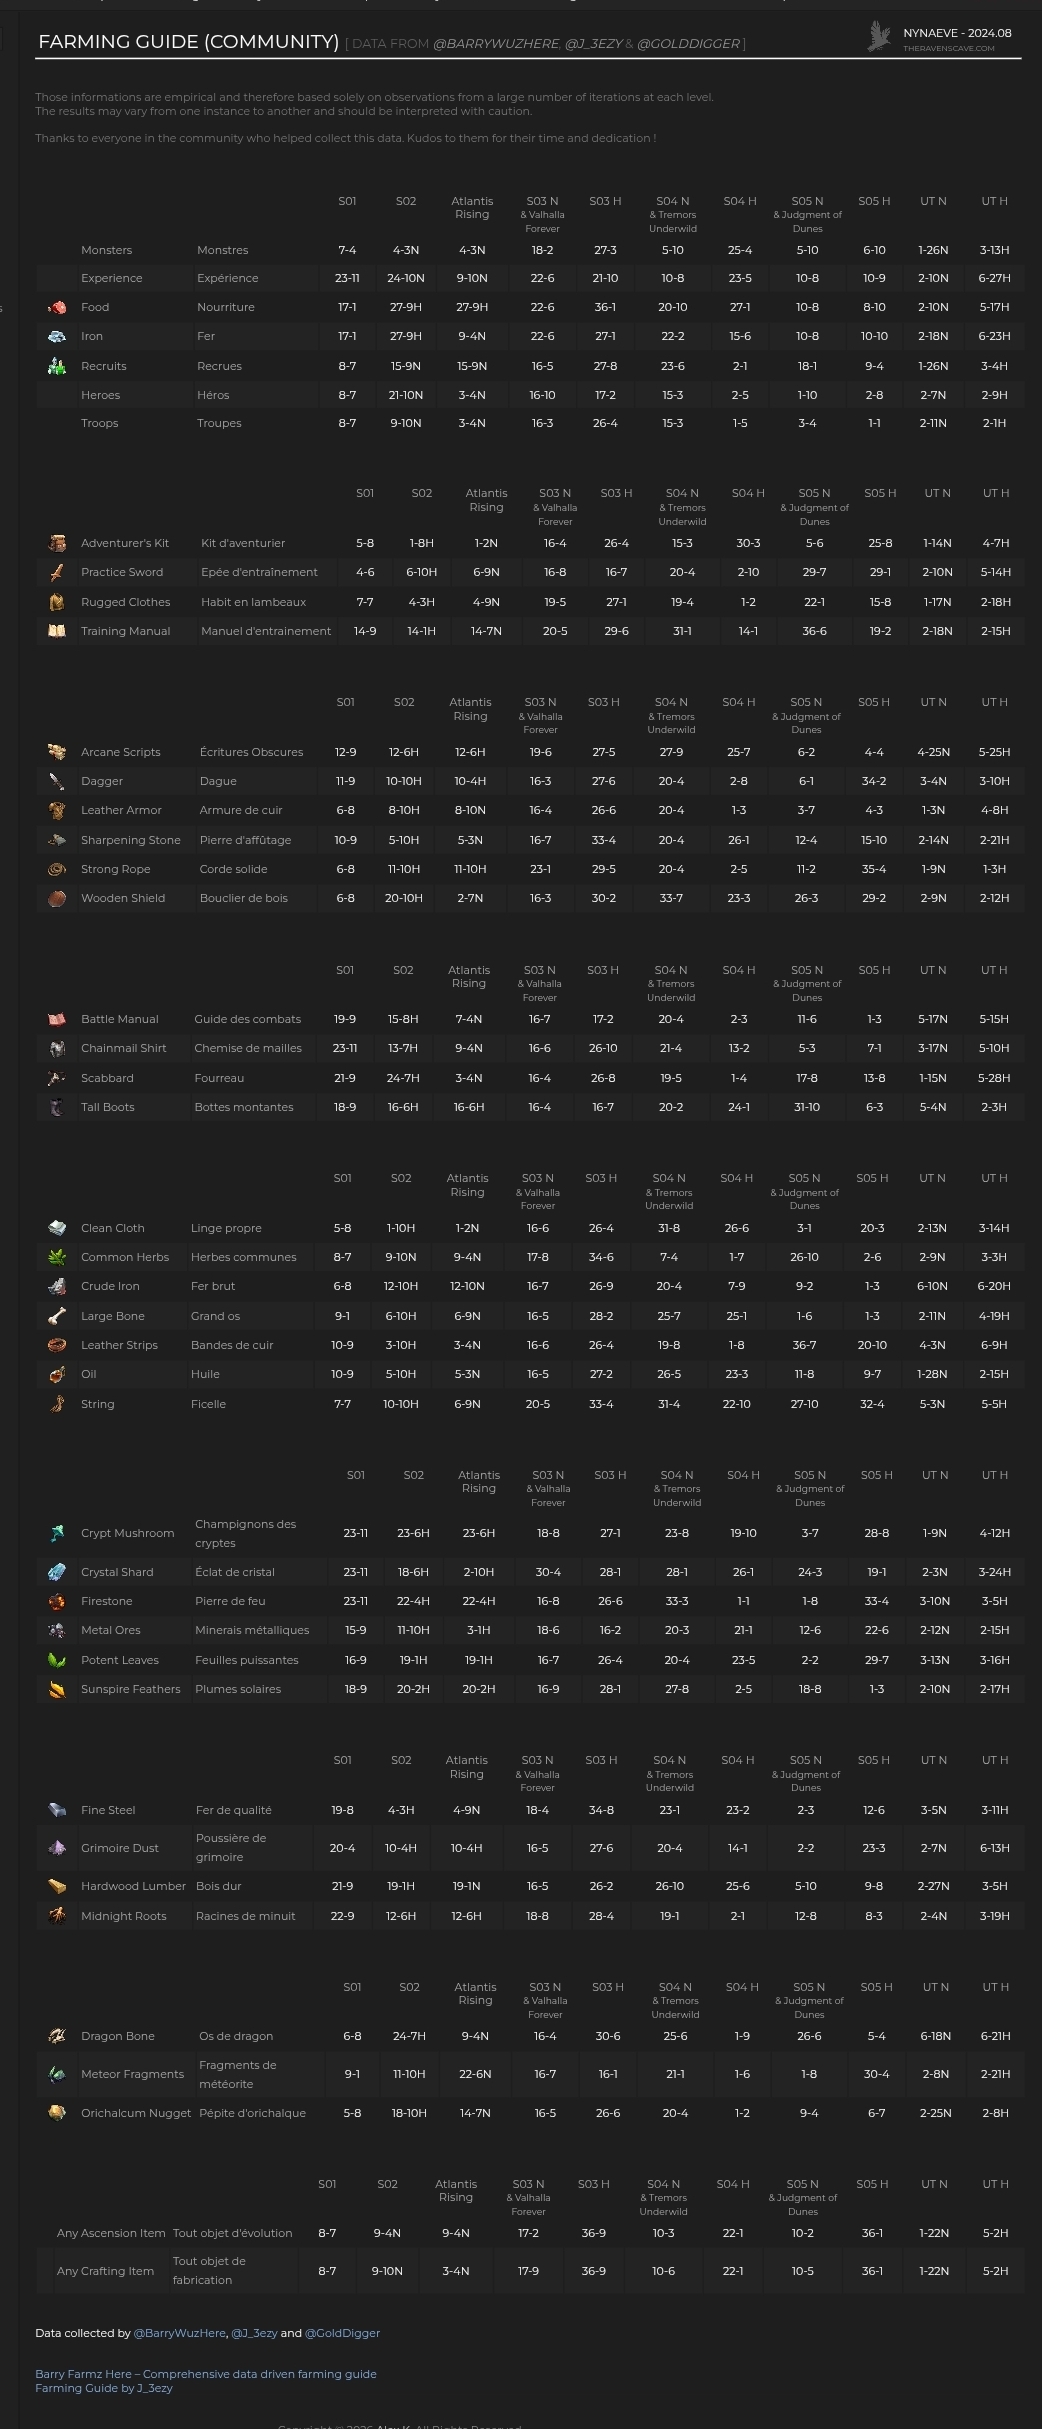
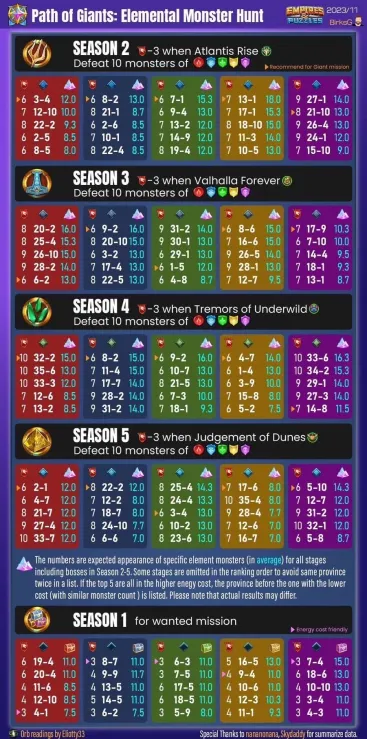
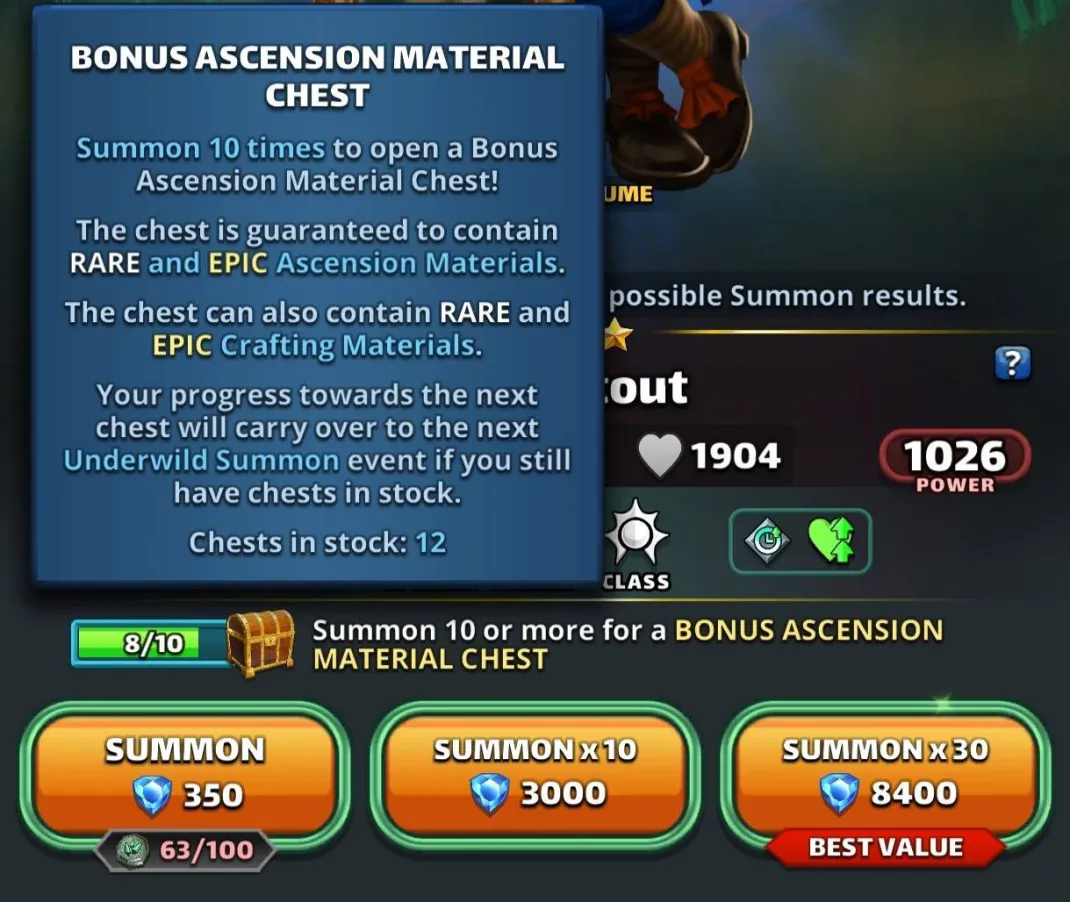
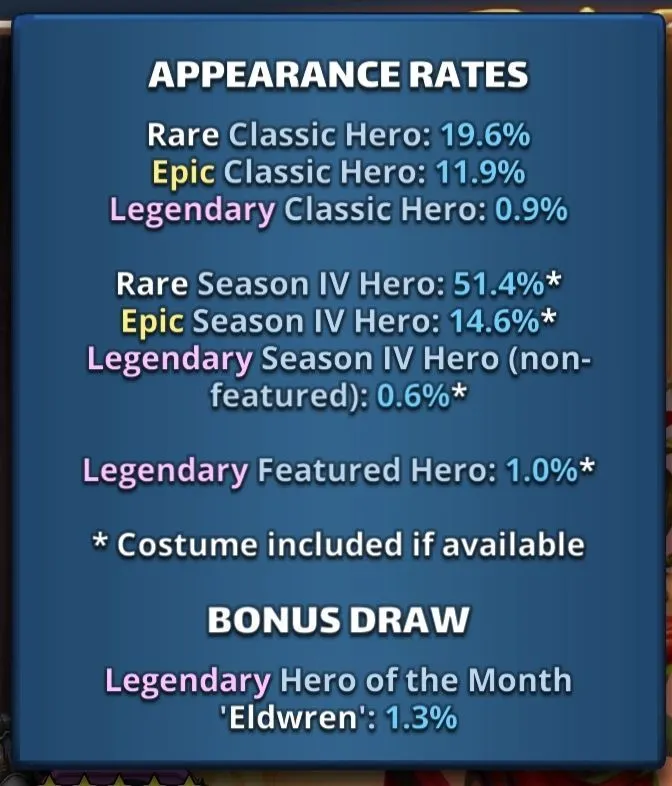
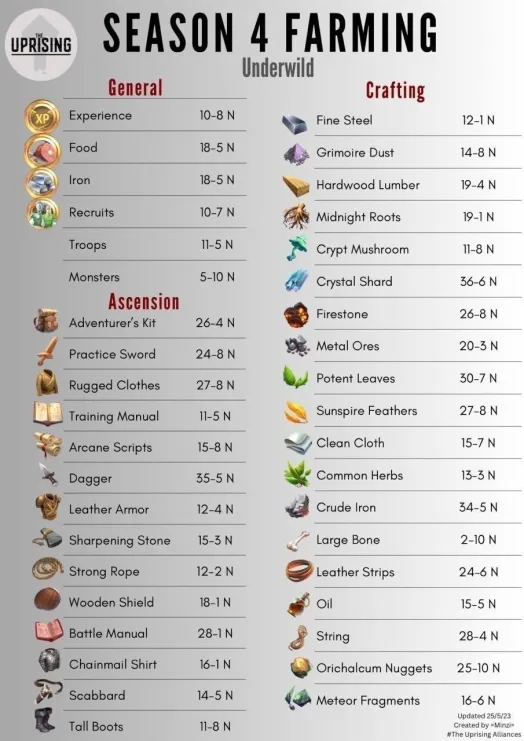
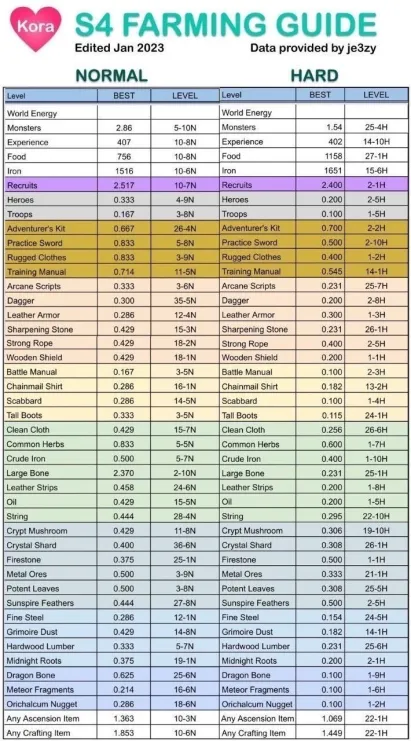
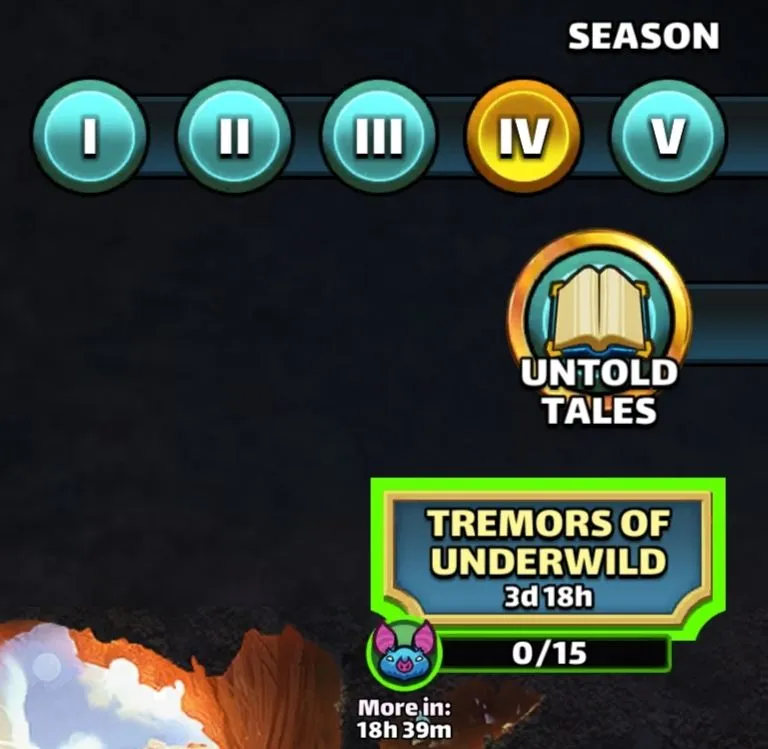
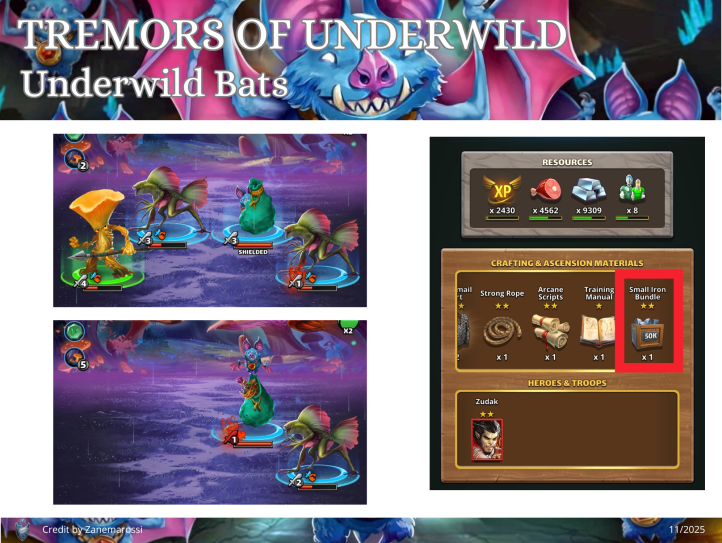
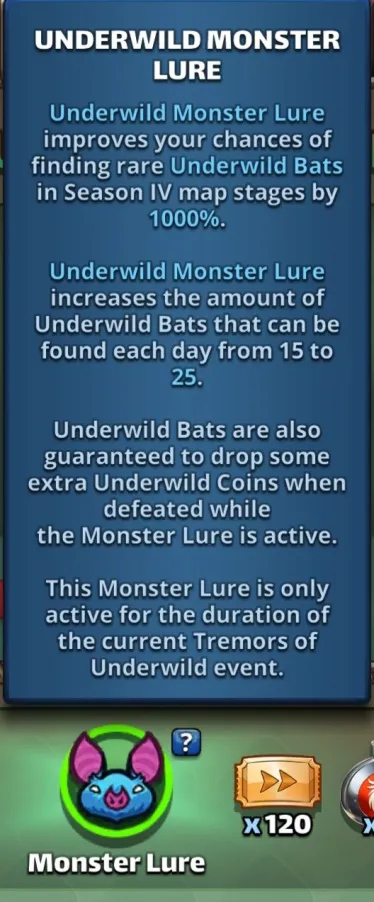


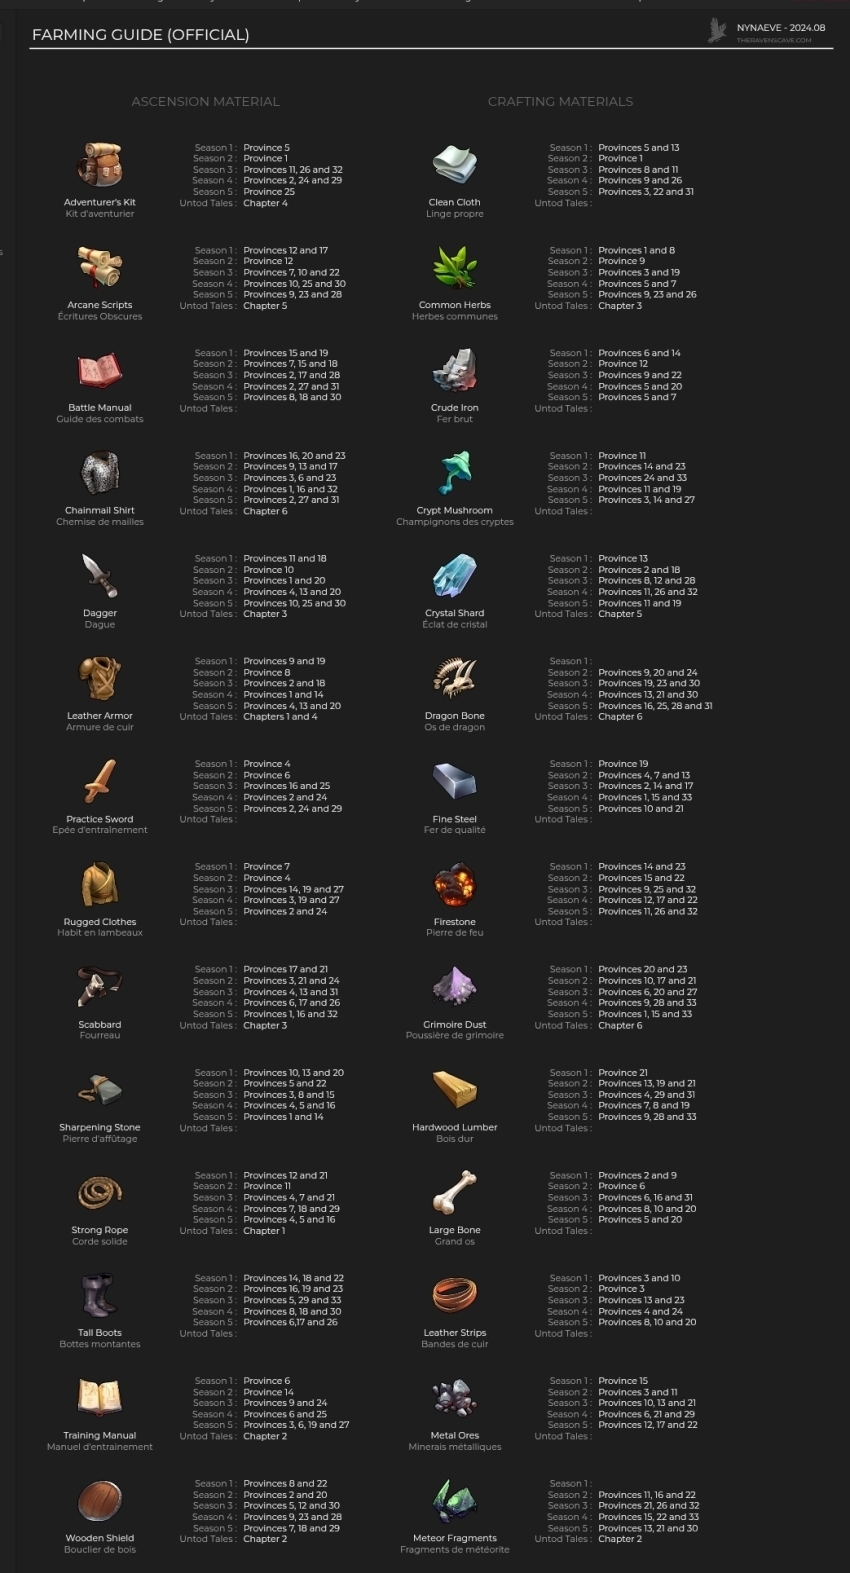
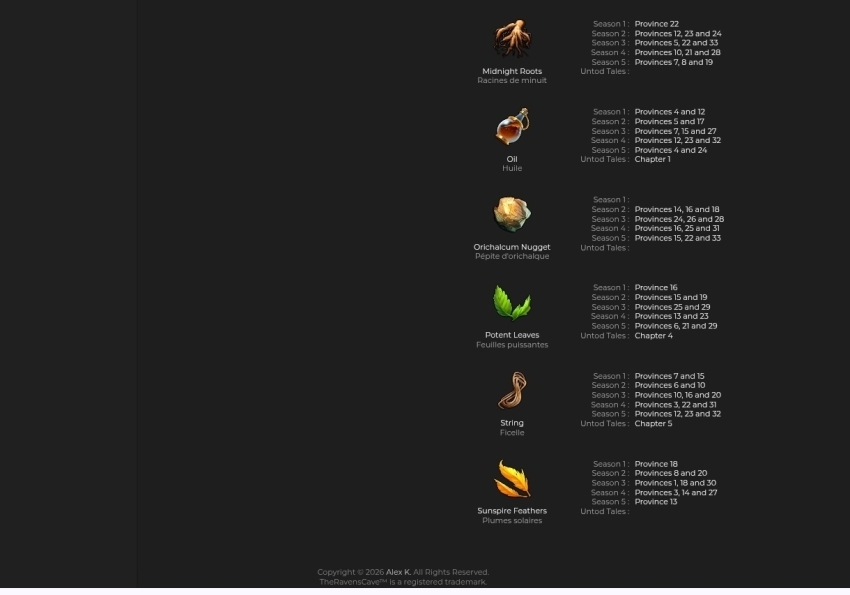
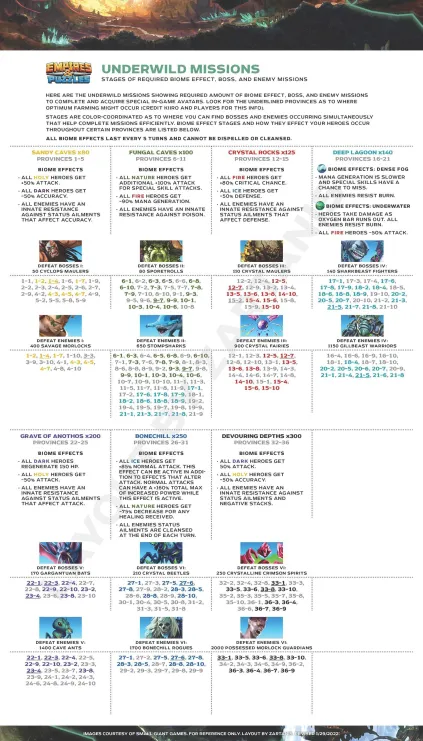

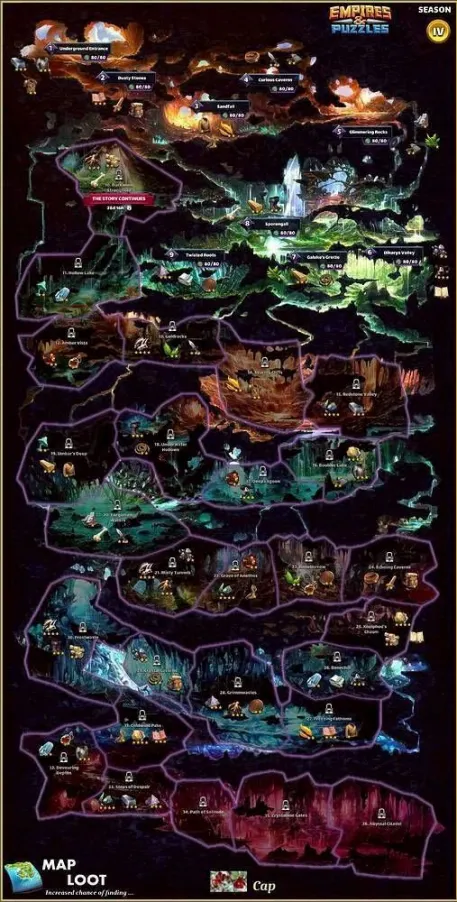
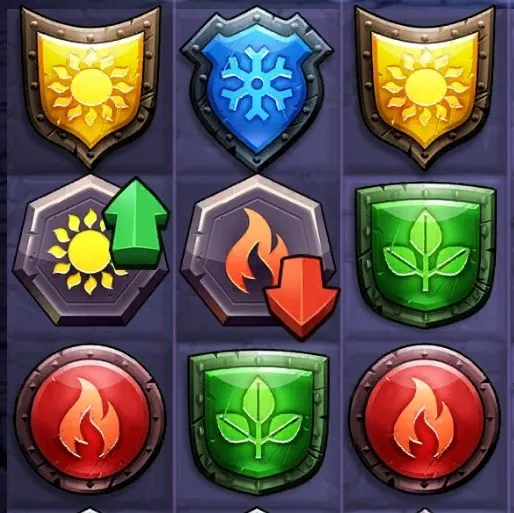
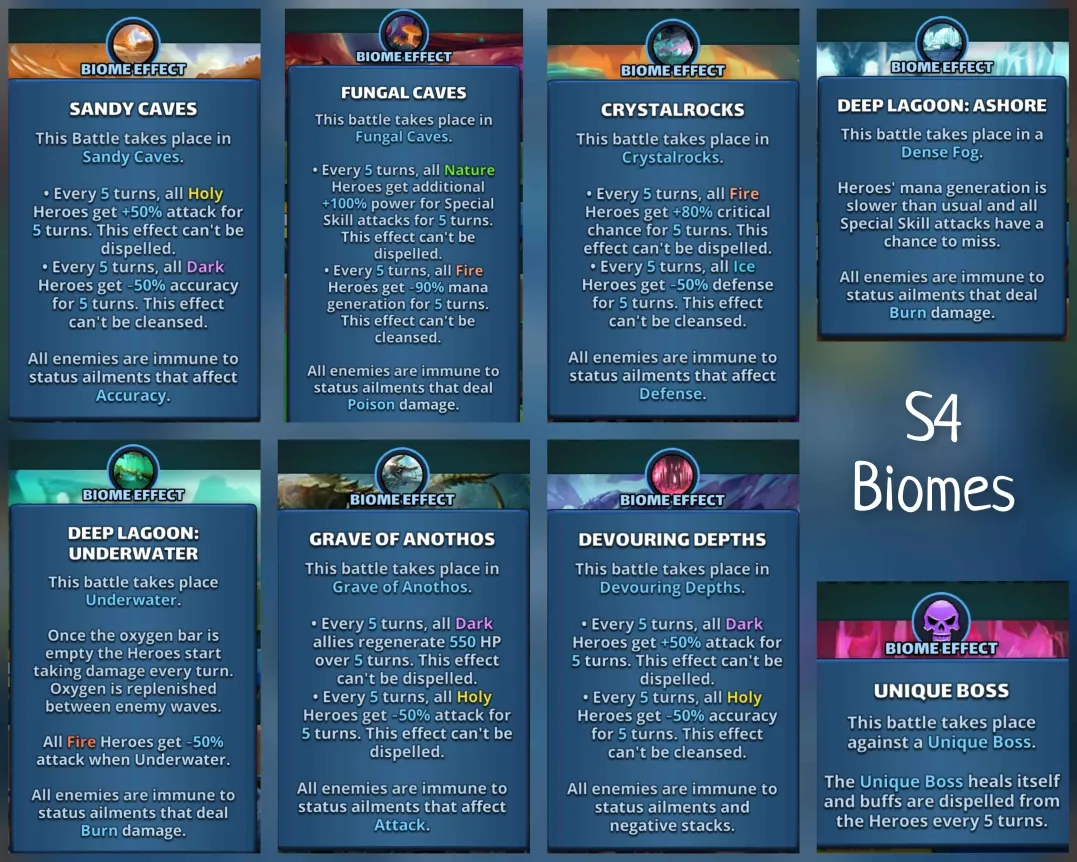
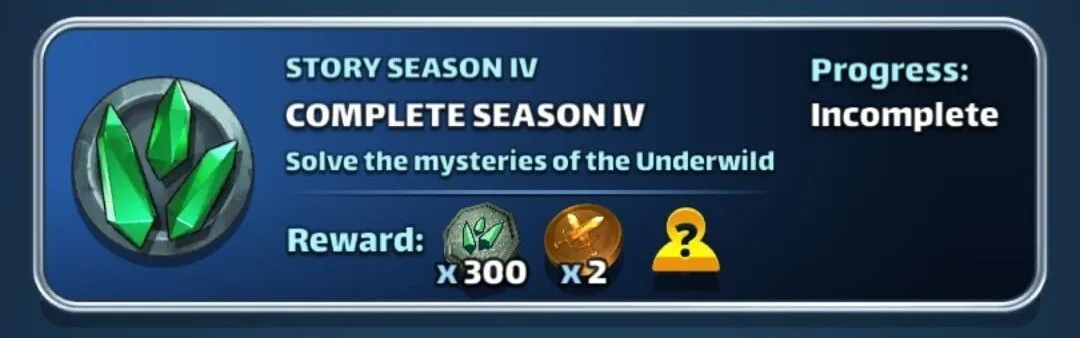
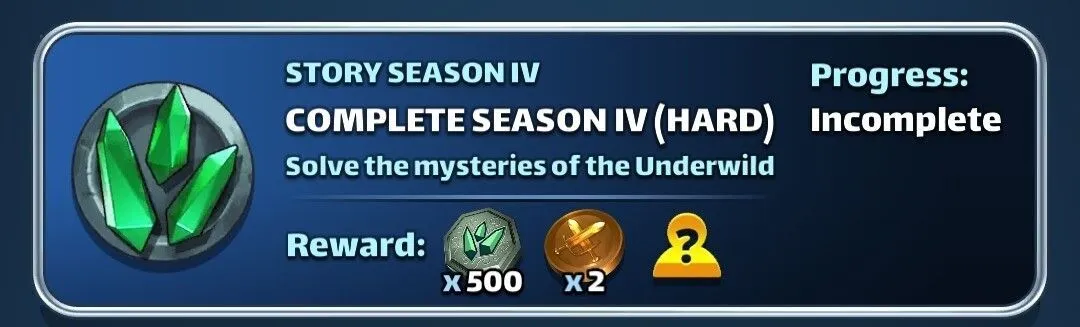

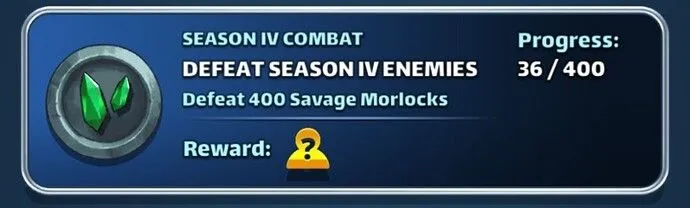


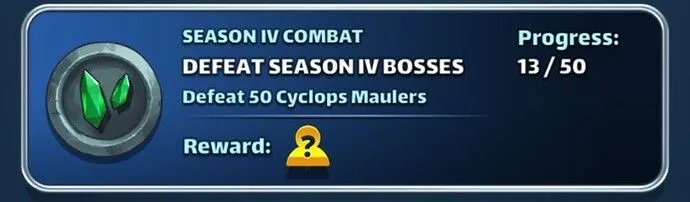
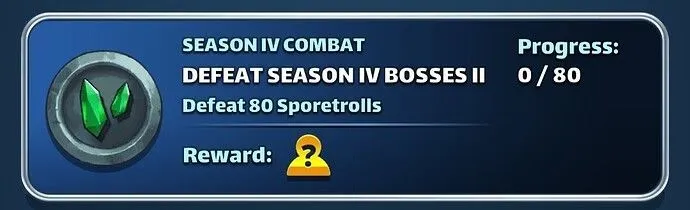
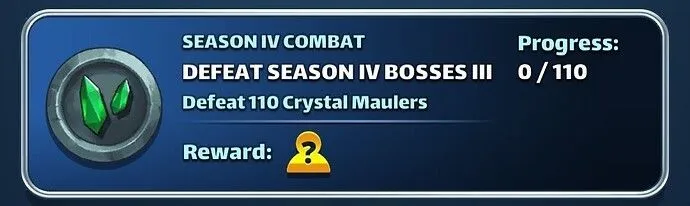
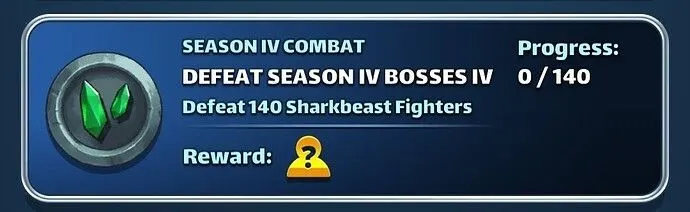
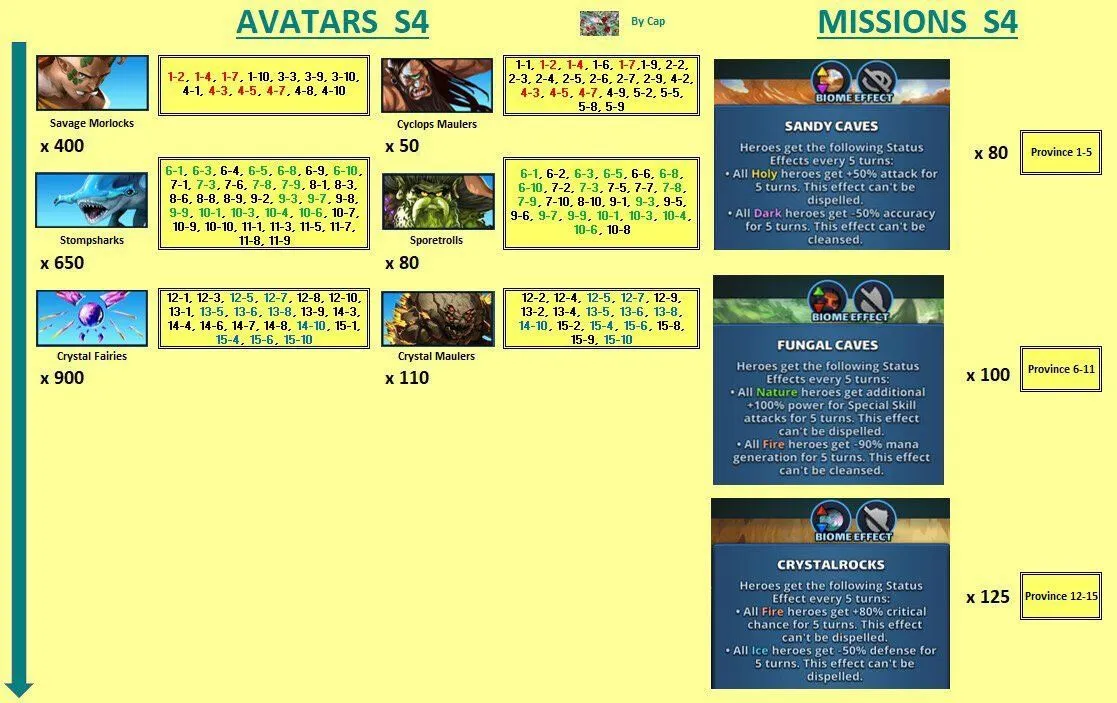

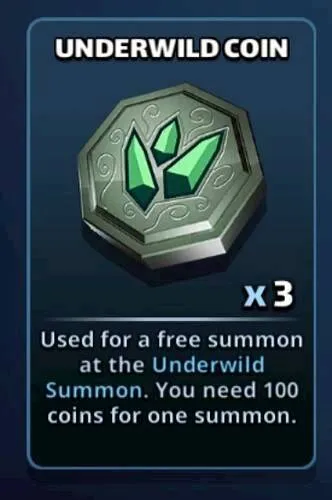

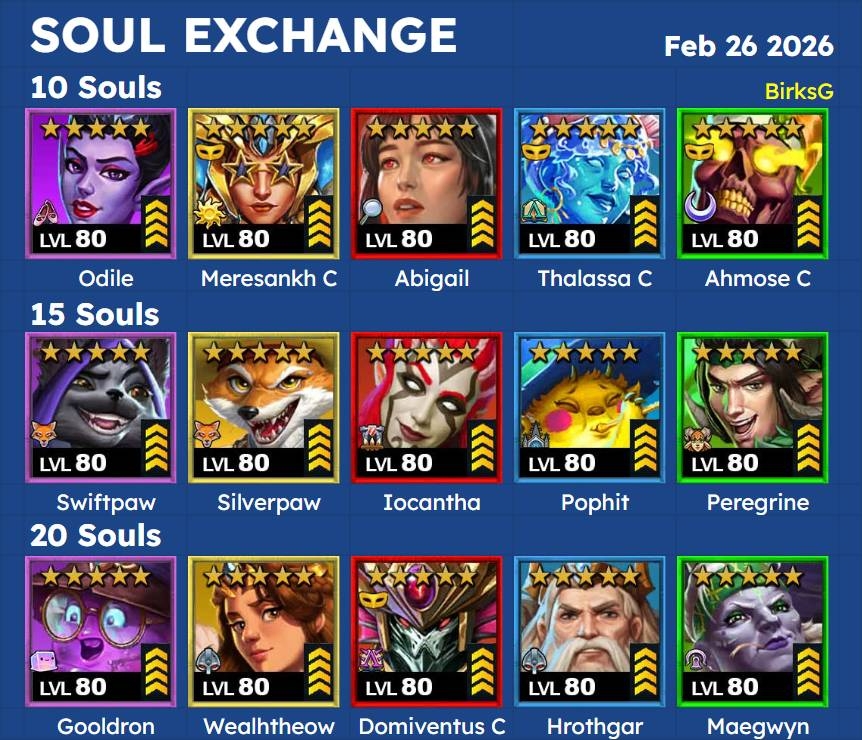


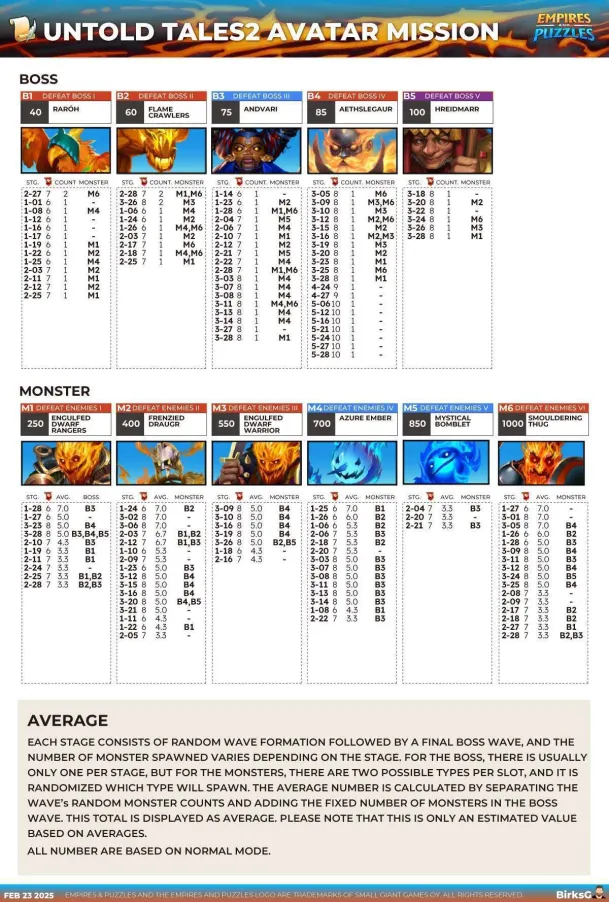
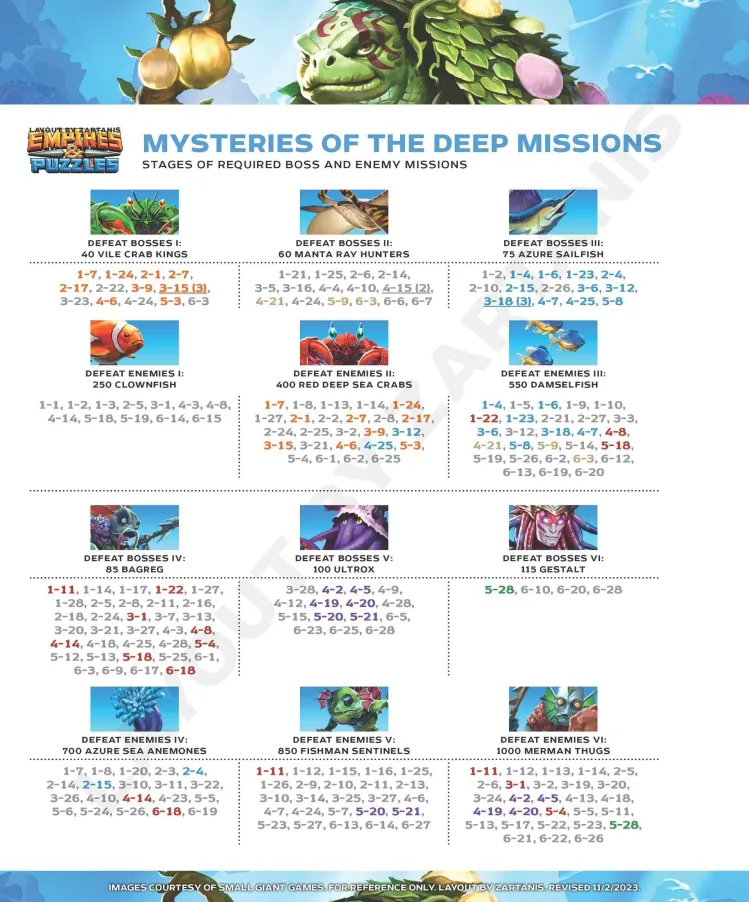
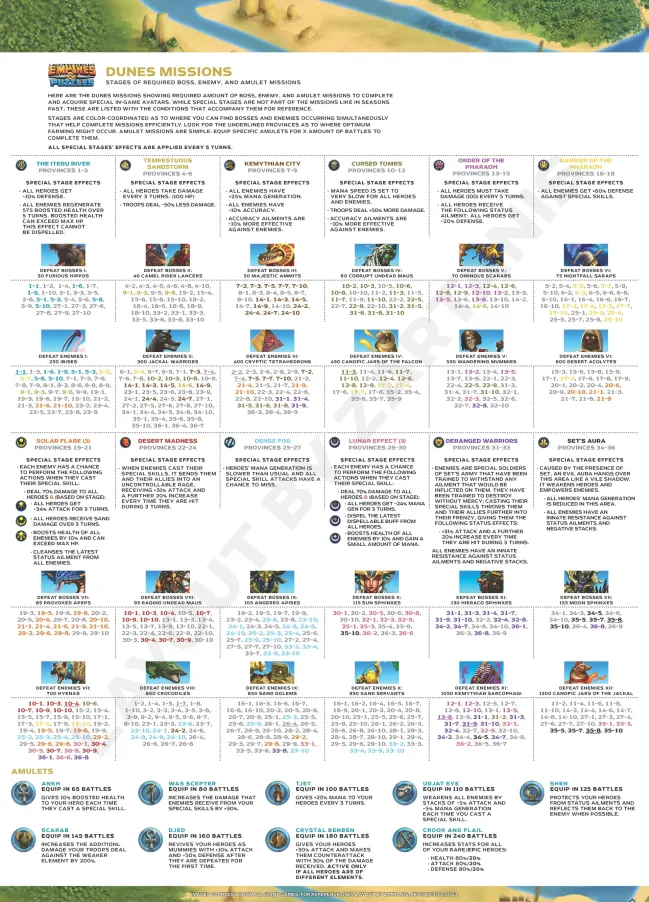
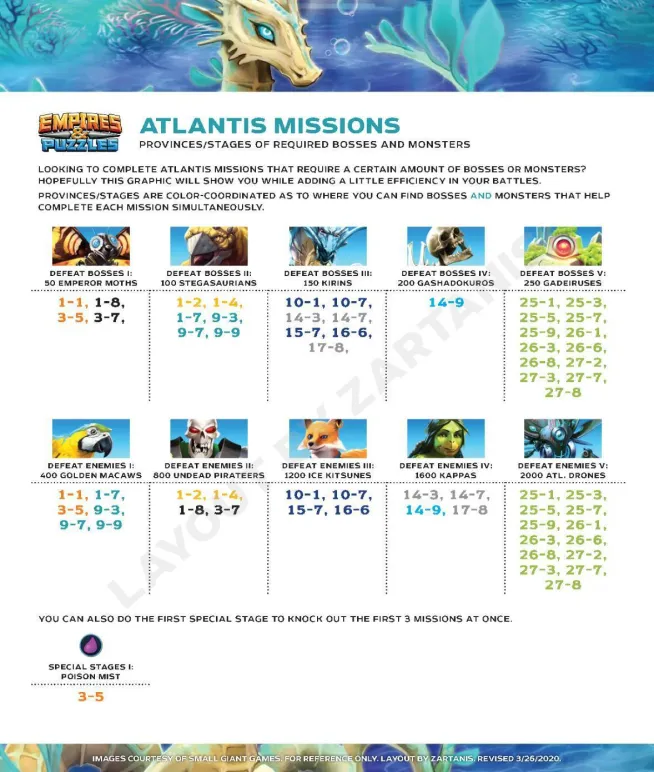
.webp.2b2c851cea245e859b5757b33ea6694b.webp)


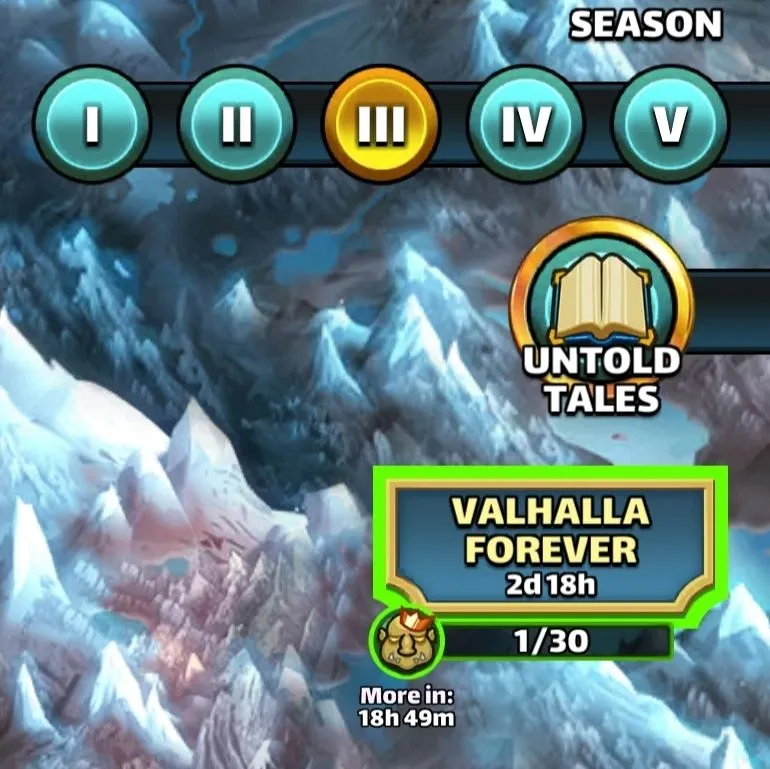
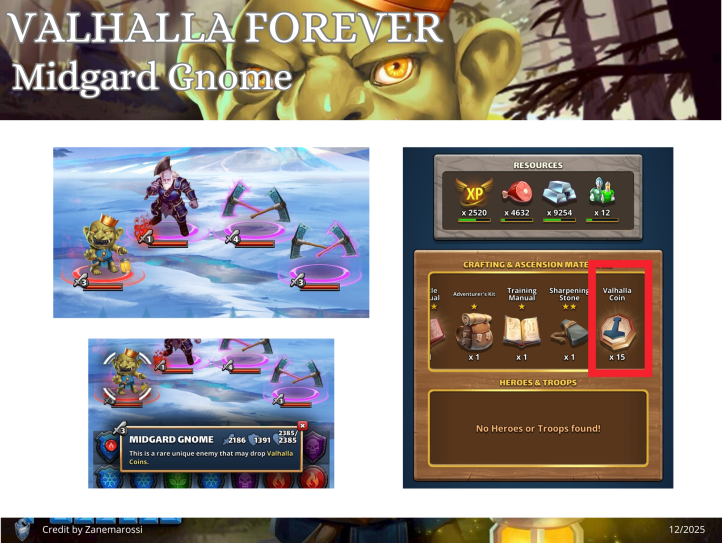
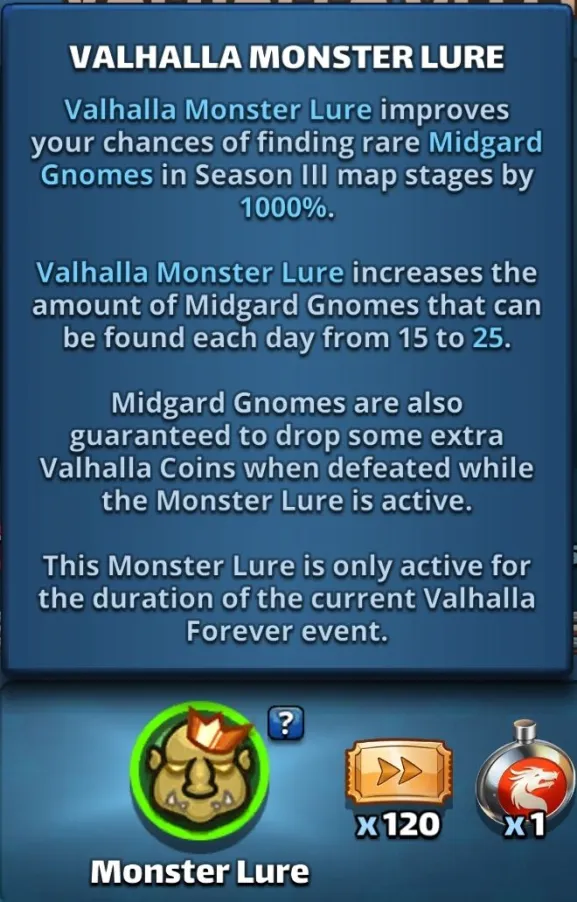
.webp.859348968a0fdf2b84695432fd1562b7.webp)
.webp.a75afbebe0237059eb71f848346ac377.webp)
.webp.7acaf82ca4d05839cb6f00888cb1faa1.webp)
.webp.8f367ec5d3514241cdb7efda380ae5b7.webp)